
6.1. Reactive Agent Simulations and Delegation
So far in our study of programming, our code has run primarily in an imperative and sequential fashion. When guiding a Jeroo across Santong Island or transforming pixels in an image, our programs followed a direct script: one method executed to completion, followed by the next, in a predictable sequence orchestrated by a single thread of control. In real-world software, however, systems often operate in dynamic, multi-agent environments. Video games, robotic control systems, traffic simulations, and autonomous ecological models do not follow a rigid, pre-planned script. Instead, they consist of independent entities that continuously observe their surroundings, make decisions based on changing conditions, and react to events in real time.
In this chapter, we transition from scripted algorithms to reactive agent simulations.
We will explore the Greenfoot micro-world framework, understand the discrete simulation
cycle driven by the act() method, model internal agent memory using state flags and
accumulator timers, and learn how to write deterministic unit tests for autonomous entities.
Furthermore, we will examine how objects collaborate through object association and
the Delegation design pattern—techniques that allow companion actors to coordinate
actions across complex environments.
6.1.1. Greenfoot Micro-Worlds & The Simulation Cycle
To understand how reactive simulations function, we must first contrast two fundamental execution models: scripted execution and event-driven simulation cycles.
In scripted programs, such as our early Jeroo exercises, a central controller or test method dictates every step:
// Scripted execution: The controller specifies every action sequentially
jeroo.hop();
jeroo.hop();
if (jeroo.seesFlower(AHEAD))
{
    jeroo.pick();
}
jeroo.turn(RIGHT);
In this scripted model, the actor has no autonomy. If an unexpected obstacle appears or another entity moves across its path while it is executing a sequence of hops, the actor remains oblivious until the controller explicitly issues a sensor query.
In contrast, an agent-based simulation operates like an animated world. Rather than
executing a single, long sequence of instructions from start to finish, the simulation
engine runs a continuous loop called the simulation cycle or event loop. In the
Greenfoot micro-world framework, every visible entity in the world is an instance of an
Actor (or a subclass of Actor). The world engine repeatedly calls a special method
named act() on every actor currently present in the world.
6.1.1.1. The Micro-world Execution Controls
When you run a Greenfoot-based micro-world simulation, the main graphical window presents two primary areas:
The World: The large visual grid covering most of the screen. This is the virtual environment where actors live, move, and interact.
The Execution Controls: The control panel at the bottom featuring the Act button, the Run button, and the Execution Speed Slider.
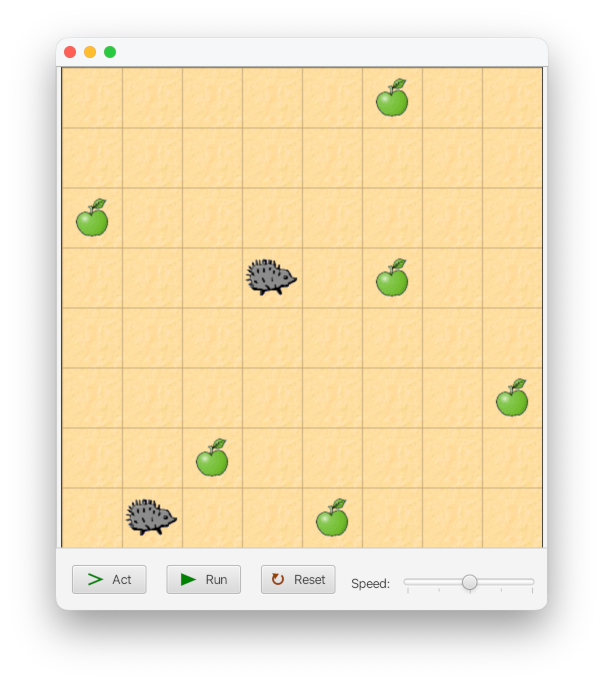
Figure 6.1.1: The Greenfoot main window showing an Orchard micro-world with Hedgehog actors, Apples to collect, and the execution controls (Act, Run, and Speed slider) along the bottom.
To understand how Greenfoot runs your program, consider what happens when you interact with these execution controls:
Clicking the Act Button: Clicking Act executes exactly one turn of the simulation. Greenfoot iterates through every actor currently placed in the world and invokes that actor’s
act()method once.Clicking the Run Button: Clicking Run causes Greenfoot to execute turn after turn continuously. It is exactly equivalent to clicking the Act button repeatedly in rapid succession. The simulation continues to run until you click the button again (which has now become Pause).
The Speed Slider: The slider controls the delay between successive simulation turns, allowing you to slow down the action to observe fine details or speed it up to watch long-term behaviors unfold.
In prior chapters, the Jeroo and LightBot classes were specially designed so that
the act() method executed just one step of the logic described in the world’s myProgram()
method. When the “Run” button was clicked, the steps in the myProgram() method were executed
repeatedly. This approach worked well for the simple, linear behavior of the Jeroos and LightBots,
but it becomes cumbersome for more complex simulations where actors need to react dynamically
to their environment.
6.1.1.2. The Meaning of the act() Method
The act() method is the central heartbeat of every actor in Greenfoot. All objects that
can be placed into a Greenfoot world possess an act() method.
When Greenfoot invokes an actor’s act() method, it is effectively giving that actor a simple
instruction:
Note
The Meaning of act(): “Do whatever you want to do now for your current turn.”
What an actor does during its turn depends on its current surroundings and its internal rules:
Look around using its sensory methods (e.g., checking if the way ahead is clear or if food is nearby).
Make a decision based on those observations.
Perform one small action (such as taking a single step forward, turning to face a new direction, or picking up an object).
Return control immediately to the simulation engine (when
act()returns) so that other actors can take their turns.
6.1.1.3. The Contract of the act() Method
Because the simulation engine repeatedly invokes act() on every actor during every turn,
the act() method carries a strict contract:
Important
The act() Contract: An actor’s act() method must execute a single, discrete
unit of work and return immediately. An actor should take at most one movement step
per turn and must never block execution.
6.1.1.4. The GridActor Base Class
While standard Greenfoot Actor objects navigate using continuous coordinates and
arbitrary 360-degree rotation angles, our simulation agents inherit from GridActor.
A GridActor is a specialized subclass of Actor that simplifies movement, turning,
and sensing to a discrete grid using cardinal compass directions (NORTH, SOUTH,
EAST, WEST) and relative directions (AHEAD, LEFT, RIGHT, HERE).
The primary action and sensory methods supported by GridActor are summarized in the
following table:
| Method | Purpose | Example |
|---|---|---|
move() | Move one space ahead in the direction this actor is facing. | hedgehog.move(); |
move(distance) | Move forward distance spaces in the direction this actor is facing. | hedgehog.move(3); |
turn(relativeDirection) | Turn 90 degrees in the
indicated relative direction [turn(LEFT) or turn(RIGHT)]. |
hedgehog.turn(LEFT);hedgehog.turn(RIGHT); |
sees(class, relativeDirection) | Checks whether
an object of the specified class is located in the indicated relative direction
(HERE, AHEAD, LEFT, or RIGHT).
Returns true if present; false otherwise. |
hedgehog.sees(Apple.class, HERE);hedgehog.sees(Burrow.class, AHEAD); |
isClear(relativeDirection) | Checks whether the cell
in the indicated relative direction is within world bounds and clear of obstacles.
Returns true if passable; false otherwise. |
hedgehog.isClear(AHEAD); |
isFacing(compassDirection) | Checks whether this actor
is facing the specified compass direction (NORTH, SOUTH,
EAST, or WEST). Returns true or false. |
hedgehog.isFacing(EAST); |
pick(class) | Removes an intersecting object of the
specified class from the world at the actor's current location (HERE)
and returns it. Requires that sees(class, HERE) is true. |
Apple food = hedgehog.pick(Apple.class);hedgehog.pick(Apple.class); |
Consider an autonomous Hedgehog exploring an Orchard grid. Because Hedgehog
extends GridActor, it inherits all of these discrete movement and sensory methods.
In each simulation turn, the hedgehog inspects whether the path ahead is clear; if blocked
by a garden wall or rock, it turns left; otherwise, it advances one step forward:
public class Hedgehog extends GridActor
{
    public void act()
    {
        if (!this.isClear(AHEAD))
        {
            this.turn(LEFT);
        }
        else
        {
            this.move();
        }
    }
}
When you click the Act button, the hedgehog checks the cell ahead, executes either a single
turn or a single move, and finishes. When you click Run, Greenfoot repeatedly calls act(),
causing the hedgehog to march forward across the orchard and navigate around boundary walls smoothly.
6.1.1.5. The Infinite Loop Anti-Pattern
A frequent beginner mistake when transitioning to simulation programming is placing a
loop inside act() to complete a task:
// CATASTROPHIC ANTI-PATTERN: DO NOT DO THIS!
public void act()
{
    // Flawed attempt to walk until an obstacle is reached
    while (this.isClear(AHEAD))
    {
        this.move(); // keeps running for one "Act" press!
    }
}
Why is this loop catastrophic? Because the micro-world engine relies on each actor completing
its turn promptly. If an actor enters a while loop that takes many iterations (or runs
infinitely):
The actor never returns from its
act()call if the loop never ends, or it performs too many actions.No other actors in the world ever get a turn to act.
The simulation engine cannot reach its display refresh step if
act()doesn’t return, causing the graphical user interface to freeze completely.User clicks on the Pause or Reset buttons cannot be processed.
In a reactive simulation, the engine provides the loop. You do not need a while
loop to keep an actor moving forward across turns; you simply command it to take a
single step during each call to act(), and let the repetitive invocation of act()
produce continuous, lifelike motion.
6.1.2. Finite State Logic & State Flags for Simulation Actors
Because an actor’s act() method finishes and returns to the engine dozens of times
every second, a fundamental question arises: How does an actor remember what it was doing
from one turn to the next?
6.1.2.1. The Stateless Trap
Consider what happens if an actor attempts to use a local variable inside act() to
track its progress:
public class FlawedHedgehog
    extends GridActor
{
    public void act()
    {
        int stepsTaken = 0; // LOCAL VARIABLE: Re-initialized every tick!
        stepsTaken++;

        if (stepsTaken >= 5)
        {
            this.turn(RIGHT);
        }
        else
        {
            this.move();
        }
    }
}
Every time Greenfoot calls act(), a fresh call begins: stepsTaken is initialized
to 0, incremented to 1, and then destroyed when act() finishes. The variable
stepsTaken never reaches 5, and the hedgehog never turns!
To maintain continuity across simulation turns, an actor must store its state in
private instance fields. Instance fields live in heap memory as part of the actor object
and persist for the entire lifetime of the actor, surviving across thousands of act()
invocations.
6.1.2.2. Boolean State Flags
The simplest mechanism for persisting memory across turns is a boolean state flag.
A state flag holds either true or false, representing whether the actor is
currently in a specific condition or executing a particular mode of behavior.
For example, in our orchard simulation, a foraging hedgehog needs to know whether it is currently searching for an apple or carrying an apple back to its burrow:
public class ForagingHedgehog
    extends GridActor
{
    // State flag belongs to the object: persists across all simulation turns
    private boolean hasApple;

    // ----------------------------------------
    public ForagingHedgehog()
    {
        super();
        this.hasApple = false;
    }

    // ----------------------------------------
    public void act()
    {
        if (this.hasApple)
        {
            this.returnToBurrow();
        }
        else
        {
            this.searchForApple();
        }
    }

    // ----------------------------------------
    private void searchForApple()
    {
        if (this.sees(Apple.class, HERE))
        {
            this.pick(Apple.class);
            this.hasApple = true; // State transition!
        }
        else if (!this.isClear(AHEAD))
        {
            this.turn(LEFT);
        }
        else
        {
            this.move();
        }
    }

    // ----------------------------------------
    private void returnToBurrow()
    {
        if (this.sees(Burrow.class, HERE))
        {
            // drop the apple in the burrow
            this.hasApple = false; // State transition back to searching!
            this.turn(RIGHT);      // Turn around to head back out
        }
        else if (!this.isClear(AHEAD))
        {
            this.turn(RIGHT);
        }
        else
        {
            this.move();
        }
    }
}
Notice how clean this architecture is: the value of hasApple determines which
sub-behavior executes during any given turn. When a transition condition is met
(such as finding an apple), the flag flips to true. On subsequent turns, the hedgehog
automatically executes the delivery behavior until it reaches its burrow, where it deposits
the apple and flips the flag back to false.
6.1.2.3. Accumulator Timers and Counters
In addition to boolean flags, reactive agents frequently need to coordinate actions over time. For example, an agent might want to walk in a straight line for 4 steps before turning to explore a new path, or pause for several turns while eating.
An accumulator counter is an integer instance field that counts simulation turns:
public class WanderingHedgehog
    extends GridActor
{
    private int stepCount;

    // ----------------------------------------
    public WanderingHedgehog()
    {
        super();
        this.stepCount = 0;
    }

    // ----------------------------------------
    public void act()
    {
        this.stepCount++;

        // After walking 4 steps, change direction
        if (this.stepCount >= 4)
        {
            this.turn(RIGHT);
            this.stepCount = 0; // Reset the accumulator
        }
        else if (!this.isClear(AHEAD))
        {
            this.turn(LEFT);
            this.stepCount = 0; // Reset if forced to turn by an obstacle
        }
        else
        {
            this.move();
        }
    }
}
Note that the counter is a field that stores information belonging to the object. Also, a constructor is provided to initialize the field (see Chapter 5 Fields, Encapsulation, and Images).
Each invocation of act() increments stepCount by 1. When the counter reaches the
target threshold, the actor performs the periodic action and resets the counter to zero.
6.1.2.4. Finite State Machines (FSM)
When an agent’s behavior grows beyond a single boolean flag, we formalize its decision-making process as a Finite State Machine (FSM). A finite state machine consists of:
A finite set of distinct states (modes of operation).
An initial state when the agent is created.
A set of transitions between states triggered by sensory events or timers.
Consider our foraging agent with two primary states:
SEARCHING: Exploring the orchard looking for apples.
RETURNING: Navigating back toward the burrow with cargo.

Figure 6.1.2: State transition diagram for the foraging Hedgehog, transitioning between SEARCHING and RETURNING based on whether food has been collected or delivered.
In Java, we can represent these states using named integer constants or an enumeration, storing the agent’s current state in a private field:
public class ForagingHedgehog
    extends GridActor
{
    public static final int SEARCHING = 0;
    public static final int RETURNING = 1;

    private int currentState;

    // ----------------------------------------
    public ForagingHedgehog()
    {
        super();
        this.currentState = SEARCHING;
    }

    // ----------------------------------------
    public void act()
    {
        if (this.currentState == SEARCHING)
        {
            this.performSearch();
        }
        else if (this.currentState == RETURNING)
        {
            this.performReturn();
        }
    }

    // ----------------------------------------
    private void performSearch()
    {
        if (this.sees(Apple.class, HERE))
        {
            this.pick(Apple.class);
            this.currentState = RETURNING; // State transition
        }
        else if (!this.isClear(AHEAD))
        {
            this.turn(LEFT);
        }
        else
        {
            this.move();
        }
    }

    // ----------------------------------------
    private void performReturn()
    {
        if (this.sees(Burrow.class, HERE))
        {
            this.currentState = SEARCHING; // State transition
            this.turn(RIGHT);
        }
        else if (!this.isClear(AHEAD))
        {
            this.turn(RIGHT);
        }
        else
        {
            this.move();
        }
    }
}
By structuring simulation actors as finite state machines, each operational state
is isolated in its own helper method. The main act() method simply dispatches to the
appropriate behavior based on the current state, keeping the overall architecture clean
and maintainable.
Note
By convention in Java, constants are given ALL_UPPER_CASE names with words separated
by underscores, and are declared as public static final fields. Programmers who
see names declared this way know immediately that they are read-only constants.
6.1.3. Testing Autonomous Reactive Entities in JUnit
Because reactive simulation actors depend on the continuous invocation of act() by an
underlying simulation engine, students often wonder: How can we write automated unit tests
for an actor without launching a graphical window and waiting for it to run in real time?
The key insight is that act() is simply a regular Java instance method. In a unit test,
we do not need the graphical Greenfoot engine running in real time. Instead, we focus
on testing individual single-turn actions performed by act() or one of its helper methods.
We instantiate an actor, place it in a
test world, call act() directly–or, even better, call the individual methods that provide
the pieces of its behavior–and immediately assert whether the actor moved to the
expected coordinates or transitioned into the expected state.
6.1.3.1. Deterministic Single-Tick Assertions
Testing an actor’s behavior for a single turn is straightforward. You configure the actor’s initial position and sensory conditions in a test world, call the target method once, and immediately check the results:
import student.micro.*;
import static student.micro.Assertions.*;

public class HedgehogTest
    extends TestCase
{
    private Orchard orchard;
    private ForagingHedgehog hedgehog;

    // ----------------------------------------
    public void setUp()
    {
        // Create a clean, predictable test world fixture
        this.orchard = new Orchard(10, 10);
        this.hedgehog = new ForagingHedgehog();
        this.orchard.add(this.hedgehog, 2, 2);
    }

    // ----------------------------------------
    public void testSingleTickAdvance()
    {
        // Manually trigger one simulation turn
        this.hedgehog.performSearch();

        // Assert that the hedgehog moveped forward one space
        assertThat(this.hedgehog).isAt(3, 2);
    }
}
6.1.3.2. Testing Multi-Tick Behaviors and State Transitions
Many behaviors require several simulation turns to unfold. For instance, an actor might need to count 4 steps before turning, or it might take several moves to reach an apple.
However, you should always strive to test single method calls from well-defined states, and avoid constructing tests that perform complex sequences of method calls.
If it makes your testing easier, you can add getter methods or setter methods (see Chapter 5 Fields, Encapsulation, and Images) to access the values of fields for use in assertions, or to change the values of fields to set the situation you need.
For example, instead of writing a loop to call act() for times to get the counter to
change value, you can write a setter method that sets the counter to a specific value
and simply call it at the start of your test method as part of setting up the initial
condition. Or, if you want to test what happens when the hedgehog is in RETURNING state,
you can write a setter method for that, too (e.g., this.hedgehog.setState(RETURNING);)
.
This approach provides several powerful testing benefits:
Instantaneous Execution: Every test is still just one action to perform–the setUp gets you into the correct situation without executing a bunch of unrelated actions first.
100% Determinism: You create exactly the situation you want without having to plan a series of actions to walk through in order to manipulate the object into a specific situation.
Boundary Condition Verification: You can verify the exact situation where a transition occurs (e.g., verifying that the actor maintains its heading on turn 3, but turns on turn 4).
6.1.4. Object Association: Companion References in Fields
Up to this point, our instance fields have stored primitive values (int, boolean, double)
or self-contained utility objects (Color, Pixel). However, one of the greatest strengths
of object-oriented programming is the ability of objects to form associations with other
objects.
6.1.4.1. What is Object Association?
An association represents a “HAS-A” relationship between two independent objects. When Object A holds a reference to Object B in an instance field, Object A “knows about” Object B and can send messages to it by invoking its methods.
Crucially, in an association, Object B is not merely an internal component owned exclusively by Object A. Object B often exists independently in the world and may interact with other entities. Object A simply maintains a connection—a companion reference—allowing the two to collaborate.
Consider a scenario where one hedgehog guides a companion hedgehog across an orchard. To do this, the guide needs a private field that refers to its companion:
public class GuideHedgehog
    extends Hedgehog
{
    // Association: A reference to another Hedgehog object
    private Hedgehog companion;

    // ...
}
Here, companion is not a primitive value; it is a reference variable capable of holding
the memory address of any Hedgehog instance (or subclass instance).
6.1.4.2. Initializing Associations in a Constructor
How does the companion reference get into the field? While a setter method could be used, the most robust technique is using a constructor: passing the companion object as a parameter when the primary object is instantiated:
public class GuideHedgehog
    extends Hedgehog
{
    private Hedgehog companion;

    // ----------------------------------------
    /**
     * Constructs a GuideHedgehog associated with a companion Hedgehog.
     * @param aCompanion the companion Hedgehog to coordinate with
     */
    public GuideHedgehog(Hedgehog aCompanion)
    {
        super();                     // Initialize the superclass (Hedgehog)
        this.companion = aCompanion; // Store the reference in our private field
    }

    // ----------------------------------------
    /**
     * Accessor method for the companion Hedgehog.
     * @return the companion Hedgehog
     */
    public Hedgehog getCompanion()
    {
        return this.companion;
    }
}
Notice what happens during instantiation:
Hedgehog buddy = new Hedgehog();
GuideHedgehog leader = new GuideHedgehog(buddy);
6.1.4.3. Memory Representation and Aliasing
When the code above executes, two objects are allocated on the heap:
STACK                           HEAP
+---------+                     +-----------------------+
|  buddy  | ------------------> | Hedgehog (x: 2, y: 2) | <-------+
+---------+                     +-----------------------+         |
                                                                  |
+---------+                     +-----------------------+         |
| leader  | ------------------> | GuideHedgehog         |         |
+---------+                     |   companion ----------+---------+
                                +-----------------------+
Both the variable buddy in the calling method and the internal field this.companion
inside leader point to the exact same Hedgehog object in memory. This is known as
aliasing. If leader invokes a method on this.companion, the state of buddy
is updated immediately because there is only one underlying object.
6.1.5. The Delegation Pattern: Forwarding Tasks to Partners
Once an object stores a reference to a companion in an instance field, how does it put that connection to work? The answer lies in one of the most foundational architectural patterns in software design: the Delegation pattern.
6.1.5.1. Understanding Delegation
Delegation is an object-oriented technique where an object handles a request by forwarding (delegating) the responsibility for performing that task to an associated companion object.
Think of an executive and an administrative assistant. When a client asks the executive to schedule an appointment, the executive does not personally update the calendar; instead, the executive turns to the assistant and delegates the task: “Please schedule this meeting.” The client interacts with the executive, but the assistant performs the work.
6.1.5.2. Delegation vs. Inheritance
Students frequently confuse inheritance with delegation:
Inheritance (“IS-A”): Reuses behavior through a parent class hierarchy. A
GuideHedgehogis aHedgehog, so it automatically inherits basic abilities likemove(),turn(RelativeDirection direction), and sensory methods.Delegation (“HAS-A”): Cooperates by forwarding requests to an associated object. A
GuideHedgehoghas a companionHedgehog, and asks that companion to perform matching actions.
Delegation provides enormous flexibility because the companion can be swapped or modified without altering class hierarchies.
6.1.5.3. Overriding Methods with super and Delegation
To implement delegation in a method that has been provided by a parent class, an actor overrides that method to redefine it. Inside the overridden method, the actor can do either or both of these things:
Call
super.method()so that it performs its own normal action.Invoke some method on its companion field (
this.companion.method()) to delegate part (or all) of the action.
As an example, the GuideHedgehog wants to implement moving by moving itself and
at the same time telling its companion to move as well. In this case, it would perform
both of the actions above.
Here is the complete implementation of delegated movement and turning in GuideHedgehog:
public class GuideHedgehog
    extends Hedgehog
{
    private Hedgehog companion;

    // ----------------------------------------
    public GuideHedgehog(Hedgehog companion)
    {
        super();
        this.companion = companion;
    }

    // ----------------------------------------
    @Override
    public void move()
    {
        super.move();                  // 1. Move myself forward
        this.companion.move();         // 2. Delegate to companion
    }

    // ----------------------------------------
    @Override
    public void turn(RelativeDirection direction)
    {
        super.turn(direction);        // 1. Turn myself
        this.companion.turn(direction); // 2. Delegate to companion
    }
}
Here, you can see the class redeclares both the move() and turn() methods
so that it can pass those requests on to its companion. Note the use of the
@Override tag, which indicates that these methods are intended to override
(or redefine) the corresponding methods in the parent class Hedgehog.
This notation expresses our intention to replace or extend those inherited methods,
and allows the compiler to double-check to see we have declared them correctly.
In both methods, the guide uses super to call the original parent method that
is being replaced, and then uses this.companion to delegate the remainder
of the action to its companion. In other situations or problems, you as the
programmer must decide whether you are completely replacing the behavior with
the other object’s, adding to your own behavior, and whether or where either of
these steps must happen in the new method body you are defining.
6.1.5.4. Constructor Invariants and Delegation
Because the companion object is supplied and assigned directly during construction:
Hedgehog buddy = new Hedgehog();
GuideHedgehog leader = new GuideHedgehog(buddy);
the leader object can rely on this.companion being fully initialized and ready.
Whenever leader.move() or leader.turn(...) is invoked, the guide performs its
own action using super and immediately forwards the matching operation to its
companion.
6.1.5.5. Delegating Overloaded Methods
In Java, methods can be overloaded—meaning multiple methods share the same name but have
different parameter lists. If an actor class provides multiple overloaded versions of a method,
such as move() and move(int distance), you must be careful to override and delegate
each overloaded variant that callers might invoke:
@Override
public void move(int distance)
{
    super.move(distance);
    this.companion.move(distance);
}
By delegating every variant, you ensure that no matter how an external caller commands the primary actor to move or turn, the companion mirrors the behavior faithfully.
6.1.6. Synchronized Multi-Actor Coordination Algorithms
Now that we understand how an actor delegates individual actions to a companion, let us examine how to build higher-level algorithms where multiple actors coordinate their movements in synchronized harmony.
6.1.6.1. Synchronized Orchard Patrol: Twin Garden Plots
Consider an orchard environment where two hedgehogs perform a synchronized perimeter patrol. As shown in Figure 6.1.3, the orchard features two identical garden plots stacked vertically: an upper plot and a lower plot, each completely enclosed by a border of trees, with a shared row of trees dividing them across the center:
Upper Plot: Contains our primary actor, an instance of
GuideHedgehog, placed at the upper-left corner at (1, 1) facingEAST.Lower Plot: Contains the companion actor, a standard
Hedgehog, placed at the corresponding upper-left corner at (1, 6) facingEAST.
The companion hedgehog in the lower plot does not possess autonomous pathfinding or
obstacle-avoidance logic of its own. It relies entirely on the GuideHedgehog in the
upper plot to navigate.

Figure 6.1.3: Coordinated patrol in twin orchard plots. The GuideHedgehog in the upper plot delegates its movements to the companion Hedgehog in the identical lower plot, allowing both to patrol their tree-lined perimeters in synchronized lockstep.
Because both plots have identical interior dimensions (6x4 clear cells) and boundary
layouts, every step and turn the GuideHedgehog takes along its perimeter translates into an
identical, collision-free movement for the companion in the lower plot. As a consequence,
the two actors traverse their respective plots in perfect synchronized lockstep!
6.1.6.3. Testing Dual-Actor Coordination in JUnit
When testing multi-actor coordination in JUnit, your test fixture sets up both entities and verifies that both reached the expected terminal state:
import student.micro.*;
import static student.micro.Assertions.*;

public class GuideHedgehogTest
    extends TestCase
{
    private Orchard orchard;
    private GuideHedgehog leader;
    private Hedgehog companion;

    // ----------------------------------------
    public void setUp()
    {
        this.orchard = new Orchard();
        this.companion = new Hedgehog();
        this.leader = new GuideHedgehog(this.companion);

        // Place companion in the lower plot at (1, 6) facing EAST
        this.orchard.add(this.companion, 1, 6);

        // Place leader in the upper plot at (1, 1) facing EAST
        this.orchard.add(this.leader, 1, 1);
    }

    // ----------------------------------------
    public void testSynchronizedMove()
    {
        this.leader.move();

        // Both actors must have moved forward by 1 unit
        assertThat(this.leader).isAt(2, 1);
        assertThat(this.companion).isAt(2, 6);
    }

    // ----------------------------------------
    public void testSynchronizedPerimeterPatrol()
    {
        this.leader.patrolPerimeter();

        // Both actors must have completed the perimeter circuit and returned home
        assertThat(this.leader).isAt(1, 1);
        assertThat(this.companion).isAt(1, 6);
    }
}
By testing both actors in the assertion phase, we prove that the delegation mechanism successfully coordinates independent objects across different parts of the virtual world.
6.1.7. Stepwise Refinement & Method Length Control
As simulation actors become more sophisticated—handling sensory checks, avoiding hazards,
tracking internal timers, and coordinating with partners—their code complexity can explode.
Without careful discipline, an actor’s act() method can easily devolve into a 50-line
“God method” filled with deeply nested if-else branches that is impossible to read, debug,
or test.
In this section, we review the software engineering principles of stepwise refinement and method length control that keep reactive simulations clean and maintainable.
6.1.7.1. The Dangers of Monolithic Methods
Consider this poorly structured implementation of a reactive foraging actor:
// POOR PRACTICE: Monolithic, cluttered act() method
public void act()
{
    if (!this.isClear(AHEAD))
    {
        this.turn(LEFT);
    }
    else
    {
        if (this.hasApple)
        {
            if (this.sees(Burrow.class, HERE))
            {
                this.hasApple = false;
                this.turn(RIGHT);
            }
            else
            {
                this.move();
            }
        }
        else
        {
            if (this.sees(Apple.class, HERE))
            {
                this.pick(Apple.class);
                this.hasApple = true;
            }
            else
            {
                this.move();
            }
        }
    }
}
While this method might run, it suffers from severe design flaws:
High Cognitive Load: A reader must trace three levels of nested conditionals to understand what the agent does in any given circumstance.
Poor Reusability: Logic like avoiding obstacles or delivering food is locked inside
act()and cannot be called or tested independently.Difficult Testing: You cannot test “returning to burrow” independently from “searching for apples”.
6.1.7.2. Stepwise Refinement: Breaking Problems into Sub-Methods
Stepwise refinement is the process of breaking a complex, high-level task down into smaller, self-contained sub-tasks, and implementing each sub-task as a focused helper method.
When applying stepwise refinement to an act() method:
The
act()method should read like an executive summary or table of contents.Each major decision branch delegates to a private helper method whose name clearly describes its intent.
Each helper method should do exactly one thing and do it well (the Single Responsibility Principle).
6.1.7.3. Refactoring with Stepwise Refinement
Let us refactor the cluttered agent above using stepwise refinement:
public class CleanHedgehog extends GridActor
{
    private boolean hasApple;

    // ----------------------------------------
    public void act()
    {
        if (!this.isClear(AHEAD))
        {
            this.avoidObstacle();
        }
        else if (this.hasApple)
        {
            this.deliverCargo();
        }
        else
        {
            this.forageForFood();
        }
    }

    // ----------------------------------------
    public void avoidObstacle()
    {
        this.turn(LEFT);
    }

    // ----------------------------------------
    public void deliverCargo()
    {
        if (this.sees(Burrow.class, HERE))
        {
            this.hasApple = false;
            this.turn(RIGHT);
        }
        else
        {
            this.move();
        }
    }

    // ----------------------------------------
    public void forageForFood()
    {
        if (this.sees(Apple.class, HERE))
        {
            this.pick(Apple.class);
            this.hasApple = true;
        }
        else
        {
            this.move();
        }
    }
}
Look at how readable this code has become! Anyone reading act() can immediately
understand the agent’s high-level strategy in five seconds: If blocked, avoid the obstacle;
if carrying an apple, deliver it; otherwise, forage.
6.1.7.4. Method Length Bounds (<= 10 Lines)
In CS 1114, we enforce clean code standards to foster disciplined software habits. A key guideline is the Method Length Bound:
Important
The 10-Line Rule: In general, no method should exceed 10 lines of code (excluding method headers, opening and closing braces, and blank lines).
In reactive agent simulations where an actor must handle sensory checks, state transitions, and boundary conditions, this bound ensures that every behavior is partitioned into clear, single-purpose helper methods. Any method exceeding this bound must be decomposed using stepwise refinement.
Enforcing short methods provides immense practical benefits:
Eliminates Spaghetti Logic: When you are constrained to 10 lines, you cannot write deeply nested branches; you are forced to extract helper methods.
Self-Documenting Code: Meaningful helper method names like
avoidObstacle()ordeliverCargo()eliminate the need for verbose comments explaining what a block of code is trying to do.Streamlined Debugging: When a test fails, Web-CAT stack traces point directly to the specific 8-line helper method where the fault occurred, rather than pointing somewhere inside a 50-line monster method.
By combining the reactive simulation cycle, finite state flags, object delegation, and disciplined stepwise refinement, you have assembled the complete set of architectural tools needed to construct autonomous, collaborative agents!

