
5.1. Fields, Encapsulation, and 2D Pixel Grids
In previous chapters, you learned how to write methods, work with primitive types and parameters, and create automated unit test cases. Up to this point, all variables you declared inside methods were temporary local variables that disappeared when the method finished executing.
In this chapter, you will take a major step forward in object-oriented software design:
modeling object state that persists over time using instance fields. You will learn
how to enforce encapsulation using access modifiers (private vs. public), design accessor
(getter) and mutator (setter) methods, navigate variable scope hierarchies, and resolve variable
shadowing with this. You will also discover how fields and the setUp() fixture method allow
you to refactor repetitive unit test suites. Finally, you will apply these concepts to digital
image processing, manipulating 2D RGB pixel grids using for-each loops.
5.1.1. Instance Fields and State Persistence
Writing an object-oriented program is largely a matter of designing classes and writing definitions for those classes in Java. Designing a class is a matter of specifying all of the attributes and behaviors that are characteristic of that type of object.
Up to this point we have been using the terms attribute and action to describe an object’s features. However, when talking about a programming language, the more common way to describe an object’s features are to talk about its fields and methods. Fields (also called instance variables) are variables declared directly inside a class (outside of any method) that store the internal state of each individual object.
For example, suppose we are writing a drawing program. One type of object we
would need for our program is a rectangle. A Rectangle object has four
key attributes: its length, its width, and its position (x and y coordinates).
Inside the class, we can declare four fields to store the values of these attributes:
public class Rectangle
{
    private int length;
    private int width;
    private int xCoord;
    private int yCoord;

    // other parts of the class go here ...
}
Our rectangle has four attributes:
The first two, length and width, store a rectangle’s dimensions.
The second two, xCoord and yCoord, store a rectangle’s position when we
draw it, much like how we determine a Jeroo’s position on an island. Note that
none of the attributes have values in the declaration. This is because the class
represents a general type of rectangle, and each individual rectangle object
(instance) will have its own values for these attributes. The declaration specifies
what all rectangles have in common, without representing any particular rectangle.
Like a cookie cutter for a cookie, a class gives the general shape of an object.
The specific values for any individual object are stored in its own fields.
A field will have different values for different objects–that is, different
instances of the class. For example, individual Rectangle objects will have
different values for their length, width, xCoord, and yCoord
fields:
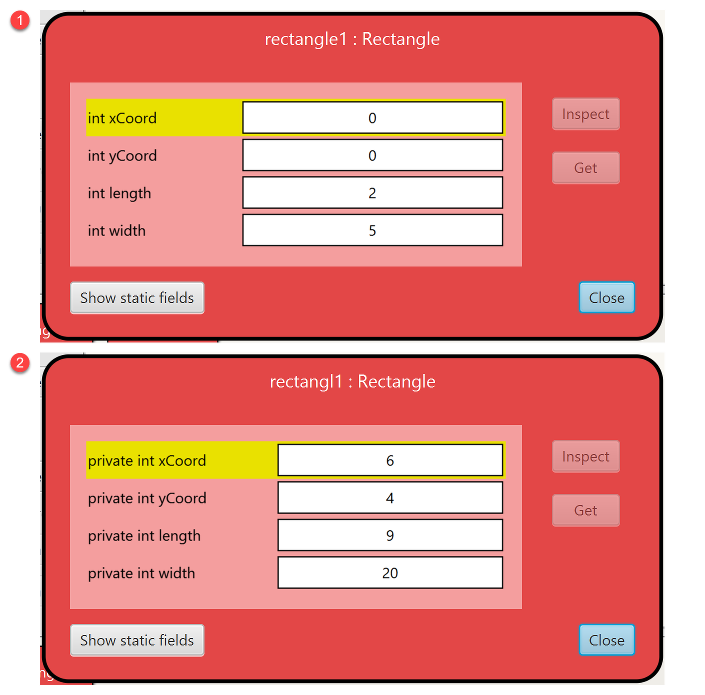
To create different Rectangle objects, we use a constructor to initialize
the fields:
public class Rectangle
{
    private int length;
    private int width;
    private int xCoord;
    private int yCoord;

    public Rectangle(int myLength, int myWidth, int initialX, int initialY)
    {
        this.length = myLength;
        this.width = myWidth;
        this.xCoord = initialX;
        this.yCoord = initialY;
    }

    // other parts of the class go here ...
}
Then, when we instantiate a rectangle:
Rectangle rectangle1 = new Rectangle(2, 5, 0, 0);
Java creates a new Rectangle object in memory with length set to 2,
width set to 5, and coordinates set to (0, 0).
5.1.2. Encapsulation & Access Modifiers (Private vs Public)
Notice that the fields in Rectangle use the keyword private:
private int length;
By convention, we always declare instance fields as private. This enforces
a core object-oriented software engineering principle called encapsulation
(or information hiding), where a class keeps its internal data protected
from direct outside tampering.
Why is encapsulation so critical? Consider what happens if another class tries to access private fields directly:
public class Runner
{
    public void myProgram()
    {
        Rectangle rectangle1 = new Rectangle(2, 5, 0, 0);
        int w = rectangle1.width;  // compiler error! width has private access
    }
}
Because width is private, the code above causes a compile error. This prevents
outside code from accidentally placing an object into an invalid or corrupt state
(such as setting a rectangle’s width to a negative number). It also ensures that
if the internal implementation of Rectangle ever changes, outside classes like
Runner won’t break. Encapsulation reduces bugs, limits the search space when
debugging, and makes code much easier to maintain.
5.1.3. Accessor and Mutator Methods (Getters and Setters)
While outside classes cannot access private fields directly, classes often need to provide controlled ways for clients to inspect or modify an object’s attributes. In object-oriented programming, this is accomplished through public getter and setter methods:
Accessor methods (or getters): Methods that retrieve or read the current value of an attribute without modifying it.
Mutator methods (or setters): Methods that change or update the value of an attribute.
5.1.3.1. Mutator Methods (Setters)
To allow other classes to change a rectangle’s position, we write mutator methods:
public class Rectangle
{
    private int length;
    private int width;
    private int xCoord;
    private int yCoord;

    public void setXCoord(int newValue)
    {
        this.xCoord = newValue;
    }

    public void setYCoord(int newValue)
    {
        this.yCoord = newValue;
    }
}
The standard pattern for a setter method:
Declared
publicso any client code can call it.Return type is
voidbecause it performs an action rather than returning an answer.Named by prefixing
setonto the attribute name (in camelCase).Takes a parameter of the same type as the field.
Assigns the parameter’s value to the field.
5.1.3.2. Accessor Methods (Getters)
To allow client code to read the rectangle’s dimensions or position, we write accessor methods:
public class Rectangle
{
    private int length;
    private int width;
    private int xCoord;
    private int yCoord;

    public int getLength()
    {
        return this.length;
    }

    public int getWidth()
    {
        return this.width;
    }

    public int getXCoord()
    {
        return this.xCoord;
    }

    public int getYCoord()
    {
        return this.yCoord;
    }
}
The standard pattern for a getter method:
Declared
publicso any client code can call it.Return type matches the type of the field being returned (e.g.,
int).Named by prefixing
get(orisfor booleans) onto the attribute name.Takes no parameters.
Uses a
returnstatement to return the field’s value.
5.1.4. Variable Scope: Local, Parameter, and Field
Now that you have seen local variables, parameter variables, and instance fields, it is vital to understand the difference in their scope and lifetime. The scope of a variable refers to the region of program text where that variable’s name is recognized and accessible.
Variable Kind |
Where Declared |
Scope (Where Accessible) |
Lifetime (Duration) |
|---|---|---|---|
Local Variable |
Inside a method or block |
From point of declaration to the enclosing closing brace |
While the enclosing block is executing (stack frame) |
Parameter Variable |
In the parameter list of a method/constructor |
Throughout the entire body of that method/constructor |
While that method/constructor is executing (stack frame) |
Instance Field |
Inside the class body, outside all methods |
Throughout the entire class across all methods |
As long as the object exists in memory (heap) |
Summary of Scope Rules:
Fields belong to the entire object. They are accessible in every method within the class and retain their values between different method calls.
Parameters belong to a single method invocation. They are initialized with the argument passed when the method is called and disappear when the method finishes.
Local variables belong to a specific block of code inside a method. They are temporary and cannot be accessed outside the pair of braces
{ }where they were declared.
5.1.5. Shadowing & The this Keyword
What happens if a constructor or method parameter has the exact same name as an instance field?
Consider this common constructor design:
public class Rectangle
{
    private int length;
    private int width;

    public Rectangle(int length, int width)
    {
        length = length; // Ambiguity! Which length is which?
        width = width;
    }
}
In Java, when a parameter or local variable shares the same name as a field,
the parameter shadows (hides) the field within that method’s scope.
In the code above, writing length = length; merely assigns the parameter to
itself, leaving the instance field uninitialized!
To resolve this ambiguity, Java provides the keyword this. In any instance
method or constructor, this is a special reference that refers to the
current object executing the code.
By writing this.length, you explicitly tell the compiler to access the
instance field on the current object, while length alone refers to the
parameter:
public class Rectangle
{
    private int length;
    private int width;

    public Rectangle(int length, int width)
    {
        this.length = length; // Assign parameter 'length' to field 'this.length'
        this.width = width;   // Assign parameter 'width' to field 'this.width'
    }
}
Using this.fieldName is standard practice across Java and makes your intent
crystal clear to anyone reading your code.
5.1.6. Applying Fields to Test Classes: The setUp Fixture
In Chapter 3, you wrote unit tests for Jeroos by creating a test island and actor locally inside each test method:
public void testPickFlowers()
{
    // 1. set up initial conditions
    Lab04Island island = new Lab04Island();
    FlowerPicker picker = new FlowerPicker();
    island.addObject(picker, 1, 2);

    // 2. call the method
    picker.pickFlowers();

    // 3. check expected results
    assertThat(picker.getX()).isEqualTo(6);
    assertThat(picker.getY()).isEqualTo(2);
    assertThat(picker.getFlowers()).isEqualTo(5);
    assertThat(picker.getHeading()).isEqualTo(EAST);
}
Now suppose you were writing a complete test suite with multiple test methods:
public class FlowerPickerTest extends TestCase
{
    public void testPickFlowers()
    {
        // 1. set up initial conditions
        Lab04Island island = new Lab04Island();
        FlowerPicker picker = new FlowerPicker();
        island.addObject(picker, 1, 2);

        picker.pickFlowers();
        assertThat(picker.getX()).isEqualTo(6);
    }

    public void testPickFlowersAgain()
    {
        // 1. set up initial conditions
        Lab04Island island = new Lab04Island();
        FlowerPicker picker = new FlowerPicker();
        island.addObject(picker, 1, 2);

        picker.turn(RIGHT);
        picker.hop();
        assertThat(picker.getY()).isEqualTo(3);
    }
}
Notice that both tests duplicate the exact same setup steps: creating Lab04Island,
creating FlowerPicker, and adding the picker at (1, 2). This duplicate setup is an
example of a code smell–a warning sign that the design can be streamlined.
Now that you know about fields, we can improve this design! Instead of declaring local variables in every test method, we can declare private instance fields in our test class:
public class FlowerPickerTest extends TestCase
{
    private Lab04Island island;
    private FlowerPicker picker;

    public void testPickFlowers()
    {
        // 1. No extra setup needed!
        this.picker.pickFlowers();
        assertThat(this.picker.getX()).isEqualTo(6);
    }

    public void testPickFlowersAgain()
    {
        // 1. No duplicate setup needed!
        this.picker.turn(RIGHT);
        this.picker.hop();
        assertThat(this.picker.getY()).isEqualTo(3);
    }
}
5.1.6.1. The setUp() Method
Where should the code that initializes these fields go? You might think a constructor would work, but a constructor only runs once when the test class is instantiated. If one test moves the Jeroo or alters the island, subsequent tests would start with a modified island, violating test independence!
In JUnit and student.TestCase, we use a special fixture method called setUp():
public class FlowerPickerTest extends TestCase
{
    private Lab04Island island;
    private FlowerPicker picker;

    /**
     * The setUp() method runs automatically BEFORE every single test method.
     * It creates fresh objects so every test starts from a clean slate.
     */
    public void setUp()
    {
        this.island = new Lab04Island();
        this.picker = new FlowerPicker();
        this.island.addObject(this.picker, 1, 2);
    }

    public void testPickFlowers()
    {
        this.picker.pickFlowers();
        assertThat(this.picker.getX()).isEqualTo(6);
        assertThat(this.picker.getY()).isEqualTo(2);
        assertThat(this.picker.getFlowers()).isEqualTo(5);
        assertThat(this.picker.getHeading()).isEqualTo(EAST);
    }

    public void testPickFlowersAgain()
    {
        this.picker.turn(RIGHT);
        this.picker.hop();
        assertThat(this.picker.getY()).isEqualTo(3);
    }
}
Key Mechanics of setUp():
Automatic Execution Before Each Test: If you have 10 test methods, JUnit runs
setUp()10 separate times–immediately before each test method starts.Fresh Test Fixture: Every test method begins with a brand-new island and actor, guaranteeing total test isolation.
Field Assignment vs. Local Declaration: Notice that inside
setUp(), there are no type names at the beginning of each line (we writethis.island = new Lab04Island();instead ofLab04Island island = ...). Because the fields were already declared at the class level,setUp()simply assigns new objects to those existing fields.
5.1.7. Introduction to Digital Images & RGB Color Model
Now let’s apply your knowledge of classes, fields, accessors, and mutators to an exciting domain: digital image manipulation.
This short video explains pixels, RGB color, and how images can be transformed by changing pixels:
5.1.7.1. A Pixel Class
A digital image is composed of a two-dimensional grid of dots. The dots are called pixels, a contraction of “picture element”. When magnified the individual pixels can be observed. The number of pixels that compose an image determines the quality of the image (resolution). The more pixels (e.g., 640 x 480; listed as horizontal x vertical numbers, or width x height), the higher the resolution.

In our programs, Pixel is a class that represents a single pixel
(or “picture element”) that represents a single tiny dot or square making up
the image. This class provides methods that allow you to retrieve its color
components or modify its color. You will primarily use this class to read or
change the color of a single pixel in the image. A Pixel object
provides getter methods to read the 4 key components of its color:
getRed(), getGreen(), getBlue(), and getAlpha(). It also
provides corresponding setter methods to change each of these color
values: setRed(int), setGreen(int), setBlue(int), and setAlpha(int).
All of these methods work with integer values between 0-255, just as explained
in the video above.
5.1.7.2. RGB Colors
Each pixel value is represented as three int components, red, green, and
blue, each with a potential value from 0 to 255. We often talk about a color
as a set of 3 ints in this way. For example, the RGB value (0, 0, 0)
represents black (zero intensity of all three colors) and the RGB
value (255, 255, 255) represents white (maximum intensity of all three colors).
For more examples, take a look
at an RGB color table.
With three integer values, we can represent any given color as a point on a three dimensional color “cube”:
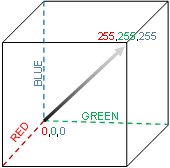
This sort of cube is called a three dimensional Color Space. You can see from the image above that there’s a straight, diagonal line from black at (0,0,0) to white at (255, 255, 255) that represents different shades of gray.
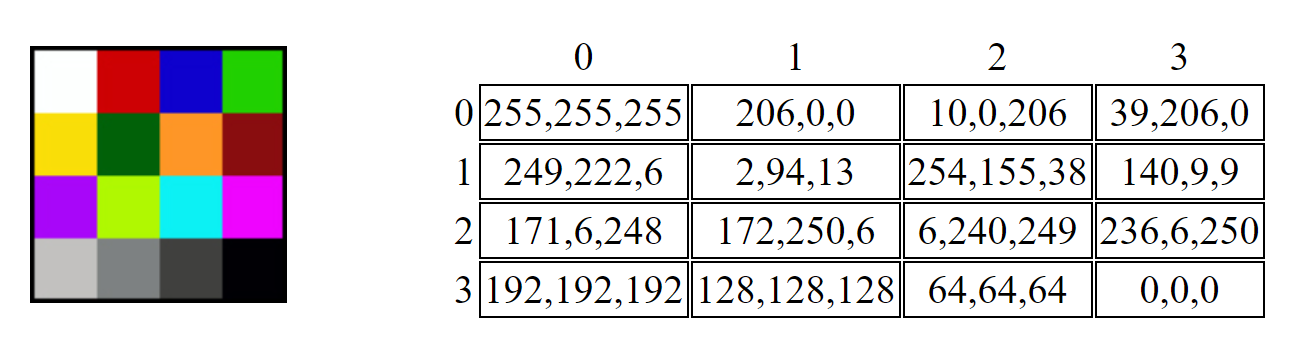
In the figure below we can see a series of colors on the left, and their RGB values in the same location on the right. For example, you can see a white square on the top left corner of the left grid, and the RGB value for white in the top left corner of the grid on the right:
To alter an image, we can simply change the RGB values of some or all of the pixels. This task can be accomplished with image processing programs such as Adobe Photoshop. However it is also possible to transform an image using simple programs like those we write in this course.
The basic methods the Pixel class provides for working with RGB colors are:
| Pixel Method | Description |
|---|---|
int getRed() |
Get the red intensity (an integer from 0-255) |
int getGreen() |
Get the green intensity (an integer from 0-255) |
int getBlue() |
Get the blue intensity (an integer from 0-255) |
void setRed(int) |
Set the red intensity to a value from 0-255 |
void setGreen(int) |
Set the green intensity to a value from 0-255 |
void setBlue(int) |
Set the blue intensity to a value from 0-255 |
int getX() |
Get the x coordinate where this pixel is located in the image |
int getY() |
Get the y coordinate where this pixel is located in the image |
void setColor(int red, int green, int blue) |
Set all three color values at once |
5.1.7.3. Imagining How Pixels Work
You could imagine how the Pixel class might work on the inside,
even if there are many different ways pixels can be represented.
As an example, you might imagine it is defined using fields and getters/setters this way:
public class Pixel
{
    private int rValue;
    private int gValue;
    private int bValue;

    private int xCoord;
    private int yCoord;

    public Pixel(int x, int y)
    {
        this.xCoord = x;
        this.yCoord = y;

        this.rValue = 0;
        this.gValue = 0;
        this.bValue = 0;
    }

    public int getRed()
    {
        return this.rValue;
    }

    public void setRed(int rValue)
    {
        this.rValue = rValue;
    }

    // getter and setter methods for the other colors would go here
}
Notably, since we want any given Pixel object to represent a single pixel
on screen, we would probably not create setters for xCoord and yCoord
since we wouldn’t want other code to be able to change which pixel we were
talking about. While the actual Pixel class is slightly more complicated
than this, the basics shown here help one reason about the capabilities
that the Pixel class provides and how the getter and setter methods
behave.
5.1.7.4. A Picture Class

Picture is a class that represents a single image that can be displayed
on the screen. We will be using this class to represent images that you
will be manipulating.
There are several ways you can access the pixels in a Picture. First,
the Picture class provides a method to access any pixel in the image:
Picture image = new Picture("image.png");
Pixel corner = image.getPixel(0, 0);
corner.setRed(0);
corner.setGreen(0);
corner.setBlue(255);
This code segment turns the upper left corner pixel of the image to blue. The
getPixel() method allows us to access any pixel in the image, and the
Picture also provides getWidth() and getHeight() accessors to
determine the image’s size. However, if we want to make changes across the
entire image, it would be preferable to use a loop over all of the
pixels.
5.1.8. Traversing Pixel Grids with Enhanced For-Each Loops
Up until now, we have created while loops in our programs. These types
of loops are really useful when we know what condition we need to reach in
order to be finished (or to stop), even if we don’t necessarily know how long
it will take to get there. For example, a while loop is a perfect fit for
when we want a Jeroo to hop as long as it continues to see flowers, no matter
how many flowers it will see.
However, there are drawbacks to these loops as well. It is possible to make a mistake in writing the condition, so the loop will not stop in the correct place, or possibly not at all (!). Also, it is possible to make a mistake inside the loop so that the steps performed do not take us closer to our goal.
However, another common use for a loop is to perform some action on every item in a group or collection. In this situation, we want the loop to repeat once for every item in the group, and stop once we have handled all of the items. In this situation, Java provides a different kind of loop that does more of the work for us, and helps us ensure the loop operates correctly. This kind of loop is called a for-each loop, and it is the best fit when you wish to repeat some action for all items in a group. This is because a for-each loop does not run the risk of mistakes in writing the loop condition or in advancing closer to the goal–the loop provides all of the decision making itself. It will always look at each item in a collection once, then move on to the next one, then finish. You don’t write any conditions yourself, so there’s no way to make a mistake with them.
A Picture is actually a big group of Pixels. The Picture
class provides a method called getPixels() that allows you to repeat
over all the pixels in the image. We can use this in a for-each loop
like this:
Picture image = new Picture("image.png");

for (Pixel pix : image.getPixels())
{
    pix.setRed(255);
}
In English, the code above, would read “for each pixel in the image, set its red intensity to 255.”
5.1.8.1. The For-Each Loop Syntax
The template we use when writing a for-each loop looks like this:
for (<datatype> <variable-name> : <collection>)
{
    // body of for-each loop
}
Here, the <collection> is the group or collection of objects to repeat over.
In the example above, the collection is all the pixels in the image.
The <datatype> is the type of a single item in the group–in our example,
that is a single Pixel. Finally, in addition to providing the collection
and the type of a single element, a for-each loop also requires a new
variable name that we can use as the name for a single item from the
collection. Within the body of the for-each loop, we can use this name to
talk about the current item as the loop repeats.
Looking at this, you should see some similarities to the other control
structures you have seen in this class. We have a keyword (in this
case for), a set of parentheses around the phrase that “controls” how
the loop operates, and a pair of curly braces surrounding a group of
statements making up the body.
Inside the parentheses, the <datatype> and <variable-name> form a local variable declaration, similar to others you have written yourself:
for (Pixel pix : image.getPixels())
{
    pix.setRed(255);
}
Here, we are declaring a variable called pix that is of type Pixel.
This variable is only usable within the curly braces of the for-each
loop–the loop’s body. After that closing curly brace, you cannot use or
reference pix. But inside the body of the loop, you can use that
variable name to refer to the current element to perform any actions on
it that are needed.
Instead of completing our variable declaration with an equal sign and initial
value, however we use a colon (:) followed by the collection of items.
The loop will repeat for all items in that collection, and each time the
loop repeats, the local variable in the loop will take on the value of the
next item in turn.
The first time through this loop, pix would represent the Pixel
object at index (0, 0). Once the body of the loop had executed once, pix
would change to represent the Pixel object at index (1, 0). The
loop repeats through all the pixels in row 0 horizontally across the top of
the picture, before moving on to the next row beginning at (0, 1), and going
through the rows one at a time until all pixels have been handled.
Once the loop body has executed once for each pixel in the image, the loop
will terminate and proceed to any code following the loop.
5.1.8.2. Using Outside Variables in Loops
One of the strengths of a for-each loop are the guarantees it provides about always repeating for all objects in a collection, and never making mistakes that lead to non-terminating loops. However, one limitation is that the variable introduced in the loop only refers to one item in the group, and is only accessible inside the body of the loop.
However, sometimes we want to gather information as the loop repeats that we can use after the loop is over. To do this, we need to introduce one or more other variables of our own before the loop, so that we can update them during the loop to remember the information we need, and still access them after the loop is done.
For example, we might want to remember the strongest red value seen anywhere in the image. We could do this by introducing a variable to remember the largest red intensity seen so far, and update it each time the loop repeats:
public int getMaxRed(Picture image)
{
    int maxRed = 0; // set to minimum value to start
    for (Pixel pix : image.getPixels())
    {
        if (pix.getRed() > maxRed)
        {
            // if this pixel has more red than any we've seen before,
            // remember it
            maxRed = pix.getRed();
        }
    }
    return maxRed;
}
When the variable maxRed is initially declared, it is initialized to 0.
Many programmers would call this variable an “accumulator” because it holds
an answer that we are building incrementally as our loop proceeds through
all the pixels. Essentially, at any point in time maxRed represents
the largest red intensity we have seen so far, in all the pixels the loop
has gone through. Before the loop runs, we set it to the minimum possible
intensity, because we know that every pixel in the image will have a red
intensity value that is zero or greater.
Inside the loop, we use an if statement to compare the current pixel’s red
value against the biggest we’ve seen so far, and if it is bigger, we use
an assignment statement to update maxRed with the new “largest” value.
Each time we go through the loop, we update maxRed only if we see a
larger value, and leave it alone if we don’t. When the loop finishes, we
will have repeated over all possible pixels in the image, and maxRed
will then equal the largest red value from any pixel in the entire picture.
5.1.8.3. Modifying Pixel Channels and Value Clamping
In addition to querying pixels, you can write methods that modify pixels across an entire picture. For example, to make an image brighter, you might increase the intensity of each color channel (red, green, blue) by a specified amount.
However, RGB channel values must strictly remain between 0 and 255. If increasing a channel’s value exceeds 255, the value must be clamped to 255 to prevent invalid color states:
public void brighten(Picture image, int amount)
{
    for (Pixel pix : image.getPixels())
    {
        int newRed = pix.getRed() + amount;
        if (newRed > 255)
        {
            newRed = 255;
        }
        pix.setRed(newRed);

        int newGreen = pix.getGreen() + amount;
        if (newGreen > 255)
        {
            newGreen = 255;
        }
        pix.setGreen(newGreen);

        int newBlue = pix.getBlue() + amount;
        if (newBlue > 255)
        {
            newBlue = 255;
        }
        pix.setBlue(newBlue);
    }
}
This pattern–reading an attribute with a getter, performing an arithmetic adjustment, checking
threshold boundaries with an if statement, and writing back the clamped value with a setter–is
a fundamental idiom in software development. You will practice this directly in Lab 05 and rely on
similar state-checking patterns in Program 03.
5.1.8.4. Methods on Pictures
The Picture class provides the following methods you can use:
| Picture Method | Description |
|---|---|
new Picture(String) |
Use this constructor to create a Picture
from an image file by providing the file name in double-quotes |
new Picture(int width, int height) |
Use this constructor to create a new, blank Picture
with the specified dimensions |
int getWidth() |
Get the width of this image, in pixels |
int getHeight() |
Get the height of this image, in pixels |
Pixel getPixel(int x, int y) |
Get the pixel at the specified location |
Pixel[] getPixels() |
Get all the pixels in the image in a form suitable for use in a for-each loop |
void show() |
Show this picture on the screen |
void repaint() |
Update the on-screen image shown using show() |
void hide() |
Hide the image shown on the screen using show() |
void explore() |
Show the image using an image explorer view that allows you to inspect the color of any pixel in the image |
void reload() |
If this image was loaded from the file, throw away any changes made to the image and reload it fresh from the original file to restore it to its original appearance |
From the methods above, you can see that you can show() an image
on-screen so you can see what it looks like, and then repaint() it
if you make any changes so you can see the updated version of the
image. The Picture class also provides an explore() method that
opens up a separate window displaying the image that allows you to click on
any location in the image to see its coordinates and color value. The
explore() method can be useful when you need to inspect an image’s
details.
5.1.9. Building Your Skills Through Practice
Learning to program is a skill built through deliberate practice and experimentation. The following optional, ungraded resources are designed to help you reinforce key concepts, build fluency, and prepare for upcoming quizzes, labs, and programming assignments.
Java Syntax Practice 5 : Build confidence and muscle memory with rapid, bite-sized drills focused on syntax rules and basic language mechanics. Especially recommended if you are new to programming.