
4.3. Grouping Objects Using Lists, Nested For Loops, and Looping Idioms
4.3.1. Collections of Objects
While we have been using individual variables or fields to refer to individual objects, eventually you will need to work with programs that manage many more than just one or two objects. When you are working with a large number of objects, placing each one in a separate variable or field is cumbersome, and eventually makes the code more complicated and bloated. Instead, when working with larger amounts of data, we see the need for container objects that allow us to hold and manage collections of objects.
Java provides a library of utility classes that help with many common
tasks, and this library includes several Collection classes. These
come in three broad categories that are common in many programming
languages:
Lists allow us to store a sequence of values in order.
Sets allow us to store an unordered collection of values.
Maps allow us to store lookup tables that allow us to use one piece of data to look up another piece of data associated with it, like using a word to look up its definition in a dictionary. Besides the word map, they also are often called dictionaries, associative arrays, or hashes.
Collections group objects together. All of these collections share a number of properties:
They increase their capacity as necessary to hold as much data as needed.
They keep a count of the number of values they hold.
They keep those values organized internally, allowing us to add or remove them when we want.
The details of how all this is done are hidden. Actually, we don’t need to know how the internals work in order to use a collection. Instead, we rely on the collection to do its job for us.
4.3.2. Interfaces
Because there are times when we want to know how to use a class without caring about its internal details, it would be nice to talk only about the services (or methods) a class provides. Java provides a tool for us to describe the set of methods provided by a class without being concerned about its internal implementation called an interface. An interface is similar to a class, but only lists the declarations of the public methods in the class (and any public constants you wish to provide). It does not include the fields, constructors, method implementations or any private aspects–just the public parts of the declarations that allow you to use it.
Compared to a class, an interface provides just enough information for you to be able to call the public methods and use it, while a class provides the full detail of exactly how those methods are actually implemented. As a result, you can use a class to create an object, since you have the full implementation available. However, you cannot use an interface by itself to create an object–all objects belong to some class, and an interface only describes a set of method declarations that a class might provide.
Why would we use an interface? Interfaces are used for three main reasons in programming:
By separating the declarations of the methods into an interface, and then moving the implementation to a separate class, it becomes possible for the same interface to be implemented in multiple different ways using different strategies. Multiple implementations is tricky and error-prone without interfaces, but since any number of classes can implement an interface just by providing the required methods, they are useful when there are multiple techniques for implementing the same algorithm or data structure.
Through an interface, you can capture a common set of methods that you expect to appear in multiple classes so that you can give the set of methods a name and ensure that classes providing that set of methods all do it consistently.
By separating the declarations of the methods into an interface, you enable programmers who need to use the code to build on top of the interface, in parallel with other programmers who are writing what is underneath. Interfaces can allow groups to communicate and depend on each other, even if the underlying software isn’t implemented yet.
As an example, suppose we were working on a program that manages graphical
shapes and we wanted all of the various types of graphical shapes to be
drawable on the screen. We might do this by imagining that each shape
would have a draw() method that would draw it on the screen. We could
capture that in an interface like this:
public interface Drawable
{
    public void draw();
}
You’ll notice a few things here that are different from other Java code
we’ve seen. For one thing, instead of saying public class we see the
keyword interface used. For another, our method signature is followed
by a ;, not curly braces. There is no implementation for the method
at all–that is left up to the individual classes that provide this method.
The interface only declares the method name, parameters, and return type.
The more general syntax for writing an interface looks like this:
public interface InterfaceName
{
    // any number of constant values

    // any number of method signatures WITHOUT implementation.
}
By itself, this code won’t do anything. However, it captures the dea
of providing a single draw() method. We cannot use it to create
objects–we need a class for that. Any class we write that we intend
to conform to this interface should implement it:
public class Rectangle
    implements Drawable
{
    // ...
    public void draw()
    {
        // ...
    }
}

public class Circle
    implements Drawable
{
    // ...
    public void draw()
    {
        // ...
    }
}
In these two class definitions, we use the keyword implements followed
by the interface name to declare that the class provides all the methods
included in that interface. When we say class Rectangle implements Drawable we are
claiming that the class Rectangle provides all the methods declared in
the interface Drawable. Further, this is a guarantee, and we will receive
a compiler error if we accidentally misspell the name of draw() or
declare it in a way that is inconsistent with the way it is declared
in Drawable.
The Rectangle class will
not compile until we implement a method with the
signature public void draw().
We can add any other fields or methods we want, but that draw()
method must be implemented.
However, by declaring that class Rectangle implements Drawable, now
any and all programmers (or source code) that use the Rectangle class
will know that it provides a draw() method, and that this method can be
used the same way it can for any other drawable objects.
By itself, this can seem like something of an odd structure in a language. Couldn’t a developer just remember to implement that one method? In our example, probably. But interfaces provide a way for us to explicitly write these requirements down so we can share them, and also provides a mechanism for the compiler to check that we have included the required methods with the correct declarations, and warn us of any mistakes we might make in that regard. So interfaces give better error checking and better communication between programmers.
4.3.3. Check Your Understanding: Interfaces
4.3.4. Syntax Practice 8a: Strings
4.3.5. The List Interface
Previously, we’ve worked on saving specific pieces of data to variables. For example, suppose we were working on a list of names stored as strings–think in terms of the names of all your classmates. We could store each name in a separate variable.
String name01 = "Anna";
String name02 = "Joey";
String name03 = "Maria";
String name04 = "Chris";
However, this becomes pretty tedious and inefficient pretty quickly when you are working with many names. For example, if you have 100 names to work with, you will need 100 different variables. Now think about how you would print them all out. You would need a separate statement for each variable, so it would also take 100 lines of code to print out all of the names.
Instead, there’s another way we can store many values. Instead of placing
each value in a separate variable, we can use one variable that acts like
a big container, and drop each individual name into the container.
Java uses the term Collection for objects that act like containers to
hold groups of other objects. In fact, Collection is actually an
interface in Java that defines the common methods that all container
objects provide. By the way, containers are often called data structures,
because they organize a group of data values in a structured way to solve
particular types of problems.
For now, we are going to focus on one specific group of containers: lists.
In Java, List is yet another interface that defines all of the methods
common to different kinds of lists. Java provides multiple classes that
store sequences of items in different ways: some are more focused on
providing faster access to individual objects by specifying their position
in line, and others are more focused on providing faster insertion and removal
operations. But there is a tradeoff, since most containers can make some of
the operations faster at the expense of slowing down others. Using a
common interface allows programmers to treat these different implementations
as completely interchangeable in terms of how methods are used, even if
some methods may run faster or slower depending on the specific class
underneath.
The following table summarizes the most common List methods:
Method Name |
Purpose |
|---|---|
|
adds an item to the list |
|
returns the item stored at this index |
|
sets the item at some index to be some value |
|
removes all elements from the list |
|
returns |
|
removes element at the specified index from the list |
|
returns the number of elements in the list |
|
returns |
|
inserts an item into the list at the specified position, moving other items back by one to make room |
4.3.6. Generics
The List interface also marks our first encounter with generic types
in Java. The List interface is generic, meaning that it requires us
to specify another type that it works with. We do this by providing another
type as a parameter whenever we use the List interface name. For
List, the other type represents the type of objects that the list will
hold.
List<String> names = ...;

names.add("Sara");        // works, since value is a String
names.add(new Jeroo());   // compiler error, since it is not a String

List<Jeroo> jeroos = ...;

jeroos.add("Sara");        // compiler error, since it is not a Jeroo
jeroos.add(new Jeroo());   // works, since value is a Jeroo
A generic type is a class or interface that requires one or more other
types as parameters. We specify those other types inside angle
brackets (<…>). Remember that you always must specify the types each
time you are declaring a field, variable, parameter, or return type. For
example, when using List you should always provide the type so
that it is clear what kind of items go into the list.
4.3.7. ArrayList
Remember that because List is an interface, it does not provide any
information to create an object–it only specifies the required methods.
To create an actual object, you need a class that implements the interface–often
called a concrete class, because it provides the concrete implementation
details of how all fields are initialized and how all methods behave internally.
While there are multiple implementations of the List interface, in this
course we will rely on the one that is used most commonly: ArrayList.
Because ArrayList implements List, you know it provides all of the
methods described in the previous section. ArrayList is also a generic
type, and takes a parameter in angle brackets (<…>) to indicate the type
of items that go in the list.
Take a few minutes to watch the following video:
In an ArrayList, data are arranged in a linear or sequential
structure, with one element following another.
For example, if we had an ArrayList` of integers, it might look like this:

The large numbers inside the boxes are the elements of the ArrayList. The
small numbers outside the boxes are the indexes (or indices, or positions)
used to identify each location in the ArrayList. Notice that the index of
the first element is 0, not 1. It’s important to remember that, much like
Pixels in a picture, ArrayList
indexing starts at 0 instead of 1. Forgetting this fact is an easy mistake
to make.
4.3.7.1. Programming with ArrayLists
Lets try re-creating the image above as an ArrayList in code.
4.3.7.1.1. Adding an Import
Before we can start though, we need to add an import statement to our code:
import java.util.*;
Without this, java will not recognize the names List or ArrayList.
4.3.7.1.2. Declaring and Instantiating an ArrayList
Since the List interface tells us everything we need to know about all
the methods available on lists, we can use it to declare a variable like this
(remember to include the type of elements inside angle brackets):
List<Integer> list = ...;
However, we cannot use new with an interface name like List. We can only
use new with the name of a class, since new creates a new object by
using the class as a template. Interfaces cannot be used in this way. So
instead, when we use new, we can use ArrayList as the name of the
specific implementation class we want to instantiate.
List<Integer> list = new ArrayList<Integer>();
Remember that when we say <Integer> after List, we are saying this
list will hold integer objects. Similarly, when we use it after ArrayList,
it means the same thing. We’ll get into
more of what we can do with this sort of type specification later, but for now,
know that whatever type of data we are storing, we need to specify it in the
variable declaration using <>. For example, if we were storing Jeroo
objects we’d specify <Jeroo>, or <Pixel> if we were storing Pixel
objects.
You may also notice we used the word Integer instead of int. This has
to do with what are called “primitive types” versus objects. We’ll get more
into what the differences between these two things are later as well. For
now, just know that if you wanted to create an
ArrayList of doubles, you’d specify <Double>. For booleans,
you’d similarly use <Boolean>.
4.3.7.1.3. Adding Our Numbers
A List has a set of methods we can call. To add an item, we could use
the add() method.
List<Integer> list = new ArrayList<Integer>();
list.add(-2);
After this code runs, our list would look like this:

If we added another value…
list.add(8);
Our list would look like this:

4.3.7.1.4. Accessing List Items
Lets assume we’ve added all 15 numbers as seen in the diagram above to our list, but then wanted to access the second number.
To access the second item in our list, we would run code like this.
int x = list.get(1); // gets the second item in our list, which is 8
It is important to note that, even though this is the second item in our list, it is at index 1. This is because positions start at zero. The first item of a list will always be at index 0.
Indexing
For any List of length n, the first item will be at index 0, and
the last at index n - 1.
4.3.7.1.5. Changing Items
While we can use the get method to access any item in the list by
specifying its position, it only returns the value held in the list.
If we want to change the value stored at a given position, we cannot
use get(). For example, typing list.get(0) = 4; would not
successfully compile. It will not allow us to change the first item stored
in the list from -2 to 4. Instead, we need to use a different List method
to change an existing entry’s value.
list.set(1, 4);
When we call this set() method, we have to specify two things. First,
the location we want to change (its index or position). In our case, we are
trying to change the second item in our list, which is at index 1.
This first argument will always be a number.
We want to change the value of the second item in the list to 4, so that is
our second argument. If we’d had a list of Pixel objects and wanted to
use the set method, it may look like this:
Pixel p = new Pixel(1, 0);
list.set(1, p);
Keep in mind though that a list’s size is only as big as the number of items you have added to it. So the following code would break:
List<String> names = new ArrayList<String>();
names.add("Anna");
names.add("Joey");
names.add("Maria");
names.set(3, "Chris"); // error, since there is no index 3
The code above would compile, but would fail when you tried to run it. It
would produce an IndexOutOfBoundsException, which means that an illegal
index was provided (an index value that was negative, or went beyond the end
of the existing positions). Again, “Anna” is
stored at index 0, “Joey” at index 1, and “Maria” at index 2. This list
contains 3 items, but since it ends at index 2, the call to set() would
fail.
In short, if your code fails and you see an IndexOutOfBoundsException,
you’re trying to access a location in the list that does not exist.
4.3.8. Check Your Understanding: ArrayLists
4.3.9. Syntax Practice 8b: Lists
4.3.10. Nested For Loops
When iterating over Pixel objects in class thus far, we’ve done so like
this (assuming we had a Picture object named picture)
for (Pixel p: picture.getPixels())
{
    // do some transformation
}
However, what if we wanted to change only every other Pixel? Or every
other row or column?
In these situations a counter controlled loop might be better.
Lets assume we know our picture is a rectangle of 100 pixels wide by 200 pixels
tall and we have a Picture variable called pic. We could write a
for loop like this.
int width = 100;
int height = 200;

for (int x = 0; x < width; x++)
{
    Pixel p = pic.getPixel(x, 0);
    p.setColor(Color.BLACK);
}
You’ll notice this code works through a series of Pixel objects, setting
their RGB value to black, or (0, 0, 0). However, this code will only work
through the top row of Pixel objects at y == 0. It
accesses the pixel at (0, 0), then (1, 0), all the way to (99, 0). However we
never use that height variable defined above and we never change the y
coordinate from 0. That’s perfectly ok if we only want to do one row. However,
if we want to do multiple rows, we need to do something more advanced. We
need a loop for the y coordinate as well.
int width = 100;
int height = 200;

for (int x = 0; x < width; x++)
{
    for (int y = 0; y < height; y++)
    {
        Pixel p = pic.getPixel(x, y);
        p.setColor(Color.black);
    }

}
Much like conditionals, for loops can be nested.
In spirit (and in fact), we have combined two loops. One loop for x-coordinates repeats for each possible x value (each column of pixels in the image). The other loop for y-coordinates repeats for each possible y value (each row of pixels in the image).
Stepping through this code, when the exterior for loop starts,
x is initialized to 0 and we know 0 is less than 100 so we can start our
loop. Next, y is initialized to 0 which is less than 200, so our second
loop can start. With x at 0, the second for loop
increments y from 0 to 199. This means we’d access the pixel at (0, 0),
then (0, 1), all the way to (0, 199). Then the interior for loop would
terminate and the exterior for loop would
increment the value of x to 1. Then the whole process would repeat, this
time accessing the pixel at (1, 0), then (1, 1), all the way to (1, 199).
This process would keep going, repeating from the topmost y == 0 pixel for
a specific x, going vertically downward until reaching the bottommost y,
then advancing to the right in the x direction, until every pixel had been
processed.
This kind of structure is called a nested for loop. It is an extremely common pattern, particularly when using two variables to increment across a two-dimensional coordinate space, such as the two-dimensional grid of pixels in an image.
4.3.11. Check Your Understanding: Nested For Loops
4.3.12. Syntax Practice 8c: Nested Loops
4.3.13. Check Your Understanding
4.3.14. Programming Practice 8a
4.3.15. Programming Practice 8b
4.3.16. Modeling the Contents of a Library
As an example, let’s try to model a library of books inside a computer
program.
To start with, lets create a Book class with fields tracking the title,
author, and ISBN number.
public class Book
{
    private String title;
    private String author;
    private int isbn;

    public Book(String aTitle, String anAuthor, int theISBN)
    {
        this.title = aTitle;
        this.author = anAuthor;
        this.isbn = theISBN;
    }

    public String getTitle()
    {
        return title;
    }

    public String getAuthor()
    {
        return author;
    }

    public int getISBN()
    {
        return isbn;
    }
}
Once a book is created, we won’t need to change any of these fields, thus we only need to create getter methods. No setter methods when the fields are read-only.
Next, we want to represent a shelf, which can store up to 50 books. Obviously, we don’t want to create 50 fields to hold the books, and 50 getter and setter methods to change them. Instead, we will store the books in a list of books, and provide a method to add another book to the shelf.
import java.uti.*;

public class Shelf
{
    private int maxCapacity;
    private List<Book> contents;

    public Shelf()
    {
        maxCapacity = 50;
        contents = new ArrayList<Book>();
    }

    // adds a book if there is space on the shelf
    public void addBook(Book book)
    {
        if (contents.size() < maxCapacity)
        {
            contents.add(book);
        }
    }

    public List<Book> getContents()
    {
        return this.contents;
    }
}
We’ll also have a library which contains many shelves:
import java.util.*;

public class Library
{
    private List<Shelf> stacks;

    public Library()
    {
        stacks = new ArrayList<Shelf>();
    }

    public void addShelf(Shelf shelf)
    {
        stacks.add(shelf);
    }
}
We’ll be enhancing this basic design as we go in the following sections.
4.3.17. Looping Idioms
An “idiom” is a common pattern or expression. When working with loops in Java, you may begin to see some common patterns in how loops are used. For loops are particularly good for situations when you need to:
Repeat code a specific number of times
Repeat over a sequence of positions
Accumulate an answer over some numeric range
In addition, loops are often used for searching through a sequence of values to find the first (or last) value matching some condition.
4.3.17.1. Repeating a Specific Number of Times: Shelving Books
Lets start in our Library class by creating some shelves for books.
import java.util.*;

public class Library
{
    private List<Shelf> stacks;

    public Library()
    {
        stacks = new ArrayList<Shelf>();
    }

    public void addShelf(Shelf shelf)
    {
        stacks.add(shelf);
    }

    // new method
    public void createShelves()
    {
        // will add Shelf objects to our stacks
    }
}
To make a single shelf, we’d create an object of our shelf class and add it to our list:
// Create a single shelf
public void createShelves()
{
    Shelf shelf = new Shelf();
    this.stacks.add(shelf);
}
However, as the name createShelves implies, we may want to make many shelves
at one time. Instead, we’ll change createShelves to take in a parameter that
specifies how many shelves we want to make:
public void createShelves(int n)
{
    for (int i = 0; i < n; i++)
    {
         Shelf shelf = new Shelf();
         this.stacks.add(shelf);
    }
}
Counter-controlled loops are a good choice when you want to perform an action a specific number of times.
4.3.17.2. Finding the First Match: Searching for a Book
4.3.17.2.1. Finding a Match with a For-Each
Lets say someone came into our library and asked if we had the book “Catch-22”. We would need some way to determine if this book was on one of our shelves.
To accomplish this, we’ll add a method to our Shelf class that
will return true if a book with a given title is on that shelf.
import java.util.*;

public class Shelf
{
    private int maxCapacity;
    private List<Book> contents;

    public Shelf()
    {
        maxCapacity = 50;
        contents = new ArrayList<Book>();
    }

    // other methods omitted ...

    // new method
    public boolean hasTitle(String title)
    {
        // should return true if a book with the specified title
        // is in our list of books,
        // otherwise return false
    }
}
We could accomplish this either with a counter-controlled loop or a for-each loop. Let’s look at how we’d write this with a for-each loop:
public boolean hasTitle(String title)
{
    boolean result = false;
    for (Book book : this.contents)
    {
        if(title.equals(book.getTitle()))
        {
            result = true;
        }
    }
    return result;
}
Here, we iterate through every Book` in the list of contents.
In each iteration we declare the title we want to
the title of whatever book we’re looking at.
If we find a book with a title that matches our parameter title, we set
the boolean result to true. Once our loop has finished, we return
whatever result has been set to.
However, once we find the book we’re looking for, there is no need to continue
looking through the rest of the shelf. Instead, lets get rid of result
and revise our code to make better use of return statements.
public boolean hasTitle(String title)
{
    for (Book book : this.contents)
    {
        if (title.equals(book.getTitle()))
        {
            return true;
        }
    }
    return false;
}
A return statement terminates a method on the line where it is executed,
so no other code within the method will be executed after the return
happens.
With this change, instead of looking through all the books and not returning
the answer until searching the entire shelf, we have changed the if statement
so that as soon as we find a matching title, the method immediately
returns true. This ends the method immediately, stopping the loop in its
tracks as soon as the desired book is found. However, if no books match the
given title, the loop continues until all loops have been checked. After
the loop a separate return statement returns the answer in that situation.
This particular approach is called early loop termination or an early loop exit, where we immediately stop the loop as soon as the answer is available, so that we avoid any unnecessary work.
4.3.17.2.2. Finding the First Object with a Counter-Controlled Loop
It would be equally correct to implement this method with a counter-controlled for loop. In this style, we would access the list by position using an index variable.
public boolean hasTitle(String title)
{
    for (int i = 0; i < this.contents.size(); i++)
    {
        Book book = this.contents.get(i);
        if (title.equals(book.getTitle()))
        {
            return true;
        }
    }
    return false;
}
You’ll notice that other than the nature of the for loop, this implementation is almost identical to the for-each implementation in the previous section.
4.3.17.2.3. The Break Keyword
Sometimes, we may want a loop to end early without causing the entire method
to terminate. In these situations, we can use the break command:
for (int i = 0; i < this.contents.size(); i++)
{
    Book book = this.contents.get(i);
    if (title.equals(book.getTitle()))
    {
        break;
    }
}
System.out.println("Found it!");
Here, once a book with a matching title is found, the break statement
is executed. This immediately stops, or “breaks”, the loop, and execution
continues with the statement following the loop.
You can use a break statement with any type of loop. Executing break
in a for-each or while loop will stop those loops in just the same way.
However, make sure you understand the purpose when you use a break
statement, since they can make code harder to read and more error-prone.
Using a single break` when you want an early loop exit to terminate
the loop when the answer is found is useful, but placing many break
statements in a loop, or using them without clearly understanding the
plan, is more likely to create bugs. In fact, many programmers stay away
from break except in early exit situations because of its potential
for problems.
4.3.17.2.4. Finding the Last Object with a For Loop
The loops above will find the very first book in the list with a matching title. However, sometimes you might want to find the last item in a list instead.
For example, what if a person came to the library asking for “The Godfather” and I remember putting that book on the shelf just a moment ago.
if the shelf’s list of contents contained 50 books, there is no need to search through most of those if I know “The Godfather” is close to the end. Instead, we could use a counter-controlled loop to start at the last position of the list, and count backwards.
public boolean hasTitle(String title)
{
    for (int i = this.contents.size() - 1; i >= 0; i--)
    {
        Book book = shelfContents.get(i);
        if (title.equals(book.getTitle()))
        {
            return true;
        }
    }
    return false;
}
This loop would start with the book at the highest index in the list and work its way down to index 0. This loop still uses the early loop exit technique to stop the loop as soon as the desired book is found.
4.3.18. Check Your Understanding: Loop Idioms
4.3.19. Syntax Practice 9a: Loop Idioms
4.3.20. Generics Revisited
So far, whenever we’ve worked with variables, we’ve always known what type
they are.
For instance, whenever we’re working with a String we’ll declare a
variable like
String s = "Hello World";. However, there are some cases in Java when
we’ll need to create methods without knowing what type of data we’ll be
working with–or, more properly, so they’ll work with any type.
For these, we use what is called a Generic Type Parameter to represent
the type of data we’re working with.
Declaring classes that use generic type parameter(s) involves using new syntax
to refer to the class name. Such classes and interfaces, including those for
Java’s collections, use angle brackets (<…>) containing one
or more variables (separated by commas) to refer to unspecified type names.
For example, you would use <Element> or <Key, Value> to refer to unspecified
type names. Sometimes, you will see super short variable names used in
this way, such as <E> or <K, V>, although the longer names are more
understandable for beginners.
Using this technique, names of classes or interfaces implemented with generic
types are written with the syntax ClassName<E>.
Lets take a look at a class that uses a generic type parameter. The
following Box class can hold a piece of any type of data. We’ll use
the parameter name Content to refer to the type of data held in
the Box.
public class Box <Content>
{
    private Content value;

    public Box(Content newValue)
    {
        this.value = newValue;
    }

    public Content getValue()
    {
        return this.value;
    }

    public void setValue(Content newValue)
    {
        this.value = newValue;
    }
}
We could then create a Box object.
Box<String> box1 = new Box<String>("surprise");
And not all Box objects need to be the same type:
Box<String> box1 = new Box<String>("surprise");
Box<Integer> box2 = new Box<Integer>(42);
In effect, the <Content> serves as parameter for the type of objects that
will be stored in the Box.
One benefit a generic type provides is checking the types of method arguments at compile time. For example, the following code would cause an error when compiled:
Box<String> box1 = new Box<String>("surprise");
box1.setValue(42);
Thus, if a programmer wishes to create a list of strings, using generic types will help guarantee that the objects being stored actually belong to the correct type. Even though you can create a list of any type of object, this specific list only contains strings, nothing else. In this way, using generic types helps to reduce the number of programming errors and thereby makes programs safer and more robust. At the same time, it allows us to create more reusable classes, since we can create types that work with a variety of other classes without having to know in advance what those classes are.
4.3.21. Check Your Understanding: Generics
4.3.22. Syntax Practice 9b: Generics
4.3.23. The Null Keyword
When you declare an object variable, remember that you are storing a reference
to an object. In Java, the keyword null is a special value that means “no
object”. You can declare and initialize object variables this way:
Pixel pix = null;
This can sometimes be useful when you do not want to create a new object or
initialize the variable to refer to a specific existing object. It can also
be useful when a method should return an object, but sometimes there is no
object to return. Think of a “find” method that looks for a specific book,
and returns that book if it is found. What happens if it is not found?
In many cases, having such a method return the special value null is
a useful way to indicate that a method returns no object, perhaps because
“no object” is a meaningful answer.
If you try to use a variable that has null as its value (or an expression
that returns null), either to access a field or invoke a
method, Java throws a NullPointerException. An exception indicates
that an unusual situation has occurred, and this can mean your program
“broke the rules”–either the rules of Java program behavior or the rules of
a specific library method or class.
Programmers often use the phrase “null pointer exception” or the acronym NPE to refer to these types of errors. NPEs virtually always mean there is a bug in your program, because your program tried to use “null” in a situation where an object was required, but null means “no object”, so the requirement wasn’t met. The following is an example of code that will throw a null pointer exception.
Pixel pix = null;
pix.setRed(255); // This was a cause a NullPointerException
NullPointerExceptions are a common error for programmers to encounter.
Be aware that if you see one arise in your own code, you’re probably working
with a variable that has not been set to refer to a specific object, or
you are working with a method that sometimes returns no object.
4.3.24. Diagnosing a Null Pointer Exception
First, remember that a NullPointerException` (also called an “NPE”) occurs
when you try to use null` as the receiver for something–basically, when
you have a dot (“.”) used to call a method or reference a field, but the
expression to the left of the dot (the “receiver”) is null. In other words,
you have a “.” where there is no object to act as the receiver.
If this happens while executing a test, the test will fail. In the test
results window, if you click on the failed test, the bottom half of the
window will show the NullPointerException` along with information about
where it occurred, as shown in this example.
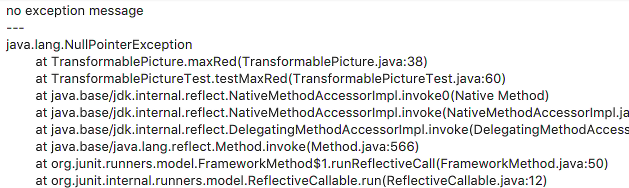
Here, by clicking on the failed test testMaxRed(), the lower half of
the test window shows the information. If the error happened while you
were not running tests, the same information would appear in Eclipse’s
Console view instead.
At the top of this information, you can see that NPE’s normally do not contain
any exception message or information. You will aso see the class name of
the exception, NullPointerException. Do not simply look at the exception
name and/or message–they are useful for saying what happened, but they are
only part of the content. In addition, there is a (possibly long) list of
methods below the exception’s message. This list of methods is called a
“stack trace”, and it basically shows exactly where the failure occured, and
how your program arrived at that location. The topmost entry in that list
shows the class, method name, file name, and line number where the exception
occurred. The file name and line number are in parentheses. Sometimes that
is in your own code–if so, go directly to the specific line in the named
file and you’ll be right at the location where the exception occurred.
For example, this stack trace points to the maxRed() method in the
TransformablePicture class, on line 38 of the class. If we look there,
we find the line where the NPE occurred (taken from the previous section).
pix.setRed(255); // This was a cause a NullPointerException
If the topmost line isn’t your code–perhaps it is a library method–don’t despair. While the exception might have happened in some method that is part of another class, it almost certainly happened because of the way your code called something. Just look lower down in the list. Look at the second method listed, the third method listed, the fourth, and so on, until you find a method in one of your own classes. Now you know exactly where in your own code the problem happened. Again, you can use the file name and line number to go right to the spot in your source code where the problem occurred. After that, it is time to debug–figure out why the problem happened, so you can fix it.
To diagnose a null pointer exception once you’ve found the location, just look at the dots (periods) on the line where the exception occurs. There could be just one, or maybe several. Examine every single one of them. You need to figure out which one happens to have “null” (that is, no object) to the left of the dot. You can often do this by the process of elimination.
In our example, the line where the problem arose contains pix.setRed(255);,
so there is only one dot. The name to the left of the dot is pix, so this
problem happened because pix was null, but then we tried to use it
to call a method as if an object was there.
Some of the most common causes for NPEs in this course are:
You are not initializing a field or variable properly
You are using the result of a method, assuming that the method always returns an object, when the method may in fact return null sometimes
You are passing null as a parameter value to a library method, when an actual object is required
You’ll need to go through each “dot” on the line where the exception occurs to rule out these kinds of problems and narrow down the possibilities until you figure out where the null is occurring and why. If you have to look several lines down the stack trace, it is always possible you’re in the last situation mentioned above–instead of having a null value to the left of a “dot”, you are instead passing a null value to some other method (a library method, or a method inherited from a parent class).
Try this and see if you can figure it out. While these are the most common, there are a limitless number of ways you can experience this problem, but the process of diagnosing them is always the same. If you have trouble figuring out the location of the error, post the contents of your exception message and stack trace as a follow-up here for more info. If you find the line where the problem is occurring but cannot determine why/how after trying the advice above, post the line where the NPE occurs along with the stack trace so we can coach you through it.