
3.1. Variables, Fields, and Parameters
3.1.1. Variables
One of the most powerful features of a programming language is the ability to define and manipulate variables. A variable is a named location that stores a value. Values may be numbers, text, images, sounds, and other types of data. To store a value, you first have to declare a variable.
int x = 7;
Each variable has a type that determines what kind of values it can store.
This statement is a declaration, because it declares that the variable
named x that is of type int, and gives it an initial value of 7.
Note that x is an arbitrary name for the variable. In general, you should
use names that indicate what a variable represents–either the value it
holds, or the role it plays. For example, if you saw these
declarations, you could probably guess what values would be stored:
int ageInYears = 21;
int studentID = 1234;
This example declares two variables, each of type int. When a variable name
contains more than one word, like ageInYears, it is conventional to
capitalize the first letter of each word except the first, just like we do with
methods. This capitalization convention is called camel case (sometimes
written CamelCase), where the capital letters form periodic “humps” in the
height of the name. In Java, like the majority of programming languages,
names are case-sensitive, so ageInYears is not the same as
ageinyears or AgeInYears. Remember that variable names always start
with a lowercase letter, while initial capitals are reserved for class names
and interface names.
You can use any name you want for a variable. But there are about 50 reserved
words, called keywords, that you are not allowed to use as variable names.
These words include public, class, static, void, and int,
which are used by the compiler to analyze the structure of the program.
You can find the complete list of keywords online, but you don’t
have to memorize them. Most programming editors provide “syntax highlighting”,
which makes different parts of the program appear in different colors.
3.1.1.1. Variable Assignment
Now that we have declared variables, we want to use them to store values. We do that with an assignment statement
int ageInYears = 29; // 29 is the initial value for ageInYears
ageInYears = 21;  // set ageInYears to now store 21
This example shows a variable declaration followed by an
assignment statement. In Java, all local variables must be given an
initial value, and we use the same “=” character to show the value
stored in the variable as part of its declaration. However, after
we declare a variable, we can change its value any time we need to,
and we do that using an assignment statement. Here, we write the
variable by itself, followed by an equal sign (=), followed by
the new variable we want the variable to store. An assignment statement
changes the value stored in the variable, so that the next time we
use the variable, the corresponding value will be the new one. Remember
that the name “variable” reflects that fact that its value can change (or
vary) over time as your program runs, and assignment is how you change
that value.
Programmers may use phrases like “set ageInYears to 21”, or
“assign 21 to ageInYears”, or even “change ageInYears to 21”.
The vocabulary
can be confusing here, but the idea is straightforward:
When you declare a variable, you create a named storage location and give it an initial value.
When you assign to a variable, you update its value, replacing whatever value it previously held.
As a general rule, a variable has to have the same type as the value you
assign to it. For example, you cannot store a string in ageInYears, since
it can only hold an integer. We will see some examples that seem to break this
rule, but we’ll get to that later.
Variables must always be initialized (assigned for the first time) when they are declared, which you write on the same line:
int ageInYears = 29;
3.1.1.2. A Note About the = Sign
Lets take a look at the following code example:
int a = 5;
int b = 7;
a = b;
Because Java uses the = symbol for assignment, it is tempting to interpret
the assignment statement a = b as a statement of equality. It is not!
Equality is commutative, and assignment is not. For example, in mathematics
if a = 7 then 7 = a. In Java a = 7; is a legal assignment
statement, but 7 = a; is not. This is because an assignment statement is
an action that changes the variable on the left by setting its value to
be the value appearing on the right of the = sign.
As a result, the left side of an assignment statement
has to be a storage location such as a variable.
Also, in mathematics, a statement of equality is true for all time. If a = b now, a is always equal to b. In Java, an assignment statement can make two variables equal, but they don’t have to stay that way:
int a = 5;
int b = a; //a and b are now equal
a = 3;     //a and b are no longer equal!
The first line declares variable a and initializes it with the value 5.
The second line declares variable b and initializes it with the value of
a, which at that point is 5.
The third line changes the value of a to 3, but it does not change the
value of b, so they are no longer equal. a now has a value of 3,
while b has a value of 5.
3.1.1.3. Arithmetic Operators
Operators are symbols that represent simple computations. For example, the
addition operator is +, subtraction is -, multiplication is *,
and division is /.
The following program converts a time of day to minutes:
int hour = 11;
int minutes = 59;
int timeAsMinutes = hour * 60 + minutes;
In this program, hour * 60 + minutes is an expression that represents
a single value to be computed.
The operators are * and +, which represent multiplication and division.
The operators work with are called
operands (which is a fancy name for parameters). When the program runs,
each variable is replaced
by its current value, and then the operators are applied.
So even though you write hour * 60 + minutes, java will compute that as
11 * 60 + 59 and assign timeAsMinutes the value 719. Expressions are
generally a combination of numbers, variables, and operators. When compiled
and executed, they are evaluated to produce a single value. It is also
important to note that order of operations applies in Java just as it does in
math. 11 * 60 will get computed before 59 gets added, since
multiplication has higher precedence than addition.
While addition (+), subtraction (-), multiplication (*), and division(/) are
all mathematical operators you can use in programming, Java supports two more
unary operators you may not have seen. These are ++ and --. These
add or subtract one, and are often used to incrementally increase or decrease
the value stored in a variable as part of a calculation.
3.1.1.4. A Note About Ints and Division
Addition, subtraction, and multiplication all do what you expect, but you might be surprised by division. For example, the following fragment tries to compute the fraction of an hour that has elapsed:
int minutes = 59;
int fractionOfHour = minutes / 60;
fractionOfHour will actually be assigned the value 0 in this situation!
This result often confuses people. The value of minutes` is 59, and 59
divided by 60 should be 0.98333, not 0. Java performs “integer
division” when the operands are integers, as in this case. By design, integer
division always rounds toward zero, even in cases like this one where the next
integer is close. Further, fractionOfHour
is declared to be an int variable, so it can only hold an integer
value anyway, not a decimal fraction.
As an alternative, we can calculate a percentage rather than a fraction:
int minute = 59;
int fractionOfHour = (minute * 100) / 60;
Now, fractionOfHour is assigned to 98. Again the result is rounded down,
but at least now it’s approximately correct.
3.1.1.5. A New Type: Double
While the examples above all make use of the data type int, we can use
variables to store more than just integer values.
A more general solution for creating an accurate fractionOfHour variable is
to use a different type of data called a double (short for double-precision)
which can represent fractions as well as integers. A double value is
actually a digital approximation of a real number in the mathematical sense.
You can create double
variables and assign values to them using the same syntax we used for the other
types:
double pi = 3.14159;
Java performs “floating-point division” when one or more operands are double values. So we can solve the problem we saw in the previous section:
double minutes = 59.0;
double fractionOfHour = minutes / 60;
Now, fractionOfHour is set to the value 0.9833333333333333.
Although floating-point numbers are useful, they can be a source of confusion. For example, Java distinguishes the integer value 1 from the floating-point value 1.0, even though they seem to be the same number. They belong to different data types, and strictly speaking, you are not allowed to make assignments between types.
The following is illegal because the variable being declared is an int and
the initial value on the right is a double:
int x = 1.1; // compiler error
It is easy to forget this rule because in many cases Java automatically converts from one type to another:
double y = 1; // legal, but bad style
The above example should be illegal, but Java allows it by automatically
converting the int value 1 to the double value 1.0 automatically. This
leniency is convenient, but it often causes problems for beginners.
For example:
double y = 1 / 3; // common mistake
You might expect the variable y to get the value 0.333333, which is a legal
value for a double. But instead it gets the value 0.0. The expression on the
right divides two integers, so Java does integer division, which yields the
int value 0. This int value is then implicitly converted to double
so it can be used as the initial value of y, so the value assigned to y
is 0.0.
3.1.1.6. Using Booleans as Variables
When working with conditions in the previous two modules, you may remember
hearing a lot about the boolean values.
Just like int and double, boolean is another data type Java
provides. Unlike ints or doubles, a
boolean value can only be true or false.
We use these when working with while loops or if statements like this:
if (this.hasFlower())
{
    this.hop();
}
In this code, if the jeroo has a flower, it will hop. hasFlower() is a
method that will return true or false depending on if the jeroo has a
flower.
We could store that boolean value in a variable if we wanted like this:
boolean pocketIsFull = this.hasFlower();
Here we’ve declared a boolean variable, named it pocketIsFull and set it
equal to the result returned by the hasFlower() method.
If we wanted to, we could then use that variable in our conditional:
boolean pocketIsFull = this.hasFlower();
if (pocketIsFull)
{
    this.hop();
}
This is another way to write the same if statement!
Additionally, we can assign a boolean variable to the result of a compound
conditional:
boolean shouldToss = this.hasFlower() && this.seesNet(AHEAD);
if (shouldToss)
{
    this.toss();
}
Remember above we declared and initialized an int variable that was the
result of a mathmatical expression. The same thing will happen here. Java
will evaluate this.hasFlower() && this.seesNet(AHEAD), and that compound
expression will produce a value that is either true or false, then
this value will be used as the initial value of the variable shouldToss.
Finally, if you just need a boolean value, you can initialize a boolean
variable using the keywords true or false.
boolean x = true;
boolean y = false;
3.1.1.7. The Scope of a Local Variable
Local variables can be very useful tools. You should use a local variable whenever you need to refer to the same value more than once, since a local variable allows you to give a name to a value, so you can use that name in more than one place. If you only need a value one time, a name may not serve much of a purpose.
However, local variables are used for local names that are being used
within a single method (or even just a few statements within a method).
Programming languages use the term scope to refer to the region of
the program text where a name can be used. For local variables, each variable
declaration appears inside some pair of braces ({ }), such as the pair
of braces surrounding the body of a method. This pair of braces forms the
start and end of a block of program statements. The scope of that local variable
is all of the statements between its declaration and the closing brace (})
at the end of the block of statements containing the declaration. The name
will not be recognized outside that block. Most importantly, this means
the variable declaration is not visible (can’t be used) in other methods.
public void doSomeStuff()
{
    int x = 17;  // declared here
    ...
    if (jeroo.getX() == 17)    // OK to use here, inside scope
    {
        ...
    }

    // scope of x ends at closing brace
}

public void doOtherStuff()
{
   if (x == 17)  // compiler error! x can't be referenced
   {
       ...
   }
}
In the code shown above, the local variable x is declared at the start of
method doSomeStuff(), so that variable can be used anywhere inside that
method. However, the scope of x ends at the end of doSomeStuff(), at
the closing brace that marks the end of the method.
That is why local variables are called local: they can only be used in a small, localized region of your program text, only up until the next closing brace. As a further example:
public void doSomeStuff()
{
    ...
    if (jeroo.hasFlower())
    {
        int x = 17;  // declared here
        ...
        if (jeroo.getX() == 17)    // OK to use here, inside scope
        {
            ...
        }

        // scope of x ends at closing brace
    }

    x = 4;  // compiler error! x can't be referenced
}
Local variables can be declared inside any pair of braces demarking a
series of statements. However, they are always local to that block of
statements, and can’t be used outside that block. Here, x is declared
inside the true branch of the first if statement, so x is local to that
block of statements, and cannot be used outside the pair of braces where it
is declared.
Variables are not visible, and cannot be used, outside of their scope. Their
scope is the region of text where they are visible. In Java, scopes are
typically marked by pairs of braces ({ }).
3.1.2. Check Your Understanding: Variables
3.1.3. Fields Versus Local Variables
Writing an object-oriented program is largely a matter of designing classes and writing definitions for those classes in Java. Designing a class is a matter of specifying all of the attributes and behaviors that are characteristic of that type of object.
Up to this point we have been using the terms attribute and action to describe an object’s features. However, when talking about a programming language, the more common way to describe an object’s features are to talk about its fields and methods. Fields are a type of variable we define at the beginning of a class that help us describe the qualities of a class.
For example, suppose we are writing a drawing program. One type of object we
would need for our program is a rectangle. A Rectangle object has two
key attributes: its length and its width. Inside the class, we can declare
two fields to store the values of these attributes: a length and
a width. Given these fields, we can
define characteristic rectangle actions, such as the ability to calculate its
area and the ability to draw itself. Identifying an object’s fields and
actions is the kind of design activity that goes into developing an
object-oriented program.
We can declare fields in our Rectangle class:
public class Rectangle
{
    private int length;
    private int width;
    private int xCoord;
    private int yCoord;

    // other parts of the class go here ...
}
Our rectangle has four attributes.
The first two, length and width, store a
rectangle’s dimensions.
The second two, xCoord and yCoord, store
a rectangle’s position when we draw it, much like how we determine a jeroo’s
position on an island. Note that none of the attributes have values. This is
because the class represents a general type of rectangle, and each individual
rectangle will have its own values for these attributes. The
declaration specifies what all rectangles have in common, without representing any
particular rectangle. Like a
cookie cutter for a cookie, a class gives the general shape of an object. The
specific values for any individual object are not included.
Notably, these fields also use the keyword private meaning they can only be
accessed and manipulated inside this class.
By convention, we always include the keyword private to ensure that
only the code inside the class can access or change the fields. This
enforces a software engineering design principle called information hiding,
where only the class itself manages the information it is responsible for,
and no other code outside the class can interfere with or change this
internal information.
A field will have different values for different objects–that is, different
instances of the class. For example, individual Rectangles will have
different values for their length, width, xCoord, and yCoord
fields. For example, here are two different Rectangle objects we could make:
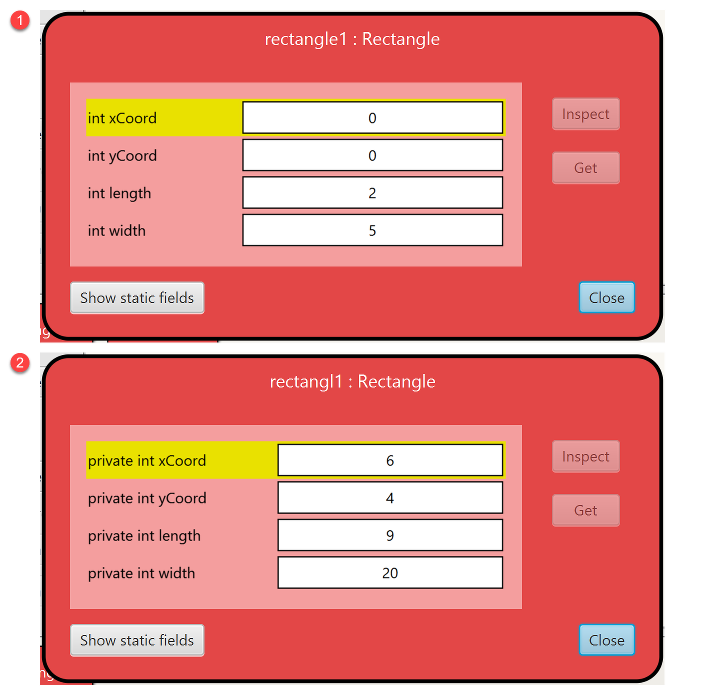
To create two different Rectangle objects like this, we’ll need a
constructor. Recall that one of the main responsibilities of a constructor
is to initialize the data stored in an object (i.e., stored in its fields).
Because our Rectangle class uses fields to store attribute values,
the constructor needs to initialize those values. Sometimes, you might
initialize a field to a fixed value for all objects, but often, you would
like for the code creating the object to specify the initial values. If
we want to do that here, we need a Rectangle constructor
that takes in 4 integers as parameters:
public class Rectangle
{
    private int length;
    private int width;
    private int xCoord;
    private int yCoord;

    public Rectangle(int myLength, int myWidth, int initialX, int initialY)
    {
        this.length = myLength;
        this.width = myWidth;
        this.xCoord = initialX;
        this.yCoord = initialY;
    }

    // other parts of the class go here ...
}
Then, if we wanted to call this constructor we could say:
Rectangle rectangle1 = new Rectangle(2, 5, 0, 0);
Which would set the length to 2, width to 5, and coordinates to (0, 0).
3.1.4. Changing Private Variables: Mutator Methods
Recall that the fields of Rectangle are private. We can access them
anywhere inside the Rectangle class, but not outside.
public class Runner
{
    public void myProgram()
    {
        Rectangle rectangle1 = new Rectangle(0, 0, 2, 5);
        int w = rectangle1.width;  // compiler error! Can't access field
    }
}
Because length is private, the code above will cause an error when
compiled. This is a convenient way to prevent fields from being changed
accidentally or when you don’t want them to, and amounts to enforced
information hiding. Information hiding helps limit the possibilities for
accidentally introducing bugs, and helps limit the search for them when they
do occur. Additionally if our Rectangle class ever changed, it’s likely the
code above would need to change too, making this Runner class dependent
on the internal details of the Rectangle class. That makes future changes
more work. So information hiding reduces the opportunities for bugs, and also
reduces the amount of code we need to check when searching for bugs, and
reduces the cost of future changes. That is why we will always declare
our fields to be private in this class. Eventually, you’ll learn more about
other options for fields, but remember that relaxing information hiding comes
at a significant cost.
On the other hand, it’s possible this Runner class would need to access
and maybe change fields in the Rectangle class–for example, to move it
to a new position. Rather than allowing direct access to the fields, one
convention of object-oriented programming is to provide public methods to set
and get the values of some of the object’s attributes when that is appropriate
for the design of the class.
Methods that get or retrieve the value of an attribute are called accessor methods or, more colloquially, getter methods. Methods that set an object’s attribute(s) to a new value are called mutator methods or, more colloquially, setter methods. Usually, accessor and mutator methods work directly with the object’s fields, if attributes are stored directly in fields.
It is up to the designer of the class to determine based on the abstraction the class represents which attributes require accessor and/or mutator methods. Some fields may be purely for internal use, and may not represent externally visible attributes. Other attributes may be stored in fields, but might be more suited to read-only use, where only accessor methods are provided. In other cases, the class may support both reading and changing attributes, and both an accessor and a mutator are a good fit.
If you were designing a BankAccount class, for example, you might want a
public getAccountNumber() method, so that clients could retrieve
information about their bank accounts, but you would probably not want a
public setAccountNumber() to let clients change that information, or
a public getAccountPassword() for data that should be kept internal-only.
We will discuss accessor methods below, but first let’s look at mutator
methods.
For our Rectangle example, lets say we wanted to let other classes change
the xCoord and yCoord attributes to move the Rectangle around the
screen. Mutator methods can be as simple as this:
public class Rectangle
{
    // field declarations from above go here

    public void setXCoord(int newValue)
    {
        this.xCoord = newValue;
    }

    public void setYCoord(int newValue)
    {
        this.yCoord = newValue;
    }
}
This code also shows the simple pattern for providing a mutator method for any attribute that is stored directly in a field. The key elements of this pattern are:
The mutator method is
publicbecause we want it to be accessible anywhere.Its return type is
voidbecause this method does notreturnanything.This method is named by adding
setas a prefix onto the name of the attribute that it changes, using our capitalization conventions for compound names.This method takes one parameter of the same type as the field.
The body of the method uses an assignment statement to set the field to the new value.
This pattern is used so frequently, it is almost always what programmers mean when they use the term “setter method”, or say “add a setter method for it”.
3.1.4.1. A Note on Scope
The bodies of the mutator methods make use of both fields and parameters. It is important to note that there is a difference in where these two types of variables can be used. Remember the scope of a name or method refers to where it can be used in a program.
A parameter’s scope is the body of the method in which it is declared.
For example consider the setLength() method below:
public class Rectangle
{
    private int length;

    public void setLength(int len)
    {
        this.length = len;
    }
}
In this code, the parameter name len` cannot be referenced outside of the
setLength() method. It is completely invisible outside of the
braces ({ }) that surround the method’s body.
Fields, on the other hand, are declared inside the braces ({ }) surrounding
the whole class, and so their scope is the entire class–they can be used
anywhere in the class, inside any method.
The field length, for example, was declared outside of the setLength()
method and can be accessed anywhere within the class.
Remember that local variables that are declared inside the body of a method have a scope that extends from the point where they are declared to the end of the block of code in which they are declared.
In summary:
Fields are declared inside the class, so their scope is the entire class. They can be referenced inside any method in the class.
Parameters are declared in the parameter list of a method declaration, so their scope is that entire method. They can be referenced anywhere inside the body of that method, but cannot be accessed outside the method where they are declared.
Local variables are declared in a block of statements surrounded by braces (
{ }). They can be accessed anywhere inside that block of code, from where the declaration is placed, up to the closing brace (}) marking the end of that block of code.
3.1.5. Check your Understanding: Scope
3.1.6. Accessor Methods
Creating an accessor method also follows a very simple pattern when the corresponding attribute is stored in a field, although there is one twist we have not covered before.
public class Rectangle
{
    private int length;
    // other field declarations from above go here

    public int getLength()
    {
        return this.length;
    }
}
This code shows the simple pattern for providing an accessor method for any attribute that is stored directly in a field. The key elements of this pattern are:
The accessor method is
publicbecause we want it to be accessible anywhere.After the keyword
public, instead ofvoidwe list the type of data stored in the field, which is the same type of data this method will return.This method is named by adding
getas a prefix onto the name of the attribute that it accesses, using our capitalization conventions for compound names.This method takes no parameters.
The body of the method uses a
returnstatement to return the value of the field.
This pattern is used so frequently, it is almost always what programmers mean when they use the term “getter method”, or say “add a getter method for it”.
What is different is the return type instead of void and this new return
keyword, which we’ll talk about in the next section. For now, it’s mostly
important to note that the return type of the method must match the type
of the field. Thus, because length is defined as an int, this getter
method must also have int as its return type.
3.1.7. Check Your Understanding: Fields, Getters and Setters
3.1.8. Syntax Practice 5a: Fields and Accessors
3.1.9. The Return Keyword
Outside of methods with a return type of void, all other methods you will
write in Java will specify a return type–the type of answer or result
the method will return. So far, we have primarily used void methods, which
do not return any result–in fact, void means “nothing”, and we call those
methods for the actions they perform rather than any value they compute.
Methods that compute values for us “return” those values when they are called.
When we say “return a value”, we mean “give us an answer” or “produce a result”.
Compared to void methods, methods that return values differ in two ways:
They declare the type of the return value (the return type).
They use at least one
returnstatement to provide a return value*.
For example if you were to write the method:
public boolean isRaining()
{
    // no code yet
}
You would see a syntax error when compiling saying “missing return statement”.
That is because the use of boolean after the keyword public
specifies that this method will return a boolean result, but the
method body doesn’t say what value is produced.
To fix this issue, we need to return something.
public boolean isRaining()
{
    return false;
}
The return statement is how we specify what value is produced by the
method when the method is called. After the keyword return, you can use
any expression you want, including constants (like false above),
variables, fields, mathematical expressions, or even combinations of
other method calls.
The type of the expression in the return statement must match the return
type declared for the method. When you declare that the return type
is double, you are making a promise that this method will eventually
produce a double value. If you try to return with no expression, or
an expression with the wrong type, the compiler will generate an error.
3.1.9.1. Doubling Back to Accessor Methods
Writing an accessor method for a field needs to have a return type because all fields have a type.
public class Rectangle
{
    private int length;

    public Rectangle()
    {
        this.length = 4;
    }

    public int getLength()
    {
        return this.length;
    }
}
In this situation our length field is of type int, therefore our
accessor method for that field needs to also return an int.
3.1.9.2. Writing More Complex Methods with Return
Sometimes you may feel the need to write multiple return statements, for example, one in each branch of a conditional:
public double absoluteValue(double x)
{
    if (x < 0)
    {
        return -x;
    }
    else
    {
        return x;
    }
}
Since these return statements are in a conditional statement, only one will be
executed. As soon as either of them executes, the method terminates without
executing any more statements. Of course, this means that other parts of
the method will not be executed after the return statement is reached.
Further, since a method that returns a value must always use a return
statement, no matter how the method ends, that is why you must include a
return statement in each and every branch, not just the first one.
Because of these constraints, some beginners find it easier always to write a single return statement and place it as the very last statement in the method–this ensures the method always returns a value, and never accidentally skips any important steps. As you develop your skills, you may find using multiple return statements easier in some situations, but always remember they require more care and are subject to more possibilities for mistakes, so fall back on using a single return statement when you have trouble:
public double absoluteValue(double x)
{
    double answer = x;
    if (x < 0)
    {
        answer = -x;
    }
    return answer;
}
Here’s an example: calculateArea takes a double as a parameter and returns
the area of a circle with that radius:
public double calculateArea(double radius)
{
   // Note that Math.PI is a constant with the value of pi
   double result = Math.PI * radius * radius;
   return result;
}
This last line is a return statement. This statement means, “exit immediately
from this method and use the following expression as the return value.” Also,
note the use of the constant PI from the built-in Java utility class
called Math. The Java Math class provides many useful and common
math functions, as well as definitions for the constants PI and E.
In Java, by convention, programmers give constants names that are written
in all capitals, so you can easily distinguish them from variables or fields.
The expression you provide in a return statement can be arbitrarily
complex, so we could have written this method more concisely:
public double calculateArea(double radius)
{
   return Math.PI * radius * radius;
}
Code that appears after a return statement (in the same block), or any place else where it can never be executed, is called dead code. The compiler will give you an “unreachable statement” error if part of your code is dead. For example, this method contains dead code:
public double absoluteValue(double x)
{
   if (x < 0)
   {
      return -x;
   }
   else
   {
      return x;
   }
   x = 5;    // can never be executed
 }
That last line, x = 5 would never run as a value would always be returned
from the method (ending the method) before that line could be reached.
If you put return statements inside a conditional statement, you have to make sure that every possible path through the program reaches a return statement. The compiler will let you know if that’s not the case. For example, the following method is incomplete:
public double absoluteValue(double x)
{
   if (x < 0)
   {
      return -x;
   }
   else if (x > 0)
   {
      return x;
   }
   // syntax error
}
When x is 0, neither condition is true, so the method ends without hitting a return statement. The error message in this case might be something like “missing return statement”, which is confusing since there are already two of them. But hopefully you will know what it means.
Again, if you run into difficulties, often an easy answer is to change the
structure of the method so that there is only a single return statement
at the very end of the method.
3.1.9.3. Using the Results of a Method
When you invoke a void method, the invocation is usually on a line all by itself. For example here is a simple hop and pick method for Jeroos.
public void hopAndPick()
{
    this.hop();
    this.pick();
}
And here is how it is called:
this.hopAndPick();
On the other hand, when you invoke a method with a return type, you have to do something with the return value. We usually assign it to a variable or use it as part of an expression.
Take for example this method:
public int square(int x)
{
    return x * x;
}
This method would take in some number x, and return the value of that
number raised to the power of 2.
We could then call the method and instantiate a new variable to save the result:
int base = 3;
int raised = square(base);
In this situation, raised is set to the value 9 (the result of
computing 3 * 3).
Additionally, we can use the result of a method as a parameter for another method call:
int base = 3;
int raisedAgain = square(square(base));
This new variable raisedAgain will be set equal to 81. The calls to
square() are evaluated “inside out”, with the one inside parentheses
performed first. So base is passed as the argument to square() in
the first call, which returns 9. The return value 9 of the first call is
used as the parameter value in a second call to square(), which then
returns 9 * 9 = 81.
This might remind you of working with functions in algebra classes. In those classes, we might see this same idea written out as:
Assume f(x) = x * x What is the value of f(3)? What is the value of f(f(3))?
Java uses this same principle, though with many different types of data, things can get a bit more complex.
3.1.10. Check your Understanding: Typed Methods and Return Statements
3.1.11. Syntax Practice 5b: Mutators and Return Statements
3.1.12. Using Fields in Testing
Last week, we worked on creating some simple test suites for a Jeroo. You may remember needing to do a lot of set-up work at the start of each test to ensure the jeroo was exactly where you wanted it and with the right number of flowers.
However, what if you had several tests in a row that all required the same initial starting conditions? To help make testing a bit more streamlined, you can declare fields instead of local variables to hold the common objects you are using in most or all of your tests. When you do this, instead of repeatedly declaring them as local variables in each test method, declaring them as fields makes them visible to all test methods so they only need to be declared once.
Further, rather than repeating the code to set up the initial conditions in every test method, you can also write that just once, instead of repeating it in each test method.
To see how this works, consider this example test method from the Software Testing module:
public void testPickFlowers()
{
    // 1. set up initial conditions
    Lab04Island island = new Lab04Island();
    FlowerPicker picker = new FlowerPicker();
    island.addObject(picker, 1, 2);

    // 2. call the method
    picker.pickFlowers();

    // 3. check expected results
    assertThat(picker.getX()).isEqualTo(6);
    assertThat(picker.getY()).isEqualTo(2);
    assertThat(picker.getFlowers()).isEqualTo(5);
    assertThat(picker.getHeading()).isEqualTo(EAST);
}
Now suppose you were writing a test class with multiple tests in it:
public class FlowerPickerTest
    extends TestCase
{
    public void testPickFlowers()
    {
        // 1. set up initial conditions
        Lab04Island island = new Lab04Island();
        FlowerPicker picker = new FlowerPicker();
        island.addObject(picker, 1, 2);

        ...
    }

    public void testPickFlowersAgain()
    {
        // 1. set up initial conditions
        Lab04Island island = new Lab04Island();
        FlowerPicker picker = new FlowerPicker();
        island.addObject(picker, 1, 2);

        // turn picker south and move forward 1
        // for this test

        ...
    }
}
Here, the two tests both use an island and both use a picker.
They both have to create the island, create the picker, and place
the picker on the island. This is just repeated code.
Repeated code is an example of a code smell, or a red flag that a design can be improved. Sometimes you look at code and you just get a feeling that there is a better way to do it–that’s a code smell. If you get that feeling, almost certainly there is a better way to do it, and revising the code would improve it.
First, instead of using local variables called island and picker in
each method, we can move those to be fields:
public class FlowerPickerTest
    extends TestCase
{
    private Lab04Island island;
    private FlowerPicker picker;

    public void testPickFlowers()
    {
        // 1. No extra setup needed
        ...
    }

    public void testPickFlowersAgain()
    {
        // 1. set up initial conditions
        // turn picker south and move forward 1
        // for this test

        ...
    }
}
But where do we put the initialization code to create the objects? While it might seem the constructor would be a good place, a constructor is executed once only when an object is created. But this initialization code needs to be executed for each and every test method in our class, not just once.
In test classes, we use a special method called setUp() for this purpose
(note the capitalization!).
This method will be automatically executed before each of the tests in
the class. To be clear, that means that if you had 3 tests
called test1(), test2(), and test3(), the setUp() method
would run before test1() executes AND before test2() AND
before test3(). It provides common initialization steps for all of
your test methods in the class.
We can use fields with this setUp() method to efficiently set up our
initial conditions. Programmers often call the common set of initial conditions
used for all of the tests in a class the test fixture.
public class FlowerPickerTest
    extends TestCase
{
    private Lab04Island island;
    private FlowerPicker picker;

    public void setUp()
    {
        this.island = new Lab04Island();
        this.picker = new FlowerPicker();
        this.island.addObject(this.picker, 1, 2);
    }

    public void testPickFlowers()
    {
        // 1. No extra setup needed
        ...
    }

    public void testPickFlowersAgain()
    {
        // 1. set up initial conditions
        // turn picker south and move forward 1
        // for this test

        ...
    }
}
Note that the fields look slightly different than the original local
variable declarations. They include the keyword private in front,
because all our fields are private. You can never use private in
front of a local variable inside a method, only with fields, but we
always use it with fields.
Also, inside setUp() you’ll notice that there is no type at the beginning
of each line. We aren’t declaring local variables inside that method.
Whenever you specify a type in front of a name, you are declaring a new
name in some way.