
2.3. Software Testing
2.3.1. What Is Software Testing?
Defective code is a major problem of the software industry, accounting for a large percentage of downtime and costing U.S. companies billions of dollars each year (some estimates say as high as $200 billion!). Software testing is an important tool used by developers in order to reduce costs, improve software quality, and reduce computer-system downtime.
We all know testing is an important skill to learn, but where should we start?
To start out, lets answer some simple questions about what software testing really is.
Software testing is the process of executing a program with the intent of finding errors. Software testing is a verification and validation technique that ensures software is developed to meet both its specification and its user’s needs.
In other words, testing is all about discovering defects (a.k.a., bugs), that is, showing that a piece of software fails somehow.
As a result, Glenford Myers (author of the classic book The Art of Software Testing) says that a successful test is one that does reveal a defect. Such a test conclusively proves there is a bug. In contrast, if we run a test and the software behaves as we expect, we only know that it behaves correctly in this one test situation, although bugs may still be hiding elsewhere. As a result, Edsger Dijkstra proclaimed that “Program testing can be used to show the presence of bugs, but never their absence!”
This definition of testing contrasts with debugging, which is all about locating and repairing defects. Testing shows that defects exist, and then debugging is used to find the source of the defect and fix it.
2.3.1.1. Test Cases and Suites
OK, if the goal is to execute a program (or part of one) with the intent of finding an error, then let’s run it! But what input value(s) or user interaction sequence(s) should we use?
As an example, suppose you are testing something very simple, like
a single function called isEven() that takes an integer
value and returns true if the integer is even, or false if it is odd.
Remember that just running the program doesn’t really count as testing; instead, we must be trying to demonstrate failures of some kind. That means carefully planning out exactly how we are going to run the program–what input values or situations we will use, and what specific behavior or result we will be looking for.
A test case is a single scenario under which the software will be run to attempt to demonstrate a failure, and typically has three basic parts.
First, a test case must define all of the input values, conditions, or variables used in the test. For example, we can imagine a scenario where we wish to test
isEven()on the input value 2.Second, a test case must define a procedure for exercising the software under test. In the case of
isEven(), the procedure can be very simple: call the method with the given input value, and store the boolean result. If we were testing a larger software part or an entire application, however, we may need to perform a longer, more complicated series of actions to exercise it, and this procedure is part of the test case.Third, a test case must define the expected behavior that should result when the software is exercised in this way. For example, if we call
isEven()with a value of 2, we would expect it to produce the resulttrue.
Further, a test case is worked out (and written down) before the test is carried out. That is, we figure out what we will do and what result we expect it to produce before running the test. That differentiates testing from simply “running the code to see what happens”.
Of course, it will probably take more than one test case to
determine that some required behavior is fully satisfied. For
example, an implementation of isEven() that always
returns true, regardless of the input value, will pass the example
test case described above. As a result, programmers typically design
collections of test cases that all work together. A collection of
test cases designed for exercising the same piece of software is
called a test suite.
For example, one might design five test cases for
isEven(): one test for a positive even integer,
one for a positive odd integer, one for a negative even integer, one
for a negative odd integer, and one for zero. Another person might
come up with a different test suite for this method, but this group
would have a good chance of successfully demonstrating most of the
simple bugs that could occur in the method in question.
2.3.1.2. Good Test Cases
Even when testing a single method like isEven(), there
are a huge number of test cases to choose from. For 32-bit integers,
there are 232 possible input values we could try. So why
would we pick any one of these values over another to use in a test
case? What makes a test case a “good” test case?
According to Glenford Myers, a good test case is one that:
Has a high probability of finding an error. Since our goal is to demonstrate faults, we should pick test cases that we think have the greatest chance of succeeding.
Is not redundant. If we already have a test case for the value 2, we don’t need another one. Further, why not use some other integer, like 147652? Well, is there any reason to think this test case will have a high probability of finding an error? If we already have other test cases that cover even numbers, why test this number as well? If it simply retests behavior that has already been adequately demonstrated, then it is redundant–it exercises behavior already tested by other test cases in our test suite.
Is “best of breed”. In other words, if there are several redundant test cases you might consider that all cover the same behavior, pick the test case that has the highest probability of finding errors. For example, if we want to test
isEven()on an even negative integer, which value should we pick? Will any random value do? In this case, it might be better to pick the largest negative integer (-231), since it will also check that the method works on an extreme boundary of the integer range.Is neither too simple nor too complex. Suppose you are testing a group of methods on a class, rather than just focusing on
isEven(). You could have a test case that called every single method in the class in some order (and maybe call some methods more than once!). Such a test case might cover a lot of ground–all of the methods would have to work correctly on at least some test values in order for this test case to pass. However, if the test reveals a defect, where is it? It could be in any method, almost anywhere. This is an example of a test case that is too complex, since it involves too many behaviors all in the same series of actions. It would be better to use many smaller test cases, each focused on examining a single behavior, so that the test results would be more meaningful. Similarly, a test case that simply constructed the object and did nothing else might be too simple to reveal any defects. Strive for narrowly focused test cases that are still likely to reveal defects in the behavior they are exercising.
2.3.1.3. Software Testing Approaches
Clearly, exhaustive testing, where every possible execution
sequence is tested, is impractical, even for very simple pieces of
code like isEven(). There are just too many possibilities
to try, and it takes too long. As a result, we need a way to select
an appropriate set of test cases (a test suite) that has a high
likelihood of revealing the most probable defects. Many different
testing methods have been developed for devising test cases, all
with the goal of helping you pick an effective test suite.
The two biggest groups of testing approaches are black-box testing approaches and white-box testing approaches, although others exist as well.
Testing activitives are also characterized according to the nature of the units being tested, and the focus of what you are trying to verify. Some of the most common testing activities are unit testing, integration testing, and system testing.
Black-box testing or functional testing is a term used for a family of testing approaches where the test cases are derived from a specification, an interface definition, or from a behavioral description. In using this strategy, the tester views the software under test as a “black box” whose behavior can only be determined by studying its inputs and the related outputs. For students, this is the approach you use when you think about writing tests using an assignment description.
In contrast, another family of testing approaches is called white-box testing, structural testing, or logic-driven testing. White-box testing approaches require the tester to examine the internal structure of the software under test. In using such a strategy, the tester derives test cases after reviewing the program’s internal logic and structure.
Unit testing is used to describe activities where one is testing a single software “unit” in isolation, independently of any of the other code being written. This is usually the technique you use when you are starting out, writing tests for one class at a time.
Integration Testing: Once individual program components or classes (units) have been tested, they must be integrated to create a partial or complete system. The integration process involves testing combinations of units working together for problems that come up with component interaction. The combination being tested may start out as small as two units interacting, and grow to be the full application. Usually, this is the time when pieces of a full system written by different developers are being tested together.
System testing is where an entire, fully integrated program is tested with respect to its typical working environment. This involves combining the code from all the developers into the full, complete software product.
2.3.1.4. Unit Testing in More Detail
Unit testing is used to describe activities where one is testing a single software “unit” in isolation, independently of any of the other code being written.
Exactly what unit means can vary from one programming language to another, from one programming paradigm to another, and from one organization to another, but is intended to mean a cleanly delimited, identifiable piece of software that can be executed independently. In Pascal, a “unit” is typically a procedure or a function. In object-oriented languages, a “unit” is often a single class, although sometimes it can be a single method. Unless otherwise specified, from here on out we will interpret “unit” to mean a single class in an object-oriented language, unit under test (UUT) to mean the class we are currently testing or writing tests for.
Unit testing is usually carried out by the programmer or programmers that wrote the unit under test (UUT), before the unit is combined with other pieces of software to form a larger application. The goal is to confirm to the greatest extent possible that the unit has no errors of its own before combining it with other software. That is because the smaller the piece of software you are testing, the easier it is to locate and remove defects that are revealed.
For students, it turns out that most of the testing you do on your own assignments is unit testing: testing individual classes in isolation to ensure they meet their individual design requirements.
2.3.1.5. The Benefits of Software Testing
Let us consider some of the benefits of software testing. This should give us a perspective for why we want to employ software testing in our assignments:
It increases your confidence in your code
It increases your understanding of the requirements
It Preempts “big bang” integration problems
It improves your grades
2.3.1.5.1. Software Testing Increases Confidence
When you take a more systematic approach to testing your own software, it increases your own confidence in the correctness of the code you have written. To maximize this benefit, it is important to write tests as you write code, rather than saving all the testing for “the end” once your coding is complete. If you write new tests for each small feature or increment you develop as you go, you can incrementally “grow” a complete test suite piece by piece.
Further, since this test suite covers all the code you’ve written so far, you can re-run all your tests (including the new ones) each time you add a new feature or implement another method. This is where you can reap the biggest increases in confidence–as you develop skill writing tests, and as you run and re-run the tests you have so far against your growing code base, you gain more and more evidence that the code you have written so far works as intended. If any tests fail, you also have a huge leg up in locating the bug, since it is almost certainly in the (small increment) of code you have added since you last ran all your tests. Finally, by writing the tests as you go and re-running them each time you complete a small change to the code, you can tell immediately if any new changes actually break old features that were working before. In other words, you gain greater confidence that new changes do not break or conflict with previously working code.
Testing software in this way promotes incremental development. It promotes the concept of always having a running (although incomplete) version of the program on hand. Most importantly, it promotes early detection and correction of errors introduced by coding changes.
2.3.1.5.2. Software Testing Increases Understanding of Requirements
When you write a new test case, you must write down what output, result, or behavior you expect to occur when the test is run. To do this, you must have a clear understanding of how the program is to behave.
Further, if you are writing tests for all the bits of code you write–as you write them–then you continually ask yourself what is the correct behavior in this case?
Sometimes, you will find the answer in the assignment description (or program specification). Other times, the desired behavior may be up to you, as an internal design choice. Occasionally, the correct behavior may be ambiguous, and you will have to ask an instructor or TA for clarification. The net result is that you will end up with a better understanding of what is truly required. In addition, if you are writing test cases for all these features, you will also end up with much greater confidence that your solution really does meet all of the requirements of the assignment.
Thus, writing tests offers more than simply checking your code. It also increases the depth of your understanding of the assignment and its requirements, by forcing you to articulate your understanding of the behavior you expect in all the test cases you write. This helps you understand the overall system requirements as well as the preconditions and postconditions of every method in your code.
2.3.1.5.3. Preempting “Big Bang” Integration
If you incrementally write tests as you go along, it will also help prevent a specific class of problems that students run into frequently: those associated with “big bang” integration. “Big bang” integration is a term from software engineering that refers to a specific strategy for integrating, or combining, the smaller pieces of your software together to make the final application. The “big bang” strategy is simple, and easy to understand:
Write code for all the units (or classes)
Combine them all together into the final system
Begin performing testing on the whole system, once it is finished
This strategy may seem simple, but it usually results in low quality results (often projects that don’t work at all!). It gets its name from the “big bang” that happens at the end when you first start testing the final system: nothing works, and it usually requires a huge (and draining) burst of time, energy, and effort to try to squash as many problems as possible before the project’s deadline. In the end, the project must be turned over as-is, with many faults still unfixed.
Believe it or not, many commercial software projects used this strategy long ago, with the same results. Also long ago, development organizations learned how to prevent it with incremental integration and testing. The root of all the problems is that with the big bang approach, when system-level tests fail (and they certainly will) there is no easy way to locate the defects. The bugs you find could be anywhere in the entire system, and it takes time and skill to narrow the search until you localize the source of the failure. This takes far more time and effort than necessary.
If you save all your testing until the end, you definitely risk suffering this same fate. Your best tool for preventing “big bang” integration is to write tests and run them incrementally as you develop your solution. Alternate back and forth: “write a little test, write a little code”. Continually re-run your tests. Add units (classes) together a few at a time and test their interactions. Put together a small (possibly incomplete) final program and test it, then incrementally integrate and test features, rather than putting everything together at once.
By taking an incremental approach to both testing and integration, you ensure that you are testing relatively small pieces of code at any given time. Thus, defects are easy to localize, since they are in the newest piece of code you have written, or the newest unit you have integrated into the system. This immediately narrows your focus in finding bugs. And constantly re-running your existing tests when you fix bugs helps you ensure that your fixes don’t accidentally break anything else you’ve written.
When you choose this approach to integration, your software testing efforts also provide a lively sense of progress, because you are always clearly aware of the growing size of your test suite and how much of the required behavior is already “in the bag” and verified.
2.3.1.5.4. Software Testing Improves Grades
OK, here’s the bottom line. We’ve been requiring students to do their own testing for several years, and we’ve also studied the results.
Students who write their own tests produce fewer bugs: about 28% fewer bugs on average per thousand lines of program code (not including comments, of course). And that is the average, with some students eliminating many more bugs than that. Further, our published research indicates that everyone benefits across the board: even the weakest students improve their code quality when they do their own testing, and they often make greater improvements than the strongest students, since they have more room to grow.
Students who write their own tests are more likely to turn assignments in on time: Our experiences show that students writing their own tests are more likely to turn assignments in on-time and avoid late penalties, when compared to students who are not required to turn in tests along with their code. This is a statistically significant difference, and avoiding late penalties results in higher scores on assignments.
Student programs are more likely to be complete and correct: In our studies of a junior-level class, before students were encouraged to test incrementally and required to turn in their tests, they rarely produced bug-free programs. Even the best students still submitted work with significant behavioral faults. Once we began requiring students to write and turn in their own software tests (on which they were graded), nearly 20% of the final submissions from students were completely or nearly bug-free.
In short, if you test your code, you are more likely to complete assignments, are less likely to turn assignments in late, and more likely to receive higher grades. Empirically, it also appears that your programs are more thoroughly tested with about 28% fewer bugs.
2.3.1.6. Test Driven Developement (TDD)
Test-driven development (TDD) is a programming technique that involves constantly alternating between writing one or more small test cases, and then writing a small increment of code, so that you can gradually build up a working code base one piece at a time. There are three principal ideas behind TDD:
Test first. That is, each time you are about to write some part of your solution, first write down the test cases that are necessary to confirm your solution works the way you want, and only then write the code. For this reason, TDD is also known as test-first coding.
Write in tiny increments. Rather than writing large chunks of code at once, you should add new code in “baby steps”: one small method, or one small piece of a method at a time, writing a new test case or two for each small bit.
For example, the
isEven()discussed earlier is small enough that you could write test cases for it, then write the method body in one step (just one line of code is needed), and finally run your test cases and debug as necessary.However, if you were writing a method with more complex behavior, it can be far too complex to write in one step. Consider a method that takes three numbers representing the lengths of the three sides to a triangle, where the method is supposed to return whether the corresponding triangle is equilateral, isosceles, or scalene, while reporting that the numbers do not form a triangle if no triangle exists with those side lengths.
If you are writing tests for this method, you will need to check many distinct types of situations. Does it handle zero-length sides? Does it handle negative numbers? Does it handle lengths that do not form any triangle? What about isosceles? Equilateral? Scalene? You can separate each of these “cases” or branches in your solution’s logic into a separate small increment. Write the test cases you want to have for zero length sides. Then just implement that part of the method and run your tests. Next, add test cases for negative numbers, add just the extra code for this case, and re-run all your tests. Proceed through the remaining cases one step at a time, writing a few tests and then writing the code that implements the corresponding behavior.
Using case analysis–that is, breaking a problem down into two or more subproblems, and defining the conditions under which one or another of these subproblems applies–is a powerful problem-solving tool. It comes up all the time in computer science, and provides a neat way to break apart complicated methods into smaller steps that can be incrementally tested.
“When the bar is green, the code is clean.” This maxim of TDD characterizes the third key idea: each time you add a small piece of code, you re-run all of the tests you have for the unit under development, and you do not move on to the next step until all of your tests pass 100%.
In short, add a small number of tests first, then add the corresponding (small) piece of code, run all your tests, and debug any problems immediately. You’re never ready to move to the next coding step (or finished with your solution, or ready to contribute your code to an open source project, etc.) unless all your tests pass. Your test cases are your expression of what “correct behavior” is for your code. Thus, these test cases are your yardstick for measuring your success, and as you incrementally grow your test suite, you can see how close you are to completing all the required behavior.
Most testing tools for automatically running your test cases will show you a progress bar as the tests run, and color it green as long as tests are successful, and red when any tests fail.
A successful test in traditional testing finds one or more defects. But in TDD, when a test fails you have made progress because you now know that you need to resolve the problem. TDD increases your confidence that your system actually meets the requirements defined for it and that your system actually works. It is said that you should “test with a purpose” and know why you are testing something and to what extent it needs to be tested. Also with TDD, when you achieve a well tested program then every single line of code is tested. In general, this is something that traditional testing does recommend, but does not guarantee.
2.3.1.7. Learn More About TDD
TDD is all about writing “clean code that works.” Here are some quotes (from Kent Beck) that intuitively describe TDD:
The style here is to write a few lines of code, then a test that should run, or even better, to write a test that won't run, then write the code that will make it run. ... [After figuring out how to write one small piece of code ...] Now, instead of just coding on, we want to get immediate feedback and practice "code a little, test a little, code a little, test a little." [... So we immediately write a test for it.]
TDD grew out of Extreme Programming and evolved from the simple XP idea of “build a little, test a little” during coding. Basically, your code always has a complete set of tests that exercises its capabilities, and you write new tests as you add to your code.
A significant advantage provided by TDD is that it enables you (encourages you!) to take small steps when writing software. For instance, suppose you add a small piece of new code, compile, and test it. Sooner or later when you do this, one or more of your tests will fail because of one or more defects in your code. However, by proceeding in small steps, it is much easier to find and fix those defects. The problem is most likely in the tiny bit of code you just wrote, since all the other code passes all the other tests you’d previously written. If some previously working behavior breaks, again it is probably a result of interference caused by the newly added code. And bugs are so much easier to find if you have only written five new lines of code rather than five hundred, or five thousand.
2.3.2. Writing Your First Software Test
Writing software tests for each method as you go is your best defense for confirming you understand what your code does, confirming your code behaves the way you intend, and finding problems as soon as possible so they won’t cause trouble later. The longer you put off testing, the harder it is to find problems, and the more bugs you’ll have to fix–if you let too many pile up, it gets increasingly challenging to get your code to work at all.
Suppose you have created a Jeroo subclass named FlowerPicker and
you are writing a method to pick a row of flowers. How will you test
this method? Each software step has three key parts, even if sometimes
the part is extremely simple:
Set up the initial conditions for your test (create any objects needed, place them in the correct state, put everything necessary where it needs to be, etc.).
Call the method you are testing.
Check that the behavior you expected has occurred. This could involve checking the return value of the method, or checking the state of the objects involved in the test. Be sure to check everything you expect to happen, not just the most obvious item.
So, if your FlowerPicker has a pickFlowers() method that you
want to test, you need to place it in an environment where you can
test it out. You are in charge, which means you can set up exactly the
situation you need. For example, you could create your own island, and
place flowers on it. Consider this island, which has several rectangular
areas of flowers already placed on it:
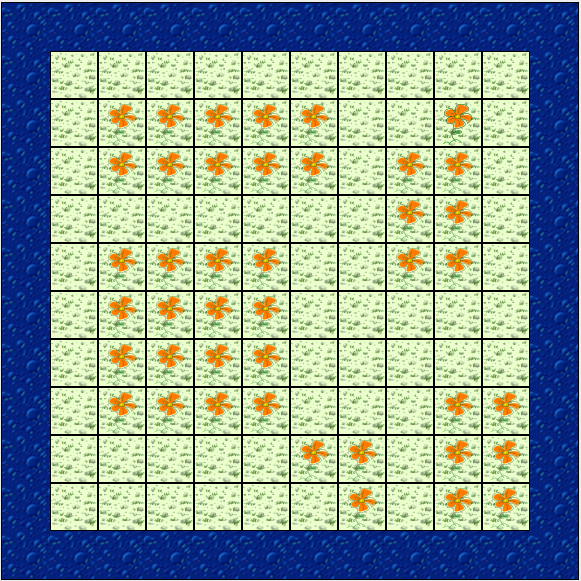
While you can certainly make up your own island for any tests you need
to write, let’s work with this one, which is called Lab04Island.
To create your software tests, what do they look like and where do they
go? We will write our software tests as plain old Java methods, one
method per test case. Like all Java methods, you place them inside of
some class. But what class? We will use a separate Java class to hold
our tests, and call it a test class. Since our Jeroo subclass is
called FlowerPicker, we will place its software tests in a new
Java class called FlowerPickerTest.
Note
By convention, all our test classes will be named after the class
they are testing with Test added on the end of the name.
A common mistake is to place Test at the front of the name
instead of the end, so always double-check your test class names.
To create a test class in BlueJ, right-click on the class you want to test and choose “Create Test Class” from the menu. BlueJ will create a new test class with the correct name for you.
Since our class is a Jeroo class, be sure to add the following import statements at the top. Import statements are how we say we wish to access library classes in our code–if we don’t say so, we can’t use them. Add the following at the top:
import student.micro.jeroo.*;
import static student.micro.jeroo.CompassDirection.*;
import static student.micro.jeroo.RelativeDirection.*;
Each test case that we write will come in the form of a single
test method. We name our test methods using a name that starts with test,
followed by a description of the method we are testing, and the
situation captured in this test case, if there are multiple situations.
We can write our first test in the FlowerPickerTest class like this:
public void testPickFlowers()
{
    // 1. set up initial conditions

    // 2. call the method

    // 3. check expected results
}
To set up the conditions for the test, we can create an island, create the jeroo, and place it on the island in the spot we have picked. We can place the Jeroo at (1, 2) just in front of the flower closest to the top left corner (note that these conditions, and the associated method may be different from your lab assignment, if you have one, and are just an example to show the process):
public void testPickFlowers()
{
    // 1. set up initial conditions
    Lab04Island island = new Lab04Island();
    FlowerPicker picker = new FlowerPicker();
    island.addObject(picker, 1, 2);

    // 2. call the method

    // 3. check expected results
}
The method we want to test is pickFlowers(), so calling the method
once the Jeroo has been placed on the island is easy:
public void testPickFlowers()
{
    // 1. set up initial conditions
    Lab04Island island = new Lab04Island();
    FlowerPicker picker = new FlowerPicker();
    island.addObject(picker, 1, 2);

    // 2. call the method
    picker.pickFlowers();

    // 3. check expected results
}
Finally, we have to consider what we expect to happen. We expect
pickFlowers() will pick the whole first row of flowers until it runs
out. However, how do we say that? How many flowers does the Jeroo pick?
what (x, y) location does the Jeroo end in? Which direction will the
Jeroo be facing? For any Jeroo, you already know the basic attributes
that Jeroos have. However, you may also wish to check the state of
the island as well. How many flowers will it have, or will it be
missing flowers in specific locations?
If you look carefully at the map of the island, when the Jeroo is
placed at (1, 2) facing east, the flower at (2, 2) will be directly
in front of it. The row of flowers starting at (2, 2) going east
contains five flowers before it ends, with the last flower at (6, 2).
So perhaps you might expect that after running pickFlowers(), the
following will be true:
The jeroo will be at (6, 2)
The jeroo will have picked 5 flowers
The jeroo will still be facing east
How can we write this in code? We write our expectations in our test case methods using a special structure that consists of regular Java methods, but we’re using them in a very stylized way. Our expectations will use a form designed to make them clearly readable. To start, we will use this basic form, which we will build on as our programs grow:
assertThat(<something we want to check>).isEqualTo(<expected value>);
So, we can translate our jeroo expectations into the following code:
assertThat(picker.getX()).isEqualTo(6);
assertThat(picker.getY()).isEqualTo(2);
assertThat(picker.getFlowers()).isEqualTo(5);
assertThat(picker.getHeading()).isEqualTo(EAST);
We can add these to our test case method:
public void testPickFlowers()
{
    // 1. set up initial conditions
    Lab04Island island = new Lab04Island();
    FlowerPicker picker = new FlowerPicker();
    island.addObject(picker, 1, 2);

    // 2. call the method
    picker.pickFlowers();

    // 3. check expected results
    assertThat(picker.getX()).isEqualTo(6);
    assertThat(picker.getY()).isEqualTo(2);
    assertThat(picker.getFlowers()).isEqualTo(5);
    assertThat(picker.getHeading()).isEqualTo(EAST);
}
Now we can actually compile and run our code. Actually, it may fail to
compile, because we haven’t even written our pickFlowers() method
yet! We can add a method stub for pickFlowers() to the FlowerPicker
class so our test will compile:
public void pickFlowers()
{
    // To be filled in later
}
Now our test class will compile. By right-clicking on the test class after everything is compiled, we can choose “Run All Tests” to execute the tests we have so far. BlueJ will execute our tests, showing the following result:
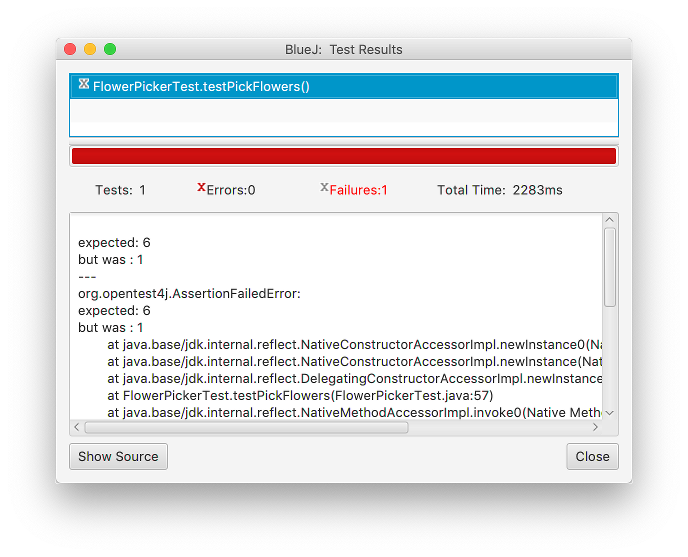
The test results window will show all the test cases run in the top half, with
a check mark by each passing test and an “X” in front of each failing test.
Click on any failing test to see the corresponding message in the bottom
half of the window. Here, the very first expectation (that the Jeroo will
end with an x-coordinate of 6) is not met, because we haven’t implemented
pickFlowers() yet and the Jeroo didn’t move at all. Our test is working,
but it is telling us that pickFlowers() is not behaving as we intend.
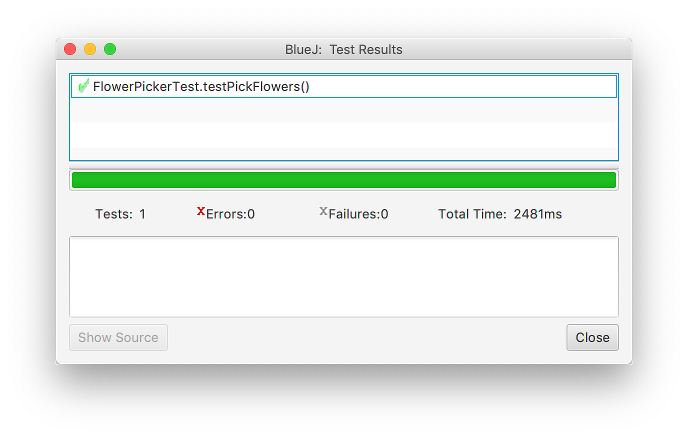
Now we can implement pickFlowers() to pick up a row of flowers (this
may not be the same behavior you might need in your assignment(s)):
public void pickFlowers()
{
    while (this.seesFlower(AHEAD))
    {
        this.hop();
        this.pick();
    }
}
If you run your tests again, this time they work. As the saying goes, “If the bar is green, the code is clean.”
For more complicated methods that handle multiple situations or conditions, write a separate test case for each situation or condition. Your initial conditions will be different, and in fact your expected results may also be different. But if you don’t write tests, you won’t know whether or not problems exist.
When testing with jeroos, Remember the following examples of methods you can mix and match to express conditions and fill in your own values (be sure to use your own jeroo name, of course):
assertThat(jeroo.getX()).isEqualTo(...);assertThat(jeroo.getY()).isEqualTo(...);assertThat(jeroo.getFlowers()).isEqualTo(...);assertThat(jeroo.getHeading()).isEqualTo(...);assertThat(jeroo.hasFlower()).isTrue();assertThat(jeroo.seesJeroo(AHEAD)).isFalse();assertThat(jeroo.seesWater(LEFT)).isTrue();
You can also express your expectations about the island (remember to choose your own values and use your own island name):
assertThat(island.countFlowers()).isEqualTo(...);assertThat(island.countNets()).isEqualTo(...);assertThat(island.hasFlowerAt(3, 7)).isTrue();assertThat(island.hasNetAt(4, 2)).isFalse();
There are virtually unlimited options for how to express what behavior you intend to occur in a test case, but these methods will get you started with writing your first tests.
2.3.3. Check Your Understanding: Software Testing Concepts
2.3.4. More About Methods
A method, which corresponds to an action or a behavior, is a named chunk of code that can be called upon or invoked to perform a certain pre-defined set of actions.
A method definition consists of two parts: the method header and the method body. In general, a method header takes the following form, including some parts which are optional:
Modifiersoptional ReturnType MethodName(ParameterListoptional)
Put together, a method definition may look like this:
public int addHops()
Above, this method starts with the access modifier, public, to declare
that this method can be accessed or referred to by other classes. The next part
of the method header is the method’s return type. This is the type of value, if
any, that the method returns. In the method declaration above, we specify that
the method returns an int value as its result. When we’ve been writing
methods so far, we’ve written methods like this:
public void pickFlowersAndDisableNets()
Instead of an int here we see the keyword void which means the method
does not return anything and is only being called for the action it performs,
without expecting it to return an answer of some kind. We’ll get more into
return types later.
In the method declaration, the method’s name follows the method’s return type. This is the name that is used when the method is called. We could call the method anything we wanted, but spaces cannot be included. Following the method’s name is the method’s parameter list which we’ll talk about in the next section.
2.3.5. Check Your Understanding: Method Signatures
2.3.5.1. Passing Information using Parameters
Some of the methods we have used require arguments, which are the values you
provide when you invoke the method. For example, a Jeroo has two methods
with the name ‘hop’. Calling hop() will cause the jeroo to hop one space
ahead. However if you specify a number inside the parentheses like this:
hop(4), the jeroo will hop four spaces ahead.
When you use a method, you provide the arguments. When you write a method, you name the parameters. The parameter list indicates what arguments are required.
For example:
public void turnAndDisable(RelativeDirection direction)
{
    this.turn(direction);
    this.toss();
}
To invoke this method, we have to provide a relative direction as an argument:
turnAndDisable(RIGHT);
This will cause the jeroo to turn right and disable a net.
2.3.5.2. Using Multiple Parameters
Here is an example of a method that takes two parameters:
public void turnThenHop(RelativeDirection direction, int hops)
{
    this.turn(direction);
    this.hop(numHops);
}
To invoke this method, we have to provide an integer and a relative direction as arguments:
turnThenHop(RIGHT, 7);
This would cause the jeroo to turn right and then hop seven times.
2.3.6. Check Your Understanding: Methods with Parameters
2.3.7. Good Habits for Conditionals
Just like with commenting, readability is an important factor when writing conditionals.
2.3.7.1. Logical NOT and the If-Else Structure
One thing to consider is that when writing if/else statements, starting with a ! usually makes code harder to read.
if (!this.isClear(AHEAD))
{
    this.toss();
}
else
{
    this.hop();
}
It’s easy to miss the ! above and misread what this conditional does.
Instead, it’s preferable to phrase the same condition like this:
if (this.isClear(AHEAD))
{
    this.hop();
}
else
{
    this.toss();
}
You can see that logically these two if-then-else structures achieve the same thing, but one is easier to read.
Note
Keep in mind, this may not always be possible for you to write the right
condition without using the ! operator. Especially if you have no
else clause, you may need to use it, but it is good practice if you can
get around it.
2.3.7.2. Too Many Conditionals
Another thing to keep in mind is writing too many conditions. When solving a complex problem it can be tempting to just keep adding new conditions for every new scenario you find yourself in. However, this is both harder to read and can introduce bugs into your code that could be hard to find later.
Take for example:
if (this.isClear(AHEAD))
{
    this.hop();
}
else if (!this.isClear(AHEAD))
{
    this.toss();
}
else
{
    this.turn(RIGHT);
}
Logically, the if and else-if branch of this conditional do the same things as
we saw above. However, there is a third branch here that will never execute.
This is because the area ahead of the jeroo will always be either clear or
not clear.
The code will always find a branch to execute between the first two choices,
and there is never any situation where the else branch will ever be
applicable.
In computer terms, code that you write that can never be executed under any possible circumstances, is called unreachable code. Such code is usually a programming problem, since the reason it can never be executed is often due to improperly constructed programming logic, as in the example here. The first two branches cover all possible situations, so the third option is useless.
If you’re not entirely sure if two boolean statements are equivalent, it can
be helpful to write out a truth table. For example, we can see below that
writing b and !!b are equivalent.
|
|
|
|---|---|---|
True |
False |
True |
False |
True |
False |
Whatever value b has, we can see that !!b matches it!
2.3.7.3. Empty Condition Branches
It is also good practice not to leave empty conditions in your code.
if (this.isClear(AHEAD))
{
    // do nothing
}
else
{
    this.turn(RIGHT);
}
It is always preferred to have just one if statement rather than an empty if-else.
if (this.isClear(AHEAD))
{
    // do nothing
}
else
{
    this.turn(RIGHT);
}
Here, it would be preferred to use the ! operator rather than to have empty
conditions:
if (!this.isClear(AHEAD))
{
    this.turn(RIGHT);
}
2.3.7.4. Many Conditions vs Compound Conditions
Taking a look at the following code snippet:
if (this.isClear(AHEAD))
{
    if (this.seesNet(RIGHT))
    {
        this.turn(RIGHT);
    }
}
Here we see one condition nested within another. It is generally preferable to instead write the same condition like this:
if (this.isClear(AHEAD) && this.seesNet(RIGHT))
{
    this.turn(RIGHT);
}
2.3.7.5. More Complex Conditionals
Sometimes you want to check related conditions and choose one of several actions. One way to do this is our cascaded if structure:
if (molly.isFacing(NORTH))
{
    molly.hop();
}
else if (molly.isFacing(SOUTH))
{
    molly.hop(2);
}
else if (molly.isFacing(EAST))
{
    molly.hop(3);
}
else
{
    molly.hop();
    molly.toss();
}
These chains can be as long as you want, although they can be difficult to read if they get out of hand.
You can also make complex decisions by nesting one conditional statement inside another. We could have written the previous example as:
if (molly.isFacing(WEST))
{
    molly.hop();
    molly.toss();
}
else
{
    if (molly.isFacing(NORTH))
    {
        molly.hop();
    }
    else if (molly.isFacing(SOUTH))
    {
        molly.hop(2);
    }
    else
    {
        molly.hop(3);
    }
}
The outer conditional has two branches. The first branch tells the jeroo to hop once and toss, and the second branch contains another conditional statement, which has three branches of its own.
These kinds of structures are common, but they get difficult to read very quickly. Good indentation is essential to make the structure (or intended structure) apparent to the reader.
2.3.8. A Different Type of Complex If-Statement
Another way if statements can get more complex is by creating longer compound conditionals.
For example,
if ((caroline.isFacing(NORTH) && caroline.hasFlower())
    || caroline.seesNet(AHEAD))
This statement could be generalized to if (A || B) where:
A = caroline.isFacing(NORTH) && caroline.hasFlower()B = caroline.seesNet(AHEAD)
If the jeroo has a flower while facing north OR sees a net ahead of it, this if
statement will trigger. Notably, if the jeroo only has a flower the logical AND
will force the statement caroline.isFacing(NORTH) && caroline.hasFlower()
to be false. Thus, the jeroo would have to see a net ahead for this if
statement to trigger.
Logical NOT can also negate a compound statement.
if (!(caroline.isFacing(NORTH) && caroline.hasFlower()))
Remember, for caroline.isFacing(NORTH) && caroline.hasFlower() to be true,
the jeroo must have a flower and be facing North.
Writing !(caroline.isFacing(NORTH) && caroline.hasFlower()) will be true
as long as the compound condition within the parentheses is false.
When looking at these sort of complex operations, it is easy to get mixed up. When considering negated compound conditions re-writing them according De Morgan’s laws may be helpful to you:
!(A && B)is the same as!A || !B!(A || B)is the same as!A && !B
Using this, instead of writing
if (!(caroline.isFacing(NORTH) && caroline.hasFlower()))
It is be logically equivalent to write:
if (!caroline.isFacing(NORTH) || !caroline.hasFlower())
Again, if we use a truth table we can see these two columns match:
|
|
|
|
|
|
|
|---|---|---|---|---|---|---|
True |
True |
True |
False |
False |
False |
False |
True |
False |
False |
True |
False |
True |
True |
False |
True |
False |
True |
True |
False |
True |
False |
False |
False |
True |
True |
True |
True |
2.3.9. Short Circuit Evaluation
Another important feature of the boolean operators is that they utilize a form of evaluation known as short-circuit evaluation. In short-circuit evaluation, a boolean expression is evaluated from left to right, and the evaluation is discontinued as soon as the expression’s value can be determined, regardless of whether it contains additional operators and operands. For example, in the expression
basil.isFacing(WEST) && basil.seesNet(AHEAD)
if basil.isFacing(WEST) is false, then the AND expression must be false.
Because the computer already knows the whole AND expression is false, it
will not evaluate basil.seesNet(AHEAD), since there is no need.
Similarly, in the expression:
basil.isFacing(NORTH) || basil.seesNet(AHEAD)
if basil.isFacing(NORTH) is true, then the computer knows the whole
OR expression will also be true, and so it will not evaluate
basil.seesNet(AHEAD), since it is unnecessary.
2.3.10. Check Your Understanding: Logical Equivalence
2.3.10.1. Relational Operators with Primitive Data Types
Relational operators are used to check conditions like whether two values
are equal, or whether one is greater than the other. These kinds of operators
do not work on objects at all, so you cannot use them on jeroos. However,
they work on numeric values such as ints. The following expressions
show how they are used.
Operator |
Example |
Meaning |
|---|---|---|
|
|
x is equal to y |
|
|
x is not equal to y |
|
|
x is greater than y |
|
|
x is less than y |
|
|
x is greater than or equal to y |
|
|
x is less than or equal to y |
The result of a relational operator is one of the two Boolean values: true
or false. These values belong to the data type boolean; in fact, they
are the only boolean values.
You are probably familiar with these operations, but notice that the Java operators compare program values. They behave similar to the mathematical operators you are familiar with, but are not written the same way as mathematical symbols like =, ≤, and ≠.
A common error is to use a single = instead of a double == when you wish to compare two values. Remember that = is the assignment operator, and == is a comparison operator. Also, writing =< or => by accident will produce a compiler error. The equals sign always comes after the < or >, just like when you say the names of those comparisons in English: “less than or equal” has the less than symbol first, followed by the equal sign second.