
3.3. Pictures and For-each Loops
In this chapter, you will learn the basics of computer image representations and how simple image manipulation can be accomplished.
3.3.1. First, the Basics
This short video explains pixels, RGB color, and how images can be transformed by changing pixels:
3.3.1.1. A Pixel Class
A digital image is composed of a two-dimensional grid of dots. The dots are called pixels, a contraction of “picture element”. When magnified the individual pixels can be observed. The number of pixels that compose an image determines the quality of the image (resolution). The more pixels (e.g., 640 x 480; listed as horizontal x vertical numbers, or width x height), the higher the resolution.
In our programs, Pixel is a class that represents a single pixel
(or “picture element”) that represents a single tiny dot or square making up
the image. This class provides methods that allow you to retrieve its color
components or modify its color. You will primarily use this class to read or
change the color of single pixel in the image. A <code>Pixel</code> object
provides getter methods to read the 4 key components of its color:
getRed(), getGreen(), getBlue(), and getAlpha(). It also
provides corresponding setter methods to change each of these color
values: setRed(int), setGreen(int), setBlue(int), and setAlpha(int).
All of these methods work with integer values between 0-255, just as explained
in the video above.
3.3.1.2. RGB Colors
Each pixel value is represented as three int components, red, green, and
blue, each with a potential value from 0 to 255. We often talk about a color
as a set of 3 ints in this way. For example, the RGB value (0, 0, 0)
represents black (zero intensity of all three colors) and the RGB
value (255, 255, 255) represents white (maximum intensity of all three colors).
For more examples, take a look
at an RGB color table.
With three integer values, we can represent any given color as a point on a three dimensional color “cube”:
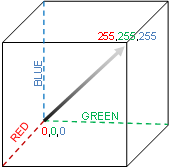
This sort of cube is called a three dimensional Color Space. You can see from the image above that there’s a straight, diagonal line from black at (0,0,0) to white at (255, 255, 255) that represents different shades of gray.
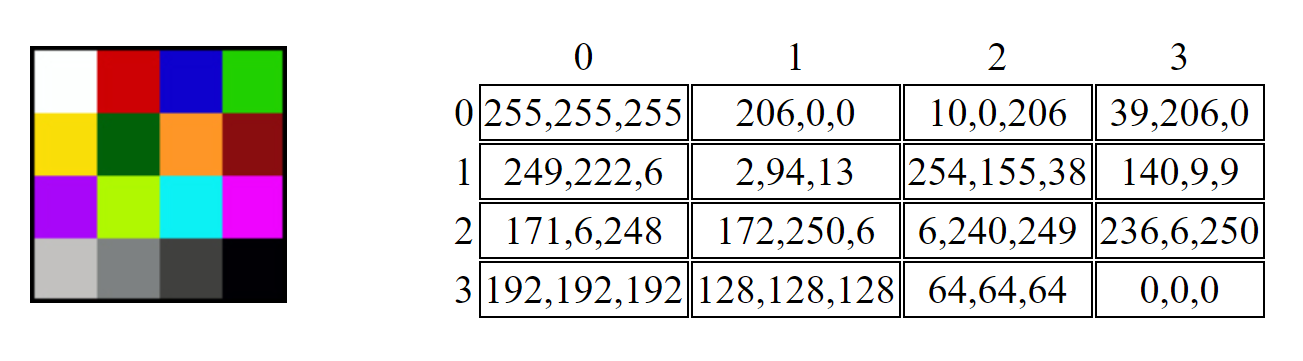
In the figure below we can see a series of colors on the left, and their RGB values in the same location on the right. For example, you can see a white square on the top left corner of the left grid, and the RGB value for white in the top left corner of the grid on the right:
To alter an image, we can simply change the RGB values of some or all of the pixels. This task can be accomplished with image processing programs such as Adobe Photoshop. However it is also possible to transform an image using simple programs like those we write in this course.
The basic methods the Pixel class provides for working with RGB colors are:
| Pixel Method | Description |
|---|---|
int getRed() |
Get the red intensity (an integer from 0-255) |
int getGreen() |
Get the green intensity (an integer from 0-255) |
int getBlue() |
Get the blue intensity (an integer from 0-255) |
void setRed(int) |
Set the red intensity to a value from 0-255 |
void setGreen(int) |
Set the green intensity to a value from 0-255 |
void setBlue(int) |
Set the blue intensity to a value from 0-255 |
int getX() |
Get the x coordinate where this pixel is located in the image |
int getY() |
Get the y coordinate where this pixel is located in the image |
void setColor(int red, int green, int blue) |
Set all three color values at once |
3.3.1.3. Imagining How Pixels Work
You could imagine how the Pixel class might work on the inside,
even if there are many different ways pixels can be represented.
As an example, you might imagine it is defined this way:
public class Pixel
{
    private int rValue;
    private int gValue;
    private int bValue;

    private int xCoord;
    private int yCoord;

    public Pixel(int x, int y)
    {
        this.xCoord = x;
        this.yCoord = y;

        this.rValue = 0;
        this.gValue = 0;
        this.bValue = 0;
    }

    public int getRed()
    {
        return this.rValue;
    }

    public void setRed(int rValue)
    {
        this.rValue = rValue;
    }

    // getter and setter methods for the other colors would go here
}
Notably, since we want any given Pixel object to represent a single pixel
on screen, we would probably not create setters for xCoord and yCoord
since we wouldn’t want other code to be able to change which pixel we were
talking about. While the actual Pixel class is slightly more complicated
than this, the basics shown here help one reason about the capabilities
that the Pixel class provides and how the getter and setter methods
behave.
3.3.1.4. A Picture Class
Picture is a class that represents a single image that can be displayed
on the screen. We will be using this class to represent images that you
will be manipulating.
There are several ways you can access the pixels in a Picture. First,
the Picture class provides a method to access any pixel in the image:
Picture image = new Picture("image.png");
Pixel corner = image.getPixel(0, 0);
corner.setRed(0);
corner.setGreen(0);
corner.setBlue(255);
This code segment turns the upper left corner pixel of the image to blue. The
getPixel() method allows us to access any pixel in the image, and the
Picture also provides getWidth() and getHeight() accessors to
determine the image’s size. However, if we want to make changes across the
entire image, it would be preferable to use a loop over all of the
pixels.
3.3.2. For Each Loops
Up until now, we have created while loops in our programs. These types
of loops are really useful when we know what condition we need to reach in
order to be finished (or to stop), even if we don’t necessarily know how long
it will take to get there. For example, a while loop is a perfect fit for
when we want a Jeroo to hop as long as it continues to see flowers, no matter
how many flowers it will see.
However, there are drawbacks to these loops as well. It is possible to make a mistake in writing the condition, so the loop will not stop in the correct place, or possibly not at all (!). Also, it is possible to make a mistake inside the loop so that the steps performed do not take us closer to our goal.
However, another common use for a loop is to perform some action on every item in a group or collection. In this situation, we want the loop to repeat once for every item in the group, and stop once we have handled all of the items. In this situation, Java provides a different kind of loop that does more of the work for us, and helps us ensure the loop operates correctly. This kind of loop is called a for-each loop, and it is the best fit when you wish to repeat some action for all items in a group. This is because a for-each loop does not run the risk of mistakes in writing the loop condition or in advancing closer to the goal–the loop provides all of the decision making itself. It will always look at each item in a collection once, then move on to the next one, then finish. You don’t write any conditions yourself, so there’s no way to make a mistake with them.
A Picture is actually a big group of Pixels. The Picture
class provides a method called getPixels() that allows you to repeat
over all the pixels in the image. We can use this in a for-each loop
like this:
Picture image = new Picture("image.png");

for (Pixel pix : image.getPixels())
{
    pix.setRed(255);
}
In English, the code above, would read “for each pixel in the image, set its red intensity to 255.”
3.3.2.1. The For-Each Loop Syntax
The template we use when writing a for-each loop looks like this:
for (<datatype> <variable-name> : <collection>)
{
    // body of for-each loop
}
Here, the <collection> is the group or collection of objects to repeat over.
In the example above, the collection is all the pixels in the image.
The <datatype> is the type of a single item in the group–in our example,
that is a single Pixel. Finally, in addition to providing the collection
and the type of a single element, a for-each loop also requires a new
variable name that we can use as the name for a single item from the
collection. Within the body of the for-each loop, we can use this name to
talk about the current item as the loop repeats.
Looking at this, you should see some similarities to the other control
structures you have seen in this class. We have a keyword (in this
case for), a set of parentheses around the phrase that “controls” how
the loop operates, and a pair of curly braces surrounding a group of
statements making up the body.
Inside the parentheses, the <datatype> and <variable-name> form a local variable declaration, similar to others you have written yourself.
for (Pixel pix : image.getPixels())
{
    pix.setRed(255);
}
Here, we are declaring a variable called pixel that is of type Pixel.
This variable is only usable within the curly braces of the for-each
loop–the loop’s body. After that closing curly brace, you cannot use or
reference pixel. But inside the body of the loop, you can use that
variable name to refer to the current element to perform any actions on
it that are needed.
Instead of completing our variable declaration with an equal sign and initial
value, however we use a colon (:) followed by the collection of items.
The loop will repeat for all items in that collection, and each time the
loop repeats, the local variable in the loop will take on the value of the
next item in turn.
The first time through this loop, pixel would represent the Pixel
object at index (0, 0). Once the body of the loop had executed once, pixel
would change to represent the Pixel object at index (1, 0). The
loop repeats through all the pixels in row 0 horizontally across the top of
the picture, before moving on to the next row beginning at (0, 1), and going
through the rows one at a time until all pixels have been handled.
Once the loop body has executed once for each pixel in the image, the loop
will terminate and proceed to any code following the loop.
3.3.2.2. Using Outside Variables in Loops
One of the strengths of a for-each loop are the guarantees it provides about always repeating for all objects in a collection, and never making mistakes that lead to non-terminating loops. However, one limitation is that the variable introduced in the loop only refers to one item in the group, and is only accessible inside the body of the loop.
However, sometimes we want to gather information as the loop repeats that we can use after the loop is over. To do this, we need to introduce one or more other variables of our own before the loop, so that we can update them during the loop to remember the information we need, and still access them after the loop is done.
For example, we might want to remember the strongest red value seen anywhere in the image. We could do this by introducing a variable to remember the largest red intensity seen so far, and update it each time the loop repeats:
public int getMaxRed(Picture image)
{
    int maxRed = 0; // set to minimum value to start
    for (Pixel pix : image.getPixels())
    {
        if (pix.getRed() > maxRed)
        {
            // if this pixel has more red than any we've seen before,
            // remember it
            maxRed = pix.getRed();
        }
    }
    return maxRed;
}
When the variable maxRed is initially declared, it is initialized to 0.
Many programmers would call this variable an “accumulator” because it holds
an answer that we are building incrementally as our loop proceeds through
all the pixels. Essentially, at any point in time maxRed represents
the largest red intensity we have seen so far, in all the pixels the loop
has gone through. Before the loop runs, we set it to the minimum possible
intensity, because we know that every pixel in the image will have a red
intensity value that is zero or greater.
Inside the loop, we use an if statement to compare the current pixel’s red
value against the biggest we’ve seen so far, and if it is bigger, we use
an assignment statement to update maxRed with the new “largest” value.
Each time we go through the loop, we update maxRed only if we see a
larger value, and leave it alone if we don’t. When the loop finishes, we
will have repeated over all possible pixels in the image, and maxRed
will then equal the largest red value from any pixel in the entire picture.
3.3.3. Check Your Understanding: For-Each Loops
3.3.3.1. Methods on Pictures
The Picture class provides the following methods you can use:
| Picture Method | Description |
|---|---|
new Picture(String) |
Use this constructor to create a Picture
from an image file by providing the file name in double-quotes |
new Picture(int width, int height) |
Use this constructor to create a new, blank Picture
with the specified dimensions |
int getWidth() |
Get the width of this image, in pixels |
int getHeight() |
Get the height of this image, in pixels |
Pixel getPixel(int x, int y) |
Get the pixel at the specified location |
Pixel[] getPixels() |
Get all the pixels in the image in a form suitable for use in a for-each loop |
void show() |
Show this picture on the screen |
void repaint() |
Update the on-screen image shown using show() |
void hide() |
Hide the image shown on the screen using show() |
void explore() |
Show the image using an image explorer view that allows you to inspect the color of any pixel in the image |
void reload() |
If this image was loaded from the file, throw away any changes made to the image and reload it fresh from the original file to restore it to its original appearance |
From the methods above, you can see that you can show() an image
on-screen so you can see what it looks like, and then repaint() it
if you make any changes so you can see the updated version of the
image. The Picture class also provides an explore() method that
opens up a separate window displaying the image that allows you to click on
any location in the image to see its coordinates and color value. The
explore() method can be useful when you need to inspect an image’s
details.