
1.3. Inheritance and Polymorphism: Subclasses and Methods
“Computer Science is not programming. Rather, programming is the medium for our art, just as writing is the medium for English and other majors. First, we teach you how to express your problem-solving through this medium, and then you practice artful problem-solving in many delightful subdisciplines. In this class, it will be as if you learn to think and write in a new way. Learning to program is transformative and empowering.” – Todd Neller
1.3.1. The Jeroos of Santong Island
Move into basic Java programming in the context of a wildlife simulation on an exotic island.

1.3.1.1. Welcome to Santong Island
Santong island is an uninhabited speck of land in the South Pacific Ocean. In the late 1980’s, naturalist Jessica Tong discovered two previously unknown species that are unique to this island. One is the jeroo, a rare mammal similar to the wallabies of Australia. The other is the large winsum flower that is the jeroo’s primary food source.
Like its distant Australian relative, the jeroo moves by hopping, but its movements are unique in all of nature. Each jeroo only moves in one of the four main compass directions, and only turns in 90 degree increments. This unusual behavior continues to mystify Jessica and the few other researchers who have observed jeroos in the wild. Some believe that this behavior is somehow related to geomagnetic forces, but others think that this is just a bizarre learned behavior.
Every jeroo has a pouch, but the male’s pouch is somewhat smaller. While the female uses her pouch to protect and nuture her offspring, both sexes use their pouches to carry winsum flowers that they have picked.
During the rainy season, January through December, sudden storms can create temporary lakes and rivers, or even alter the shape of the island itself. Despite living on Santong island for uncounted millennia, the jeroos are extremely poor swimmers. While they are keenly aware of their immediate surroundings, jeroos can be careless. If one happens to hop into the ocean, its fur becomes waterlogged and it must rest in the sun for a few hours before resuming its normal activity. In what can only be described as a telepathic connection, all other jeroos also cease their activities until the wet jeroo has recovered.
Until recently, the jeroos were safe from human interference because they were only known to a handful of researchers and because Santong island is very small, very remote, and missing from most maps. The jeroo’s idyllic world was interrupted in 2001, when Brian arrived at the island. Brian is a renowned collector who was hired to capture a jeroo for the extreme animal exhibit at Missouri’s C. A. Baret zoo. Having studied the jeroos’ unique patterns of movement, Brian periodically sets nets in the locations that a jeroo is likely to visit. Fortunately, the sensitive jeroos can detect his nets, and have learned that tossing a winsum flower onto a net will disable the net and make that location safe for future travel. Brian can only catch a careless jeroo that leaps before it looks.
1.3.1.2. A Jeroo Simulator
After returning from a recent trip to Santong island, Jessica asked her colleague, Deanna, to develop a simulator that could be used to demonstrate the jeroos and their relationship with their island. The result of Deanna’s work is a computer program written in Java to help Jessica with her research. The program provides a micro-world representation of Santong island and shows the behavior of one or more jeroos on the island.
When Deanna designed the simulator, she used the jeroo’s unique movements to model the island as a grid, where the x-axis runs from West to East along lines of lattitude, and the y-axis runs from North to South along lines of longitude. Each element (cell) of this model corresponds to a location where a jeroo might land when it hops.
Deanna chose to number both the x-coordinates and y-coordinates by starting with zero at the northwest corner of the map containing the island (her maps included the water immediately surrounding the island). When asked why she started at zero, Deanna said that she was counting the number of safe hops from any location to the northwest corner. We will use the notation (x, y) to indicate a specific cell, where x represents the horizontal position of the cell and y represents the vertical position of the cell.
1.3.1.3. Jeroo Action Methods
Two of the Java classes in Deanna’s simulation are Island
and Jeroo. The Island class is a world
subclass that represents the island map, while the Jeroo
class is an actor subclass. There are also Flower,
Net and Water classes to represent other
objects on the island.
There as seven action methods that a Jeroo understands
(three of them require an argument value):
| Method | Purpose | Example |
|---|---|---|
hop() | Hop one space ahead. The program terminates with a logic error if the hopping Jeroo lands in the water, lands on another Jeroo, or hops onto a net. A Jeroo can hop onto a flower. | jessica.hop(); |
hop(number) | Hop number times in a row, where number is a positive integer. | jessica.hop(3);jessica.hop(12); |
pick() | Pick a flower from the current location. Nothing happens if there is no flower at the current location. | jessica.pick(); |
plant() | Plant a flower at the current location. Nothing happens if the jeroo does not have a flower to plant. | jessica.plant(); |
toss() | Toss a flower one space ahead. The tossed flower is lost forever. If the flower lands on a net, the net is disabled. | jessica.toss(); |
turn(relativeDirection) | Turn in the
indicated direction [ turn(AHEAD) and
turn(HERE) are meaningless ] |
jessica.turn(LEFT);jessica.turn(RIGHT); |
give(relativeDirection) | Give a flower
to a neighboring Jeroo in the indicated direction. Nothing happens
if the giving Jeroo has no flowers, or if there is no neighboring
Jeroo in the indicated direction. [ give(HERE) is
meaningless ] |
jessica.give(LEFT);jessica.give(RIGHT);jessica.give(AHEAD); |
1.3.1.3.1. Direction
Each Jeroo knows four relative directions and four compass
directions as shown in the following table. Each direction must be
written in UPPER CASE (In Java, constant values that never change are
usually written this way). The relative direction HERE
refers to the Jeroo’s current location, so it isn’t useful with the
action methods in the previous section (we’ll see other methods later
where HERE makes sense).
| Relative Directions | Compass Directions |
|---|---|
LEFT | NORTH |
RIGHT | EAST |
AHEAD | SOUTH |
HERE | WEST |
1.3.1.3.2. Attributes
When designing an object to represent something, we must select facts about that thing that are relevant to the problem we are trying to solve. For example, the title of a book would be important to a bookstore, but not to the company that shipped the book from the publisher’s warehouse. On the other hand, the weight of the book would be important to the shipper, but not to the bookstore. Facts such as the title or weight of a book are called attributes.
Note
An attribute is a fact associated with a specific object.
The attributes of a Jeroo object include its location,
the number of flowers in its pouch, and the direction it’s facing.
When we instantiate a class, the class’
constructor is responsible for
initializing the new object’s attributes. So when we create a
Jeroo object, its constructor is responsible for
initializing the number of flowers in its pouch and
the direction it’s facing–it’ position is set when you add it to the world.
If we do not specify a value
for one (or more) of the attributes when we create the jeroo, the
constructor provides defaults for us.
As a convenience, the Jeroo class provides
multiple constructors so that we can omit (or provide)
values we want for any of these attributes. All but one of the
constructors allow us to provide values for just some of the
attributes. The constructors are summarized in the following
table:
| Example | Attributes | ||||
|---|---|---|---|---|---|
// Accept all defaults Jeroo jessica = new Jeroo(); |
| ||||
// Specify just the flowers Jeroo jessica = new Jeroo(8); |
| ||||
// Specify just the direction Jeroo jessica = new Jeroo(WEST); |
| ||||
// Specify both attributes Jeroo jessica = new Jeroo(WEST, 8); |
|
The equal sign between the declaration and instantiation portions indicates that the newly created Jeroo object is to be associated with the identifier in the declaration portion.
1.3.1.4. Creating Jeroos on an Island
An instance of the Island class is pretty plain:

This island is completely bare, with no jeroos, no flowers, and a pretty basic shape. But to change the behavior of a library class, we need to create our own version of the class. We do this by defining a subclass. A subclass inherits all the features of the class it is based on. That means it understands all of the methods of the original class, and may add more of its own. We create a subclass using this basic pattern:
public class NewClassName
    extends ExistingClassName
{
    ...
}
The keywords public class indicate that we are
introducing a brand new class that can be used anywhere
in our code (i.e., it is “public”ly available for use elsewhere).
The NewClassName is the name of the new class we are defining,
and the ExistingClassName is the name of the class we want
to build on. The keyword extends is what indicates that
our new class is a subclass. Whenever you use
extends, you are saying that the class you are declaring
inherits all the features from another existing class.
Note
A subclass is a class that inherits all the methods and attributes of another class, called its superclass.
Note
The terms**derived class** and child class are different names for subclass.
Note
The terms**base class** and parent class are different names for superclass.
In BlueJ, we can create a new subclass from the
Island class by clicking the “New Class…” button in BlueJ’s
main window. In the resulting new class dialog, enter the name for your
new class, select “Island subclass”, and click the “OK” button.
This action will create a new class and an
associated source file for you, and fill it with the required
starting content (including some comments and placeholders).
Note
In Java, the source code for a given class is stored in a plain text file that has the same name as the class with “.java” added on the end. The file name must be capitalized exactly the same way as the class name.
When you create a new subclass in BlueJ, the generated class will already have a constructor. a constructor is a special kind of method that is used only to initialize a brand new object.
Note
A constructor is a special kind of method that is used to initialize a brand new object.
In the constructor for our island subclass, you can define the island’s dimensions and put any actions you would like to perform when the island is created–such as populating it with some flowers, or placing water in new locations.
We can also say what we wish to happen when the Run button
is pressed by added a myProgram() method. You
can add this to your island subclass:
public void myProgram()
{
    Jeroo jessica = new Jeroo(8);
    this.addObject(jessica, 3, 4);

    //  Give instructions to your jeroo to carry out here
}
Any actions you place in myProgram() will be executed
when the “Run” (or the “Act”) button
is pressed.
Try It Yourself
Create an Island subclass and add the
myProgram() method sketched above to it. Replace
the comment in myProgram() with instructions to
have the jeroo jessica plant a row of three flowers
from (3, 4) to (5, 4).
1.3.1.5. Self-Check
1.3.2. Class Hierarchy and Inheritance
How are classes related to each other? In Java, and in any other
object-oriented language, classes are organized in a class hierarchy.
A class hierarchy is like an upside-down tree. At the very top of the
hierarchy is the most general class. In Java, the most general class is
the Object class. The classes below Object in the hierarchy are
known as its subclasses. Since
all of the objects we use in our programs belong to some class or other,
this is like saying that all objects are Objects.
The figure below illustrates the concept of a class hierarchy using the
classes that we have described in this section. Notice that the Object
class occurs at the top of the hierarchy. It is the most general class. It
has features that are common to all Java objects. As you move down the
hierarchy, the classes become more and more specialized. A Rectangle is
an Object but it contains attributes–length and width–-that are
common to all rectangles but not to other objects in the hierarchy. For
example, an ATM object does not necessarily have a length and a width.
Notice that we have added a square class to the hierarchy. A square
is a special type of Rectangle, namely one who’s length equals its width.
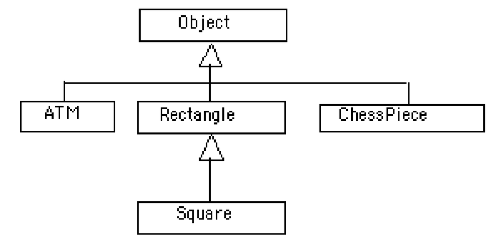
To introduce some important terminology associated with this kind of
hierarchy, we say that the Rectangle class is a subclass of
the Object class. The square class is a subclass of both square
and Object. Classes that occur above a given class in the hierarchy are
said to be its superclasses. Thus Rectangle class is superclass of
the square class. The Object class is also a superclass of square.
In general, we say that a subclass extends a superclass, meaning that it
adds additional elements (attributes and/or methods) to those contained in
its superclasses. We saw this in the case of the square class. It adds
the feature that its length and width are always equal.
Another important concept associated with a class hierarchy is the notion of class inheritance, whereby a subclass inherits all the attributes and methods from its superclass. To take an example from the natural world, think of the sort of inheritance that occurs between a horse and a mammal. A horse is a mammal. So horses inherit the characteristic of being warm blooded by virtue of also being mammals. (This is different from the kind of individual inheritance whereby you inherit your mother’s blue eyes and your father’s black hair).
To illustrate how inheritance works in programming, consider a chess program.
There are several different types of ChessPiece objects. There
are Pawns, and Knights, and Queens, and Kings.
The figure below illustrates the chess piece hierarchy.

A pair of attributes that all chess pieces have in common is their row
and column position on the chess board. Because all chess pieces have
these attributes in common, they are located at the top of the ChessPiece
hierarchy and inherited by all ChessPiece subclasses. Of course,
the row and column attributes have different values in
each ChessPiece object.
One of the actions that all chess pieces have in common is that they
can moveTo() a given square on the chess board. But different types of
chess pieces have different ways of moving. For example,
a Bishop can only move along diagonals on the chess board, whereas
a Rook can only move along a row or column on the chess board.
So, clearly, we can’t describe a moveTo() method that will work for
all ChessPieces. This is why we put the moveTo() method in all of
the ChessPiece subclasses. The ChessPiece class also has
a moveTo() method, but note that its name is italicized in the diagram.
This indicates that it cannot be completely defined at that level.
Finally, note that in chess, the king has certain special attributes and
actions. Thus only the king can be put in check. This means that the king
is under attack and in danger of being captured, thereby ending the game.
Similarly, only the king has the ability to castle. This is special move
that a king can make together with one of its rooks under certain conditions.
Thus, the reason we show the inCheck attribute and castle() action
in the King class is because these are characteristics that particular
to King objects.
In this way, a class hierarchy represents a specialization of classes as you
move from top to bottom. The most general class, ChessPiece, is at the top
of the hierarchy. Its attributes and methods are passed on to (inherited by)
its subclasses. However, in addition to the attributes and methods they
inherit from their superclasses, the subclasses define their own special
attributes and methods. Each of the subclasses, Pawn, Bishop
and so on, represents some kind of specialization of the superclass. In this
example, each of the subclasses have their own distinctive ways of moving.
And the King subclass has unique attributes and actions (inCheck
and castle()).
1.3.2.1. Creating Subclasses
Let’s consider the Chess example from the previous section. If we wanted to
create a ChessPiece class, it might look like this. For now, let’s not
worry about the attributes or methods, just the class definition.
public class ChessPiece
{

}
Creating the King class would then look like this:
public class King
    extends ChessPiece
{

}
This extends keyword tells java that the King class is a subclass
of ChessPiece.
1.3.2.2. Self-Check
1.3.2.3. Creating Smarter Jeroos
In addition to creating subclasses of Island to
provide different maps, we can also create our own subclass(es) of
Jeroo. If you create a subclass of Jeroo,
you can add new methods to it so that your personal jeroo understands
a larger vocabulary of actions. You can then use these new methods
to solve problems.
As an example, suppose we wanted our jeroo to know how to hop
and plant flowers at the same time–that is, each time it takes a
hop forward, it also plants a flower (if it has one). We can do
this by adding a hopAndPlant() method of our own. But
to add a method, we need to a class of our own to write it in.
Try It Yourself
Create a Jeroo subclass with the name of your
choice (remember to capitalize the first letter of the name).
Write a method called hopAndPlant() that hops one
square and then plants a flower.
1.3.3. Summarizing: What is Inheritance?
1.3.4. Syntax Practice 2a: Jeroo Methods
1.3.5. Problem Solving and Algorithms
Learn a basic process for developing a solution to a problem. Nothing in this chapter is unique to using a computer to solve a problem. This process can be used to solve a wide variety of problems, including ones that have nothing to do with computers.
1.3.5.1. Problems, Solutions, and Tools
I have a problem! I need to thank Aunt Kay for the birthday present she sent me. I could send a thank you note through the mail. I could call her on the telephone. I could send her an email message. I could drive to her house and thank her in person. In fact, there are many ways I could thank her, but that’s not the point. The point is that I must decide how I want to solve the problem, and use the appropriate tool to implement (carry out) my plan. The postal service, the telephone, the internet, and my automobile are tools that I can use, but none of these actually solves my problem. In a similar way, a computer does not solve problems, it’s just a tool that I can use to implement my plan for solving the problem.
Knowing that Aunt Kay appreciates creative and unusual things, I have decided to hire a singing messenger to deliver my thanks. In this context, the messenger is a tool, but one that needs instructions from me. I have to tell the messenger where Aunt Kay lives, what time I would like the message to be delivered, and what lyrics I want sung. A computer program is similar to my instructions to the messenger.
The story of Aunt Kay uses a familiar context to set the stage for a useful point of view concerning computers and computer programs. The following list summarizes the key aspects of this point of view.
Note
A computer is a tool that can be used to implement a plan for solving a problem.
A computer program is a set of instructions for a computer. These instructions describe the steps that the computer must follow to implement a plan.
An algorithm is a plan for solving a problem.
A person must design an algorithm.
A person must translate an algorithm into a computer program.
This point of view sets the stage for a process that we will use to develop solutions to Jeroo problems. The basic process is important because it can be used to solve a wide variety of problems, including ones where the solution will be written in some other programming language.
1.3.5.2. An Algorithm Development Process
Every problem solution starts with a plan. That plan is called an algorithm.
Note
An algorithm is a plan for solving a problem.
There are many ways to write an algorithm. Some are very informal, some are quite formal and mathematical in nature, and some are quite graphical. The instructions for connecting a DVD player to a television are an algorithm. A mathematical formula such as \(\pi R^2\) is a special case of an algorithm. The form is not particularly important as long as it provides a good way to describe and check the logic of the plan.
The development of an algorithm (a plan) is a key step in solving a problem. Once we have an algorithm, we can translate it into a computer program in some programming language. Our algorithm development process consists of five major steps.
1.3.5.2.1. Step 1: Obtain a description of the problem
This step is much more difficult than it appears. In the following discussion, the word client refers to someone who wants to find a solution to a problem, and the word developer refers to someone who finds a way to solve the problem. The developer must create an algorithm that will solve the client’s problem.
The client is responsible for creating a description of the problem, but this is often the weakest part of the process. It’s quite common for a problem description to suffer from one or more of the following types of defects: (1) the description relies on unstated assumptions, (2) the description is ambiguous, (3) the description is incomplete, or (4) the description has internal contradictions. These defects are seldom due to carelessness by the client. Instead, they are due to the fact that natural languages (English, French, Korean, etc.) are rather imprecise. Part of the developer’s responsibility is to identify defects in the description of a problem, and to work with the client to remedy those defects.
1.3.5.2.2. Step 2: Analyze the problem
The purpose of this step is to determine both the starting and ending points for solving the problem. This process is analogous to a mathematician determining what is given and what must be proven. A good problem description makes it easier to perform this step.
When determining the starting point, we should start by seeking answers to the following questions:
What data are available?
Where is that data?
What formulas pertain to the problem?
What rules exist for working with the data?
What relationships exist among the data values?
When determining the ending point, we need to describe the characteristics of a solution. In other words, how will we know when we’re done? Asking the following questions often helps to determine the ending point.
What new facts will we have?
What items will have changed?
What changes will have been made to those items?
What things will no longer exist?
1.3.5.2.3. Step 3: Develop a high-level algorithm
An algorithm is a plan for solving a problem, but plans come in several levels of detail. It’s usually better to start with a high-level algorithm that includes the major part of a solution, but leaves the details until later. We can use an everyday example to demonstrate a high-level algorithm.
Problem: I need a send a birthday card to my brother,
Mark.
Analysis: I don’t have a card. I prefer to buy a card rather
than make one myself.
High-level algorithm:
Go to a store that sells greeting cards
Select a card
Purchase a card
Mail the card
This algorithm is satisfactory for daily use, but it lacks details that would have to be added were a computer to carry out the solution. These details include answers to questions such as the following:
“Which store will I visit?”
“How will I get there: walk, drive, ride my bicycle, take the bus?”
“What kind of card does Mark like: humorous, sentimental, risque?”
These kinds of details are considered in the next step of our process.
1.3.5.2.4. Step 4: Refine the algorithm by adding more detail
A high-level algorithm shows the major steps that need to be followed to solve a problem. Now we need to add details to these steps, but how much detail should we add? Unfortunately, the answer to this question depends on the situation. We have to consider who (or what) is going to implement the algorithm and how much that person (or thing) already knows how to do. If someone is going to purchase Mark’s birthday card on my behalf, my instructions have to be adapted to whether or not that person is familiar with the stores in the community and how well the purchaser known my brother’s taste in greeting cards.
When our goal is to develop algorithms that will lead to computer programs, we need to consider the capabilities of the computer and provide enough detail so that someone else could use our algorithm to write a computer program that follows the steps in our algorithm. As with the birthday card problem, we need to adjust the level of detail to match the ability of the programmer. When in doubt, or when you are learning, it is better to have too much detail than to have too little.
Most of our examples will move from a high-level to a detailed algorithm in a single step, but this is not always reasonable. For larger, more complex problems, it is common to go through this process several times, developing intermediate level algorithms as we go. Each time, we add more detail to the previous algorithm, stopping when we see no benefit to further refinement. This technique of gradually working from a high-level to a detailed algorithm is often called stepwise refinement.
Note
Stepwise refinement is a process for developing a detailed algorithm by gradually adding detail to a high-level algorithm.
1.3.5.2.5. Step 5: Review the algorithm
The final step is to review the algorithm. What are we looking for? First, we need to work through the algorithm step by step to determine whether or not it will solve the original problem. Once we are satisfied that the algorithm does provide a solution to the problem, we start to look for other things. The following questions are typical of ones that should be asked whenever we review an algorithm. Asking these questions and seeking their answers is a good way to develop skills that can be applied to the next problem.
Does this algorithm solve a very specific problem or does it solve a more general problem? If it solves a very specific problem, should it be generalized? For example, an algorithm that computes the area of a circle having radius 5.2 meters (formula \(\pi (5.2)^2\)) solves a very specific problem, but an algorithm that computes the area of any circle (formula \(\pi R^2\)) solves a more general problem.
Can this algorithm be simplified? One formula for computing the perimeter of a rectangle is:
length + width + length + width
A simpler formula would be:
2.0 * (length + width)
Is this solution similar to the solution to another problem? How are they alike? How are they different? For example, consider the following two formulae:
Rectangle area = length * width
Triangle area = 0.5 * base * heightSimilarities: Each computes an area. Each multiplies two measurements.
Differences: Different measurements are used. The triangle formula contains 0.5.
Hypothesis: Perhaps every area formula involves multiplying two measurements.
1.3.5.3. Example: Pick and Plant
This section contains an extended example that demonstrates the algorithm development process. To complete the algorithm, we need to know that every Jeroo can hop forward, turn left and right, pick a flower from its current location, and plant a flower at its current location.
1.3.5.3.1. Problem Statement (Step 1)
A Jeroo starts at (0, 0) facing East with no flowers in its pouch. There is a flower at location (3, 0). Write a program that directs the Jeroo to pick the flower and plant it at location (3, 2). After planting the flower, the Jeroo should hop one space East and stop. There are no other nets, flowers, or Jeroos on the island.
Start

Finish
1.3.5.3.2. Analysis of the Problem (Step 2)
The flower is exactly three spaces ahead of the jeroo.
The flower is to be planted exactly two spaces South of its current location.
The Jeroo is to finish facing East one space East of the planted flower.
There are no nets to worry about.
1.3.5.3.3. High-level Algorithm (Step 3)
Let’s name the Jeroo Bobby. Bobby should do the following:
Get the flower
Put the flower
Hop East
1.3.5.3.4. Detailed Algorithm (Step 4)
Let’s name the Jeroo Bobby. Bobby should do the following:
Get the flower
Hop 3 times
Pick the flowerPut the flower
Turn right
Hop 2 times
Plant a flowerHop East
Turn left
Hop once
1.3.5.3.5. Review the Algorithm (Step 5)
The high-level algorithm partitioned the problem into three rather easy subproblems. This seems like a good technique.
This algorithm solves a very specific problem because the Jeroo and the flower are in very specific locations.
This algorithm is actually a solution to a slightly more general problem in which the Jeroo starts anywhere, and the flower is 3 spaces directly ahead of the Jeroo.
1.3.5.3.6. Java Code for “Pick and Plant”
A good programmer doesn’t write a program all at once. Instead, the programmer will write and test the program in a series of builds. Each build adds to the previous one. The high-level algorithm will guide us in this process.
Note
A good programmer works incrementally, add small pieces one at a time and constantly re-checking the work so far.
1.3.5.3.7. FIRST BUILD
To see this solution in action, create a new BlueJ project scenario and use the “New Class…” button to create a new Island subclass with the name of your choice. This subclass will hold your new code.
The recommended first build contains three things:
The main method (here
myProgram()in your island subclass).Declaration and instantiation of every Jeroo that will be used.
The high-level algorithm in the form of comments.
public void myProgram()
{
    Jeroo bobby = new Jeroo();
    this.addObject(bobby, 0, 0);

    // --- Get the flower ---

    // --- Put the flower ---

    // --- Hop East ---

}   // ===== end of method myProgram() =====
The instantiation at the beginning of myProgram() places
bobby at (0, 0), facing East, with no flowers.
Once the first build is working correctly, we can proceed to the others. In this case, each build will correspond to one step in the high-level algorithm. It may seem like a lot of work to use four builds for such a simple program, but doing so helps establish habits that will become invaluable as the programs become more complex.
1.3.5.3.8. SECOND BUILD
This build adds the logic to “get the flower”, which in the detailed algorithm (step 4 above) consists of hopping 3 times and then picking the flower. The new code is indicated by comments that wouldn’t appear in the original (they are just here to call attention to the additions). The blank lines help show the organization of the logic.
public void myProgram()
{
    Jeroo bobby = new Jeroo();
    this.addObject(bobby, 0, 0);

    // --- Get the flower ---
    bobby.hop(3);     // <-- new code to hop 3 times
    bobby.pick();     // <-- new code to pick the flower

    // --- Put the flower ---

    // --- Hop East ---

}   // ===== end of method myProgram() =====
By taking a moment to run the work so far, you can confirm whether or not this step in the planned algorithm works as expected. Right-click on your island subclass in BlueJ’s main window and use “new” (the first menu entry) to create a new instance.
1.3.5.3.9. THIRD BUILD
This build adds the logic to “put the flower”. New code is indicated by the comments that are provided here to mark the additions.
public void myProgram()
{
    Jeroo bobby = new Jeroo();
    this.addObject(bobby, 0, 0);

    // --- Get the flower ---
    bobby.hop(3);
    bobby.pick();

    // --- Put the flower ---
    bobby.turn(RIGHT);    // <-- new code to turn right
    bobby.hop(2);         // <-- new code to hop 2 times
    bobby.plant();        // <-- new code to plant a flower

    // --- Hop East ---

}   // ===== end of method myProgram() =====
1.3.5.3.10. FOURTH BUILD (final)
This build adds the logic to “hop East”.
public void myProgram()
{
    Jeroo bobby = new Jeroo();
    this.addObject(bobby, 0, 0);

    // --- Get the flower ---
    bobby.hop(3);
    bobby.pick();

    // --- Put the flower ---
    bobby.turn(RIGHT);
    bobby.hop(2);
    bobby.plant();

    // --- Hop East ---
    bobby.turn(LEFT);     // <-- new code to turn left
    bobby.hop();          // <-- new code to hop 1 time

}   // ===== end of method myProgram() =====
1.3.5.4. Example: Replace Net with Flower
This section contains a second example that demonstrates the algorithm development process.
1.3.5.4.1. Problem Statement (Step 1)
There are two Jeroos. One Jeroo starts at (0, 0) facing North with one flower in its pouch. The second starts at (0, 2) facing East with one flower in its pouch. There is a net at location (3, 2). Write a program that directs the first Jeroo to give its flower to the second one. After receiving the flower, the second Jeroo must disable the net, and plant a flower in its place. After planting the flower, the Jeroo must turn and face South. There are no other nets, flowers, or Jeroos on the island.
Start
Finish

1.3.5.4.2. Analysis of the Problem (Step 2)
Jeroo_2 is exactly two spaces behind Jeroo_1.
The only net is exactly three spaces ahead of Jeroo_2.
Each Jeroo has exactly one flower.
Jeroo_2 will have two flowers after receiving one from Jeroo_1.
One flower must be used to disable the net.
The other flower must be planted at the location of the net, i.e. (3, 2).Jeroo_1 will finish at (0, 1) facing South.
Jeroo_2 is to finish at (3, 2) facing South.
Each Jeroo will finish with 0 flowers in its pouch. One flower was used to disable the net, and the other was planted.
1.3.5.4.3. High-level Algorithm (Step 3)
Let’s name the first Jeroo Ann and the second one Andy.
Ann should do the following:
Find Andy (but don’t collide with him)
Give a flower to Andy (he will be straight ahead)After receiving the flower, Andy should do the following:
Find the net (but don’t hop onto it)
Disable the net
Plant a flower at the location of the net
Face South
1.3.5.4.4. Detailed Algorithm (Step 4)
Let’s name the first Jeroo Ann and the second one Andy.
Ann should do the following:
Find Andy
Turn around (either left or right twice)
Hop (to location (0, 1))Give a flower to Andy
Give ahead
Now Andy should do the following:
Find the net
Hop twice (to location (2, 2))
Disable the net
Toss
Plant a flower at the location of the net
Hop (to location (3, 2))
Plant a flowerFace South
Turn right
1.3.5.4.5. Review the Algorithm (Step 5)
The high-level algorithm helps manage the details.
This algorithm solves a very specific problem, but the specific locations are not important. The only thing that is important is the starting location of the Jeroos relative to one another and the location of the net relative to the second Jeroo’s location and direction.
1.3.5.4.6. Java Code for “Replace Net with Flower”
As before, the code should be written incrementally as a series of builds. Four builds will be suitable for this problem. As usual, the first build will contain the main method, the declaration and instantiation of the Jeroo objects, and the high-level algorithm in the form of comments. The second build will have Ann give her flower to Andy. The third build will have Andy locate and disable the net. In the final build, Andy will place the flower and turn East.
1.3.5.4.7. FIRST BUILD
This build creates the main method, instantiates the Jeroos, and
outlines the high-level algorithm. In this example, the main method
would be myProgram() contained within a subclass of
Island.
public void myProgram()
{
    Jeroo ann  = new Jeroo(NORTH, 1);
    this.addObject(ann, 0, 0);
    Jeroo andy = new Jeroo(1);  // default EAST
    this.addObject(andy, 0, 2);

    // --- Ann, find Andy ---

    // --- Ann, give Andy a flower ---

    // --- Andy, find and disable the net ---

    // --- Andy, place a flower at (3, 2) ---

    // --- Andy, face South ---

}   // ===== end of method myProgram() =====
1.3.5.4.8. SECOND BUILD
This build adds the logic for Ann to locate Andy and give him a flower.
public void myProgram()
{
    Jeroo ann  = new Jeroo(NORTH, 1);
    this.addObject(ann, 0, 0);
    Jeroo andy = new Jeroo(1);  // default EAST
    this.addObject(andy, 0, 2);

    // --- Ann, find Andy ---
    ann.turn(LEFT);
    ann.turn(LEFT);
    ann.hop();
    // Now, Ann is at (0, 1) facing South, and Andy is directly ahead

    // --- Ann, give Andy a flower ---
    ann.give(AHEAD);       // Ann now has 0 flowers, Andy has 2

    // --- Andy, find and disable the net ---

    // --- Andy, place a flower at (3, 2) ---

    // --- Andy, face South ---

}   // ===== end of method myProgram() =====
1.3.5.4.9. THIRD BUILD
This build adds the logic for Andy to locate and disable the net.
public void myProgram()
{
    Jeroo ann  = new Jeroo(NORTH, 1);
    this.addObject(ann, 0, 0);
    Jeroo andy = new Jeroo(1);  // default EAST
    this.addObject(andy, 0, 2);

    // --- Ann, find Andy ---
    ann.turn(LEFT);
    ann.turn(LEFT);
    ann.hop();
    // Now, Ann is at (0, 1) facing South, and Andy is directly ahead

    // --- Ann, give Andy a flower ---
    ann.give(AHEAD);       // Ann now has 0 flowers, Andy has 2

    // --- Andy, find and disable the net ---
    andy.hop(2);           // Andy is at (2, 2) facing the net
    andy.toss();

    // --- Andy, place a flower at (3, 2) ---

    // --- Andy, face South ---

}   // ===== end of method myProgram() =====
1.3.5.4.10. FOURTH BUILD (final)
This build adds the logic for Andy to place a flower at (3, 2) and turn South.
public void myProgram()
{
    Jeroo ann  = new Jeroo(NORTH, 1);
    this.addObject(ann, 0, 0);
    Jeroo andy = new Jeroo(1);  // default EAST
    this.addObject(andy, 0, 2);

    // --- Ann, find Andy ---
    ann.turn(LEFT);
    ann.turn(LEFT);
    ann.hop();
    // Now, Ann is at (0, 1) facing South, and Andy is directly ahead

    // --- Ann, give Andy a flower ---
    ann.give(AHEAD);       // Ann now has 0 flowers, Andy has 2

    // --- Andy, find and disable the net ---
    andy.hop(2);           // Andy is at (2, 2) facing the net
    andy.toss();

    // --- Andy, place a flower at (3, 2) ---
    andy.hop();
    andy.plant();

    // --- Andy, face South ---
    andy.turn(RIGHT);

}   // ===== end of method myProgram() =====
1.3.5.5. Self-Check
1.3.6. Creating and Using Jeroo Methods
For some problems, it would be convenient if we could extend the basic behaviors of Jeroos (or other objects). Java allows us to write programmer-defined methods that extend the behavior of every object created from a given class.
1.3.6.1. Creating and Using a Jeroo Method
The concepts of behavior and method were defined earlier and are repeated here. A behavior is an action that an object can take or a task that it can perform in response to a request from an external source. A method is a collection of statements that are written in some programming language to describe a specific behavior.
These definitions imply that the creation of a method is a two-part process. First, we need to define and name the new behavior. Second, we need to write the source code for the method.
1.3.6.1.1. Defining a Behavior
The first question we must ask is “How do I decide on a good behavior?” There is no fixed answer to this question, but there are some guidelines to follow.
Examine the high-level algorithm. Any complex, but well-defined, step is a candidate for a new behavior, especially if two or more Jeroos need to perform that step.
Examine the detailed-algorithm. Any sequence of steps that occur several times is a candidate for a new behavior.
These guidelines serve as a starting point, but experience is a good teacher. Examine your own programs and those of others. A good behavior has a very clear definition and is used more than once in the program.
1.3.6.1.2. Writing a Jeroo Method
A Jeroo method contains the source code that describes what an arbitrary Jeroo needs to do to carry out the corresponding behavior. The form of a Jeroo method is:
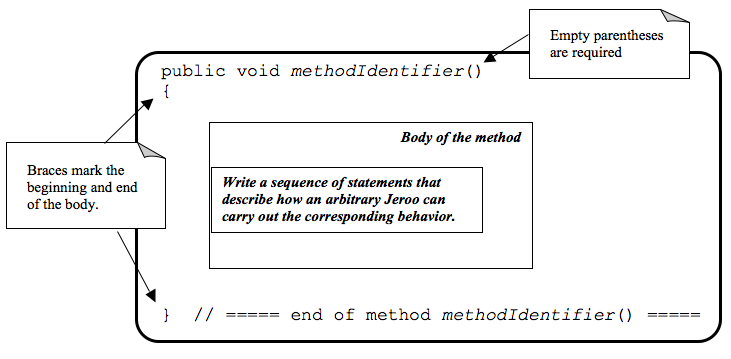
The methodIdentifier on the first line (the header line) is a name that the programmer chooses for the method. The name should indicate the corresponding behavior. The rules for creating an identifier for a method are the same as those given in Module 1–but remember that we always start method names with a lowercase letter. In every method, we should indent every line between the opening and closing braces.
Note
The name of a method should be a verb or a short verb phrase that describes what the method does.
Since a Jeroo method defines a behavior that applies to every Jeroo, we cannot send a message to a specific Jeroo. Instead, we use the special Java name this, which is like a pronoun that refers to the Jeroo that is performing the entire method.
1.3.6.1.3. Example: Turn Around
If we wanted to add a method to cause a Jeroo to turn around, we
need a class to place it in. We have to create our own subclass of
Jeroo to hold our code. In BlueJ, you can use the “New Class…”
button to create a new subclass of Jeroo
with a name of your own choosing. In that new subclass, you could add
a method to turn the jeroo around:
// ----------------------------------------------------------
/**
 * Turn the jeroo around 180 degrees so it faces the opposite
 * direction.
 */
public void turnAround()
{
    this.turn(LEFT);
    this.turn(LEFT);
}
1.3.6.1.4. Example: One Method Can Use Another, or Even Itself
This example introduces two new behaviors: planting four flowers in a row, and planting two adjacent rows with four flowers per row.
// ----------------------------------------------------------
/**
 * Plant four flowers in a row, starting at the current location.
 */
public void plantFour()
{
    this.plant();   // -- one ---

    this.hop();
    this.plant();   // -- two ---

    this.hop();
    this.plant();   // -- three ---

    this.hop();
    this.plant();   // -- four ---
}


// ----------------------------------------------------------
/**
 * Plant two adjacent rows of flowers.
 */
public void plantRowsOfFour()
{
    // --- Plant first row ---
    this.plantFour();

    // --- Move into position for next row ---
    this.turn(RIGHT);
    this.hop();
    this.turn(RIGHT);

    // --- Plant second row (in opposite direction) ---
    this.plantFour();
}
1.3.6.1.5. Using a Jeroo Method
A Jeroo method is used just like any other method. In our island’s
myProgram() method, we just have to be sure to create
a jeroo from our special subclass that contains the new methods we
want to use. Then we send a message to a specific Jeroo object,
requesting that Jeroo to perform the task associated with the method.
As an example, suppose we had created our own Jeroo
subclass called PlantingJeroo, and added the
plantFour() and plantRowsOfFour() methods
to it. Then in our island subclass, we could have a new Jeroo named
Ali plant two rows of flowers, south and east of (5, 5):
public void myProgram()
{
    PlantingJeroo ali = new PlantingJeroo(8);
    this.addObject(ali, 5, 5);

    ali.plantRowsOfFour();
}
1.3.6.1.6. A Word About Constructors
We know
that when we create a subclass
that it inherits all of the
methods and attributes from the class that it
extends. If you create a
subclass of Jeroo called PlantingJeroo, then
any PlantingJeroo object can perform all of the methods
that any Jeroo knows–because a PlantingJeroo
is a special kind of Jeroo. The PlantingJeroo
class inherits all of
the methods and attributes from the class Jeroo, and also
understands any new ones you write, such as the
platRowsOfFour() method. Computer scientists sometimes
call this an is-a relationship,
because every PlantingJeroo object is a
Jeroo at the same time–just a Jeroo that can do more.
Note
An is-a relationship exists between a subclass and its superclass, since every instance of the subclass is also an instance of the superclass at the same time.
Also, as we have already read above, a constructor is a special
kind of method that is used to initialize a brand new object. But,
while a subclass automatically inherits all of the (plain) methods
and attributes from its superclass, it does not inherit
constructors. That means that the object instantiation for
Ali in the previous example will not actually compile–unless we
provide an appropriate constructor for our
PlantingJeroo subclass.
One reason that subclasses do not automatically inherit constructors is because subclasses can add new attributes in addition to new methods, and those attributes must be initialized, no matter what. But any constructor from a superclass won’t know anything about the subclass’ new attributes and can’t initialize them appropriately. So subclasses have to explicitly define every constructor they support, all the time.
Note
Every time you create a subclass, you are responsible for defining all of the constructors it supports. Constructors are not inherited from superclasses.
Fortunately, while constructors are not inherited, there is a
simple pattern for defining them. In our PlantingJeroo,
we can add the following constructor:
// ----------------------------------------------------------
/**
 * Create a new Jeroo facing east.
 * @param flowers   The number of flowers the Jeroo is holding.
 */
public PlantingJeroo(int flowers)
{
    super(flowers);
}
While we have not yet covered all of the features in this small
piece of code, the gist is straightforward. A constructor is
declared like a regular method, except that
we omit the word void
and its name is exactly the same as the class name.
Here, we are defining a constructor for our
PlantingJeroo subclass that takes one number (integer)
as an argument, representing the number of flowers in its pouch.
The body of this constructor contains only a single line that uses
the special Java keyword super. This word can only
be used as the first word inside a subclass constructor, and it allows
us to invoke a superclass constructor, passing it any information it
might need. So here, we are saying that the first (and only) action
in our PlantingJeroo constructor is to call the
constructor for its superclass (Jeroo), passing the
number of flowers. This allows the superclass
to initialize all of its attributes correctly with the given information.
If our subclass needed more initialization, we would perform that in
following statements in the subclass constructor’s body.
But for now, this constructor is enough for our
PlantingJeroo class. It will allow us to create a
PlantingJeroo object by specifying its location and
number of flowers. That will in turn allow us to instantiate the
Ali Jeroo in the previous example without problems.
1.3.6.2. Preconditions and Postconditions
We should always define a behavior carefully before we write the code for the corresponding method. A complete definition for a behavior must include a statement of the preconditions and the postconditions. A precondition for a method is something that is assumed to be true before the method is invoked. The portion of the code that invokes the method is responsible for ensuring that all preconditions are satisfied before the method is invoked. A postcondition for a method is something that is true after the method has been executed. The code within the method is responsible for ensuring that all postconditions are met. The process of determining good preconditions and postconditions can be difficult, but it is easier if we remember a few characteristics of objects and methods.
All work is done by sending messages to objects.
Exactly one object executes a method in response to a message.
A method can modify the attributes of the object that executes the method, but cannot directly modify the attributes of any other object.
One method can send messages to several different objects, and those messages can lead to modifications in their receivers.
Using the previous list of characteristics as a guide, we can use
the following questions as a basis for writing preconditions and
postconditions. When we are working with Jeroos, we need to consider
how a method can change the attributes of the Jeroo object that executes
the method. In some cases, Jeroo actions like pick(),
plant(), and toss() can change the attributes
of the world by adding or removing objects, although we normally don’t
send messages to these other objects directly. Behind the scenes,
the pick(), plant(), and
toss() methods send appropriate messages to the island in
order to add or remove objects corresponding to the desired behavior.
| Precondition Questions | Postcondition Questions |
|---|---|
Do any of the attributes of the receiving object need
to have special values?
Location |
How does this method affect the attributes of the receiving
object?
Location |
| Are the contents of certain island cells important? | Have the contents of any island cells changed? |
The preconditions and postconditions can be created rather informally, but the final versions should be stated in a comment block at the beginning of the source code for the method. As an example, consider the method from the previous section to plant four flowers in a row:
// ----------------------------------------------------------
/**
 * Plant four flowers in a row, starting at the current location.
 *
 * @precondition The three spaces directly ahead of the Jeroo are clear.
 * @precondition The Jeroo has at least four flowers.
 * @postcondition The Jeroo has planted four flowers, starting at its
 *     current location and proceeding straight ahead.
 * @postcondition The Jeroo is standing on the last flower, and facing in
 *     its original direction.
 */
public void plantFour()
{
   this.plant();   // -- one ---

   this.hop();
   this.plant();   // -- two ---

   this.hop();
   this.plant();   // -- three ---


   this.hop();
   this.plant();   // -- four ---
}
1.3.6.3. Example: Clear Nets and Pick
The section contains an extended example that demonstrates the algorithm development process, and shows a recommended process for developing source code that contains Jeroo methods.
1.3.6.3.1. Problem Statement (Step 1)
A Jeroo starts at (4, 1) facing North with 5 flowers in its pouch. There are two nets immediately South of the Jeroo at locations (4, 2) and (4, 3). There is a flower directly South of the second net. Write a program that directs the Jeroo to disable the nets and pick the flower. After picking the flower, the Jeroo should return to its starting location and face South.
Start
Finish

1.3.6.3.2. Analysis of the Problem (Step 2)
The Jeroo must turn around to locate the first net
Each net is directly South of the previous one
The first net is directly South of the Jeroo
The flower is at location (4, 4)
The Jeroo must finish facing South at location (4, 1)
The Jeroo should finish with 5 - 2 + 1 = 4 flowers
1.3.6.3.3. Detailed Algorithm (Steps 3 and 4)
Let’s name the Jeroo Kim. Kim should do the following:
Turn around // now at (4, 1) facing South|br| Disable two nets in a row
Toss
Hop once // now at (4, 2) facing South
Toss
Hop once // now at (4, 3) facing SouthGet the flower
Hop once // now on flower at (4, 4) facing South
PickGo back to (4, 1) and turn around
Turn around // now at (4, 4) facing North
Hop 3 times // now at (4, 1) facing North
Turn around // now at (4, 1) facing South
1.3.6.3.4. Review the Algorithm (Step 5)
The high-level algorithm helps manage the details.
We used a “turn around” step in example 4.2. We can use the same logic here.
The act of turning around appears as a step in the high-level algorithm and as part of the “Go back to (4, 1) and turn around” step. Interesting!
1.3.6.3.5. Possible Behaviors
“Turn around” is used three times
- The sequence “Toss, Hop” is used two times in the “Disable
nets” step.
We will create a custom Jeroo subclass and write a
Jeroo method for each of these behaviors, but first, we need to define
a purpose, preconditions, and postconditions for each method. This can
be done informally, because we will write these things in a comment
block at the beginning of each method.
Note
Method: turnAround()
Purpose: Make the Jeroo turn 180 degrees
Preconditions:
none
Postconditions:
The Jeroo has turned 180 degrees
The Jeroo is at the same location
Note
Method: tossAndHop()
Purpose: Disable a net and move to the newly cleared location
Preconditions:
There is a net ahead
The Jeroo has at least one flower
Postconditions:
The net has been disabled
The Jeroo has one less flower
The Jeroo is at the location originally occupied by the net
The Jeroo has not changed direction
The last postcondition of the tossAndHop() method simply
says that the Jeroo is facing the direction it was facing at the start
of the method. It does not prohibit the Jeroo from changing direction
during the course of the method as long as the Jeroo returns to its
original direction at the end.
1.3.6.3.6. Java Code for “Clear Nets and Pick”
As before, we should develop the code as a series of builds. To
start this process, create a new project using BlueJ
use the “New Class…” button to create a new subclass of Island called
ClearNetsAndPick for this example. Also, create a
new subclass of Jeroo called ClearingJeroo
to hold your Jeroo methods.
Once you have these classes created, make sure they are compiled.
Edit the constructor provided in your ClearNetsAndPick class
to create and add flowers and nets at the appropriate starting
locations on the island.
Then right-click on your ClearNetsAndPick class and
create an instance of it, which will then fill the world view.
1.3.6.3.7. FIRST BUILD
The recommended first build contains three things:
The
myProgram()method in your island subclass that creates and sends messages to the Jeroo.Declaration and instantiation of every Jeroo that will be used. This implies adding an appropriate constructor to our
Jeroosubclass.The high-level algorithm in the form of comments.
Skeletons for each of the Jeroo methods in your Jeroo subclass. These skeletons are often called stubs.
Note
A method stub, or just a stub, is a bare skeleton of a method that will compile, but is really just a placeholder for the real method definition that will come later.
The myProgram() method goes inside your
ClearNetsAndPick class:
public void myProgram()
{
    Jeroo kim = new Jeroo(NORTH, 5);
    this.addObject(kim, 4, 1);

    // --- Turn around ---

    // --- Disable nets ---

    // --- Get the flower ---

    // --- Go back to (4, 1) and turn around ---

}
An appropriate constructor and the new Jeroo methods go inside your
ClearingJeroo class:
// ----------------------------------------------------------
/**
 * Create a new Jeroo.
 * @param direction The direction the Jeroo is facing.
 * @param flowers   The number of flowers the Jeroo is holding.
 */
public Jeroo(CompassDirection direction, int flowers)
{
    super(direction, flowers);    // Let the superclass initialize these
}


// ----------------------------------------------------------
/**
 * Turn the jeroo around 180 degrees so it faces the opposite
 * direction.
 *
 * @precondition  None.
 *
 * @postcondition The Jeroo has turned 180 degrees.
 * @postcondition The Jeroo is at the same location.
 */
public void turnAround()
{
}


// ----------------------------------------------------------
/**
 * Disable a net and move to the newly cleared location.
 *
 * @precondition  There is a net ahead.
 * @precondition  The Jeroo has at least one flower.
 *
 * @postcondition The net has been disabled.
 * @postcondition The Jeroo has one less flower.
 * @postcondition The Jeroo is at the location originally occupied by the net.
 * @postcondition The Jeroo has not changed direction.
 */
public void tossAndHop()
{
}
1.3.6.3.8. SECOND BUILD
This build finishes the turnAround() method and uses it
in the myProgram() method. It would be wise to test this
method four times, each time start with Kim facing in a different
direction. Once we are comfortable that this method works correctly, we
can proceed with the next build.
In the ClearNetsAndPick class:
public void myProgram()
{
    Jeroo kim = new Jeroo(NORTH, 5);
    this.addObject(kim, 4, 1);

    // --- Turn around ---
    kim.turnAround();                 // new code

    // --- Disable nets ---

    // --- Get the flower ---

    // --- Go back to (4, 1) and turn around ---

}
In the ClearingJeroo class:
// ----------------------------------------------------------
/**
 * Turn the jeroo around 180 degrees so it faces the opposite
 * direction.
 *
 * @precondition  None.
 *
 * @postcondition The Jeroo has turned 180 degrees.
 * @postcondition The Jeroo is at the same location.
 */
public void turnAround()
{
    this.turn(LEFT);                  // new code
    this.turn(LEFT);                  // new code
}


// ----------------------------------------------------------
/**
 * Disable a net and move to the newly cleared location.
 *
 * @precondition  There is a net ahead.
 * @precondition  The Jeroo has at least one flower.
 *
 * @postcondition The net has been disabled.
 * @postcondition The Jeroo has one less flower.
 * @postcondition The Jeroo is at the location originally occupied by the net.
 * @postcondition The Jeroo has not changed direction.
 */
public void tossAndHop()
{
}
1.3.6.3.9. THIRD BUILD
This build finishes the tossAndHop() method and uses it
in the myProgram() method. Our focus is on destroying the
two nets.
In the ClearNetsAndPick class:
public void myProgram()
{
    Jeroo kim = new Jeroo(NORTH, 5);
    this.addObject(kim, 4, 1);

    // --- Turn around ---
    kim.turnAround();

    // --- Disable nets ---
    kim.tossAndHop();                 // new code
    kim.tossAndHop();                 // new code

    // --- Get the flower ---

    // --- Go back to (4, 1) and turn around ---

}
In the ClearingJeroo class:
// ----------------------------------------------------------
/**
 * Turn the jeroo around 180 degrees so it faces the opposite
 * direction.
 *
 * @precondition  None.
 *
 * @postcondition The Jeroo has turned 180 degrees.
 * @postcondition The Jeroo is at the same location.
 */
public void turnAround()
{
    this.turn(LEFT);
    this.turn(LEFT);
}


// ----------------------------------------------------------
/**
 * Disable a net and move to the newly cleared location.
 *
 * @precondition  There is a net ahead.
 * @precondition  The Jeroo has at least one flower.
 *
 * @postcondition The net has been disabled.
 * @postcondition The Jeroo has one less flower.
 * @postcondition The Jeroo is at the location originally occupied by the net.
 * @postcondition The Jeroo has not changed direction.
 */
public void tossAndHop()
{
    this.toss();          // new code
    this.hop();           // new code
}
1.3.6.3.10. FOURTH BUILD (final)
This build finishes the myProgram() method. We need
to check to see that Kim has the correct number of flowers at the
end.
In the ClearNetsAndPick class:
public void myProgram()
{
    Jeroo kim = new Jeroo(NORTH, 5);
    this.addObject(kim, 4, 1);

    // --- Turn around ---
    kim.turnAround();

    // --- Disable nets ---
    kim.tossAndHop();
    kim.tossAndHop();

    // --- Get the flower ---
    kim.hop();            // new code
    kim.pick();           // new code

    // --- Go back to (4, 1) and turn around ---
    kim.turnAround();     // new code
    kim.hop(3);           // new code
    kim.turnAround();     // new code
}
1.3.6.4. Self-Check
1.3.7. What is Polymorphism?
All jeroos understand the same set of messages–that is, they respond to the same method invocations. But now that you’ve seen how define custom methods, it is also possible for a subclass to redefine a method to do something more or to alter its behavior. It turns out that different jeroos might respond to the same method call in different ways, depending on which subclass they belong to. We use the term receiver to refer to the object on which a method is called. Each time you call a method, the receiver determines how to respond, so the exact behavior depends on how the method is defined in the specific subclass used to create the receiver.
Polymorphism means that different receivers can respond to the same method call in different ways.