
6.3. Variable Scoping, Input, and Output
6.3.1. Variable Scoping
Now that you have experience with fields, parameters, and variables in a variety of situations, it is time to learn more about exactly where a user-defined name can be accessed. The scope of a user-defined name is the region of source code where the name is visible and can be used.
6.3.1.1. Local Scope
Recall that mutator methods (or “setters” as they’re often called) are used to change the values of private fields in a class. For example:
public class Cat
{
    private String color;

    // ...

    public void setColor(String newColor)
    {
         color = newColor;
    }
}
This setColor() method makes use of both a field and a parameter.
It is important to note that there is a difference in where these two types
of variables can be used. The scope of a variable or method refers to where
it can be used in a program.
A parameter’s scope is limited to the body of the method in which it is
declared. Parameters are local variables
which are declared in the parameter list of a method’s header and which
have initial values specified by the arguments in a method call. For example,
if we had an object of type Cat called c, we could call
the setColor() method like so:
c.setColor("Black");
When we write the method, we declare the variable newColor, and when we call
the method here,
we set s equal to the string “Black”. If we wanted to call the method
again, we would need to provide a new value for the variable newColor.
c.setColor("Black");
c.setColor("Grey");
Such values do not carry over between method calls.
The scope of a parameter is the same as the scope of a variable declared at the very beginning of the body of a method. Once the flow of execution leaves a method, its parameters and other local variables cease to exist. The scope of local variables is referred to as local scope.
Note
Local Variables
Local variables, that is, parameters and variables declared in the body of a method, have local scope which extends from the point at which they are defined to the end of the block of code in which they are defined. In particular, the scope of a parameter is the entire body of the method in which it is declared.
It would be a syntax error to refer to a method’s parameters or other local variables from outside the method.
6.3.1.2. Block-Level Scope
Variables that are declared in the body of a method have scope which extends from the point where they are declared to the end of the block of code in which they are declared. When a local variable is declared at the beginning of a method, it has the local scope discussed above.
However, local variables are not restricted to the beginning of a method, and their declarations can be placed elsewhere, which can affect their scope. When control structures like if-statements or loops are involved, scope can be a bit more specific.
public void exampleMethod(int x)
{
    if (x % 2 == 0)
    {
        int value = 4;
    }
    value = value + 2; // This will not work!
}
Variables declared inside the curly braces ({}) of a control structure
like a loop or conditional only exist within those curly braces. The method
above would not work as the variable value is only declared and initialized
inside the if statement’s true branch, and that variable ceases to exist when
the corresponding closing brace marking the end of the if statement’s true
branch is reached. As a result, its name is no longer visible once execution
has left the block (the pair of braces) where it is declared. Any attempt to
use the variable outside of the braces where it is declared will result in a
compiler error, since the variable is no longer visible or accessible–no longer
“in scope”.
The same is true for looping structures:
for (int i = 0; i < 12; i++)
{
    System.out.println(i);
}
i = i + 1; // This will not work!
The variable i is defined as part of the for loop and its scope is the
body of the for loop–the braces surrounding the loop’s body. The variable i
ceases to exist after the for loop is finished.
To get around this issue, you will sometimes see code where a variable is declared before a control structure, so that it can be accessed inside the control structure and also after it.
public void exampleMethod(int x)
{
    int value = 0;
    if (x % 2 == 0)
    {
        value = 4;
    }
    value = value + 2;
}
We could also do something similar with a for loop:
int i = 0;
for (i = 0; i < 12; i++)
{
    System.out.println(i);
}
i = i + 1; // This will work!
6.3.1.3. Class Scope
By contrast, fields and all methods have scope that extends throughout the entire class, that is, class scope. They can be used in the body of any method and in the expressions that assign initial values to class level variables.
Note
Class-Level Variables
Fields and methods have class scope, which extends throughout the class.
6.3.1.4. A Common Misconception
After declaring a variable it is tempting to use to both the variable name and the variable’s type whenever referring to it. For example:
public class Cat
{
    private String color;

    // ...

    public void setColor(String newColor)
    {
         String color = newColor;
    }
}
This setter will not change the value of the field color. To Java,
whenever the type of a variable is included, you are declaring a variable.
Java will allow you to declare variables with the same name, as long as they
are in different scopes.
In the code above, there is a field called color with class-level
scope, and a local variable called color that only exists within
the setColor() method.
Even though these variables have the same name and type, they are different.
Changing one will not change the other. Another common example of this can be
seen when testing. Let’s look at a hypothetical test file for our Cat class.
public class CatTest
    extends TestCase
{
    private Cat testCat;

    public void setUp()
    {
        Cat testCat = new Cat();
    }

    public void test1()
    {
        testCat.setColor("White");
    }
}
This is the same issue as we saw in the previous example.
There is a class-level Cat object declared as a field (private Cat testCat;).
But, instead of initializing the field inside setUp(), we also
have a local variable being declared, also called testCat. This means
the field testCat will not be initialized, since the object created inside
setUp() is being used to initialize the local variable inside that method,
which will cease to exist when the method ends. When
we refer to the testCat variable in test1(), we refer to the field,
which was never initialized and will therefore contain null. Thus, this
test will produce a NullPointerException.
Fortunately, the problem is easily fixed. Once a variable has been declared, we only need to refer to it by the variable’s name.
public class CatTest
    extends TestCase
{
    private Cat testCat;

    public void setUp()
    {
        testCat = new Cat();
    }

    public void test1()
    {
        testCat.setColor("White"); // this won't work!
    }
}
This code would run without error. The field testCat is still declared
outside any method, giving it a class-level scope. But this time, it is
initialized in our setUp() method correctly, and setUp()
runs before every test. This means that in test1(), testCat would
refer to a Cat object, not the value null.
6.3.1.5. A Note on Naming
As we saw above, Java can handle having two variables with the same name
and type when they are declared in different scopes. This can also lead to
confusion. For example, we could
have two String variables called color. One a field and one a parameter.
public class Cat
{
    private String color;

    // ...

    public void setColor(String color)
    {
         color = color;
    }
}
This code would compile but it is not advisable to use such naming conventions.
This is because it is not clear if the field color is being set to the
parameter color or vice-versa, or something else entirely. Let’s take a
look at what is happening here by adding a few print statements:
public class Cat
{
    private String color;

    public Cat()
    {
        this.color = "Black";
    }

    public void setColor(String color)
    {
        color = color;
        System.out.println(this.color);
        System.out.println(color);
    }
}
In this example, whenever we make a new Cat object, the value of the
field color is set to “Black” at first. When we run setColor("Green")
we see an interesting result in our print statements:
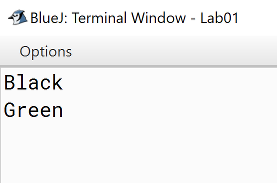
The first thing to be printed out is this.color. Which we see is “Black”.
The value of the field was not changed to “Green”! This means that when we write
color = color we know that the field color was not on the left side of
the assignment operator.
One might assume, then, that the parameter color is the value on the left
side of the assignment operator. This would mean that the parameter was changed
from “Green” to “Black”. But our second print statement tells us otherwise.
When we print out the parameter color we see it is still “Green”. This
means that the field color was not on the right side of the equals
sign either!
What happened in this code is that we set the parameter variable color
equal to itself–meaning nothing changed!
Generally, the best way to avoid such confusion is to give your variables distinct names like we did initially:
public void setColor(String newColor)
{
    color = newColor;
}
Alternately, if for some reason you must use the same variable name at two
different scope levels, using the modifier this will help clarify which
variable you are referring to:
public void setColor(String color)
{
    this.color = color;
}
Now, the field color is on the left side of the assignment operator and the
parameter color is on the right. So, if we ran setColor("Green");
the field color would be changed from “Black” to “Green”.
You will sometimes see this convention in setter methods or constructors,
where the programmer has intentionally used the same name for both the
parameter and the field, to communicate the intent that the parameter is
the value that will be stored in the field. When using this approach it
is mandatory to alway include this. as a prefix when referring to the
field name, because otherwise, all uses of the name would refer to the
parameter only.
6.3.2. Summarizing Scope Concepts
6.3.3. Check Your Understanding: Scope
6.3.4. Syntax Practice: Scoping
6.3.5. Java Input and Output
We have been using System.out.println() for a while, but you might not
have thought about what it means. System is a class that provides methods
related to the “system” or environment where programs run. It also provides
System.out, which is a special field that refers to an object providing
methods for displaying output, including println().
In fact, we can use System.out.println() to display the value
of System.out:
System.out.println(System.out);
The result is:
java.io.PrintStream@685d72cd
This output indicates that System.out refers to a PrintStream object,
which is defined in a package called java.io. A package is a collection of
related classes; java.io contains classes for “I/O” which stands for
input and output.
6.3.5.1. Basic Input and Output Concepts
Java provides an extensive library of classes for managing input and output of all forms of data. In Java, any source or destination for I/O is considered a “stream” or sequence of bytes or characters. To perform output, we insert bytes or characters into the stream. To perform input, we extract bytes or characters from the stream. Even characters entered at a keyboard (if we think about them as a sequence of keystrokes) can be represented as a stream.
Input operations are framed in terms of reading from a stream in a three-step process:
open the stream
read data items from the stream front to back in sequence
close the stream.
Output operations are framed in terms of writing to a stream in a similar three-step process:
open the stream
write data onto the end of the stream in sequence
close the stream.
To use Java’s input/output classes, make sure that in addition to importing
any other necessary packages, also import the java.io package and
the java.util package:
import java.io.*;
import java.util.*;
6.3.6. Output Using PrintWriters
6.3.6.1. Opening a Stream for Output
In this class, we will only deal with textual, human-readable output. The main
class we will use for generating output is Java’s PrintWriter class, from
the java.io package. To create a PrintWriter, we’ll use a utility
method in the IOHelper class from the VT student package
(import student.*;):
PrintWriter outStream = IOHelper.createPrintWriter("output.txt");
This line declares a new variable, outStream and creates a new PrintWriter
object that sends output to a brand new file in the file system. If a file with
the name already exists in the project directory it will be deleted before a new
empty file with the same name is created.
The PrintWriter object provides formatting and conversion operations.
A PrintWriter object is designed to send its output to a stream. It does
not know (or care) whether the stream is connected to a disk file or a network
connection or another device. The IOHelper class provides a few other
methods for creating PrintWriter objects, including methods that append to
an existing file instead of overwriting it, or streams that are connected to
the console for output.
6.3.6.2. Writing to an Output Stream
Three basic methods provided by PrintWriter objects provide virtually all
of the output capabilities you will need in this course:
<stream>.print(<value>);writes the specified <value> to the given <stream>. There are actually many versions of this method that support every possible type of <value> you might want to print.<stream>.println(<value>);writes the specified <value> to the given <stream>, and then follows it by writing a ‘line terminator’ to mark the end of the current line (Java writes an appropriate line termination character sequence based on the current operating system’s text file format conventions). As withprint(), you can provide any type of value toprintln(). You can even callprintln()without giving any argument at all, for example, to terminate the current line after several previousprint()messages.<stream>.write(<value>);writes a single character specified by an integer <value>. This operation is most often used when you are producing output one character at a time, rather than in larger chunks. However, if you pass an entireStringvalue towrite()instead of anintvalue, then the entire string will be written to thePrintWriter()just as if you had usedprint().
For example:
outStream.print("This is a message, and ");
outStream.println("these words appear on the same line as those above");
outStream.println(100 / 2);  // prints the value "50"
outStream.write(65);         // writes the letter 'A', whose ASCII code is 65
6.3.6.3. Closing a Stream
Once you have completed all of the operations you intend to carry out on a given stream, the stream should be closed. Closing the stream frees up operating system resources used to connect to and communicate with the stream, and makes sure that any buffered data you have written to the stream is flushed out to the physical device involved (if any).
Closing a stream is easy:
outStream.close();
You should close both input streams and output streams this way. In many simple programs, a good rule of thumb is to make sure that the method that creates the stream should also be the one responsible for closing it.
6.3.6.4. A Complete Output Example
We can put all these pieces together to show how to generate output to a file,
for example. Let’s say we want to create a file called output.txt containing
some output from our program. We can do it in one method like this (don’t
forget to import java.io.* in your class):
public void printResultFile(int result)
{
    PrintWriter out = IOHelper.createPrintWriter("output.txt");
    out.println("This is the first line of output.");
    out.print("The result is: ");
    out.print(result);
    out.println();
    out.close();
}
If called with a specific argument, like printResultFile(42);, the method
will produce a file called output.txt in your BlueJ project directory
containing these lines:
This is the first line of output.
The result is: 42
At other times, when there is a lot of output to produce, you may want to place
all the println() calls in one or more other methods. Then you can pass a
PrintWriter object as a parameter, as in this example:
public void printResultFile()
{
    PrintWriter out = IOHelper.createPrintWriter("output.txt");
    printHeader(out);
    printData(out);
    out.close();
}

public void printHeader(PrintWriter outStream)
{
    outStream.println("This is the output for ...");
    // other output commands go here.
}

public void printData(PrintWriter outStream)
{
    outStream.print(/* ... */);
    // more, as needed ...
}
6.3.6.5. Output with System.out
It turns out that printing to the terminal is such a common action that Java
provides a pre-initialized output stream just for that purpose, called
System.out. The advantage of System.out is that it is already declared
and always ready for use, and your program is not responsible for closing it.
As a result, you can directly call print(), println(), or write()
on System.out anywhere you like.
System.out.println("beginning the code ...");
...
if (someCondition())
{
    System.out.println("someCondition() is true");
    x = ...;
    System.out.println("x = " + x);
}
else
{
    System.out.println("someCondition() is false");
    y = ...;
    System.out.println("y = " + y);
}
Above, notice the way the plus operator (+) was used to combine a textual
string with another value to make a larger message. This is a nice feature of
Java–the plus operator works to “concatenate” two strings into a larger string
by placing one after the other. Further, when you concatenate a string with
any other type of value, the other value is converted into a human-readable
string representation first by calling its toString() method.
As a result, here are some recommendations for output in this course:
When you just want to produce simple messages in the terminal window to help debug a problem with your code, use
System.out.When you just want to interactively prompt the user for some value(s), use
System.out.When your program is supposed to produce a series of output lines in a file, use a
PrintWriter.When your program is supposed to produce a series of output lines that may go either to the terminal window or to a file, write one or more methods that use a
PrintWriterprovided as a parameter. You can always call such a method and provide it with aPrintWriterproduced with aSystem.outstream in order to produce output on the screen (see theIOHelper.createConsoleWriter()method). Alternatively, you can pass in aPrintWriterconnected to a file instead (or even one connected to an internet socket for communicating with another program on another machine!).
6.3.7. Check Your Understanding: Output
6.3.8. Input Using Scanners
6.3.8.1. Opening a Stream for Input
The main class we will use for reading input is Java’s Scanner class, from
the java.io package. Creating a Scanner is simple:
Scanner inStream = IOHelper.createScanner("input.txt");
This line declares a new name, inStream and creates a Scanner object that
reads characters from the named file. The createScanner() method opens
files using path names relative to your project directory, so the file
called input.txt should be located there.
You can provide a fully qualified path name instead of a relative path name
if you desire.
The java.io package offers a rich inheritance hierarchy of classes for
reading from text files. The Scanner class was created to simplify text
input and is thus preferred over the other classes.
6.3.8.2. Reading from an Input Stream
Several methods provided by Scanner objects provide virtually all of the input capabilities you will need in this course:
<scanner>.hasNext();Returnstrueif this scanner has another token in its input.<scanner>.next();Finds and returns the next complete token (by default the next whitespace delimited string as a String object like the next line or next tab-seperated word) from this scanner. ANoSuchElementExceptionis thrown if no more tokens are available, (i.e., you have reached the end of input).<scanner>.hasNextLine();Returnstrueif this scanner has another line in its input.<scanner>.nextLine();Finds and returns the next complete line. ANoSuchElementExceptionis thrown if no more tokens are available, (i.e., you have reached the end of input).<scanner>.hasNext<PrimitiveType>();The<PrimitiveType>can be replaced bydouble,float,int, etc. Returnstrueif this scanner has another token in its input and it can be interpreted as a value of the<PrimitiveType>.<scanner>.next<PrimitiveType>();he<PrimitiveType>can be replaced bydouble,float,int, etc. The method scans the next token of the input as an<PrimitiveType>and returns back the corresponding<PrimitiveType>value. It throws anInputMismatchExceptionif the next token does not match the<PrimitiveType>, or if the value scanned is out of range. It also throws aNoSuchElementExceptionif no more tokens are available.<scanner>.useDelimiter(String pattern);by default whitespace (spaces, tabs, or new line characters) are used as delimiters for separating the input into tokens to return. This method allows the user to set the delimiter characters to whatever they wish for breaking up the input. Commas are a common other delimiter to use as tables or data is often stored in what are called CSV (comma seperated value) files.<scanner>.close();closes the scanner to release system resources being used by the scanner.
To use these methods, normally you will process the input by scanning one line at a time and then scanning the line for the desired tokens.
For example:
Scanner inStream = IOHelper.createScanner("input.txt");
// if NOT at the end of the stream, more input is available
if (inStream.hasNextLine())
{
    // Get an entire line
    String thisLine = inStream.nextLine();
    // Create a scanner to process the line
    Scanner line = new Scanner(thisLine);
    // Check for the next whitespace delimited int
    if (line.hasNextInt())
    {
        System.out.println(line.nextInt());
    }
}
inStream.close();
Notice how the existence of each input is checked before it is extracted to avoid exceptions.
Also, if you have programmed in another language before, note that characters in Java are encoded using unicode, a 16-bit character code. Programmers in other languages may instead be familiar with ASCII, the American Standard Code for Information Interchange, which is a 7-bit character code. Fortunately, the first 128 codes in unicode are equivalent to the entire ASCII character set . For American users, ASCII values may thus be freely used when reading and writing character-by-character without error, although this approach does not directly extend to programs written for an international audience.
The Scanner class can be used to read from any input stream, including files, the keyboard through the terminal window, or even URLs. To read from the keyboard, for example:
Scanner keyBoard = IOHelper.createKeyboardScanner();

System.out.print("Enter your name: ");
// Prompt the user String name = keyBoard.nextLine();
System.out.println("Hello " + name); // Echo input
When performing interactive keyboard input there is no need to check for the existence of the next token. The scanner will automatically block (i.e., wait) for the user to enter input.
Scanners can also be used to read from a file that is publicly available on the Web if you know the URL:
Scanner inWebFile = IOHelper.createScannerForURL(
    "http://server.subdomain.domain/dir/file.txt");
while (inWebFile.hasNextLine())
{
    String line = inWebFile.nextLine();
    System.out.println(line); // Echo input
}
inWebFile.close();
6.3.9. A Complete Input Example
We can put all these pieces together to show how to read input from a file one
character at a time, for example. Let’s say we want to read the characters
from a file called input.txt. We can do it in one method like this (don’t
forget to import java.io.* and java.util.* in your class):
public void readChars()
{
    Scanner in = IOHelper.createScanner("input.txt");
    // while NOT at the end of the stream, more input is available
    while (in.hasNextLine())
    {
        String thisLine = in.nextLine(); // Get an entire line
        for (int index = 0; index < thisLine.length(); index++)
        {
            char ch = thisLine.charAt(index);
            System.out.print(ch);
        }
        System.out.println();
    }
    in.close();
}
At other times, when there is a lot of output to produce, you may want to place
all the read() calls in one or more other methods. Then you can pass a
Scanner object as a parameter:
public void processInputFile()
{
    Scanner in = IOHelper.createScanner("input.txt");
    readHeader(in);
    readData(in);
    in.close();
}

public void readHeader(Scanner inStream)
{
    String nextLine = null;
    if (inStream.hasNextLine())
    {
        nextLine = inStream.nextLine();
        // other input commands go here.
    }
}

public void readData(Scanner inStream)
{
    String nextLine = null;
    if (inStream.hasNext() )
    {
        nextLine = inStream.nextLine();
        // more, as needed ...
    }
}
6.3.10. Check Your Understanding: Input
6.3.11. A Complete Input/Output Example
Often, it is necessary to combine the processes of reading from some source and writing to some destination. Here is a simple example that copies an input file character by character:
import cs1705.*;
import java.io.*;
import java.util.*;


// -------------------------------------------------------------------------
/**
 * Shows how to read/write a file one character at a time.
 * @author Dwight Barnette
 * @version 2006.03.09
 */
public class CopyFileByLine
{
    // ----------------------------------------------------------
    /**
     * Copy the source file to the specified destination file.
     * @param fromFile the name of the file to copy from
     * @param toFile the name of the file to copy to
     */
    public void copyFile(String fromFile, String toFile)
    {
        Scanner source = IOHelper.createScanner(inFile);
        PrintWriter dest = IOHelper.createPrintWriter(toFile);

        while (source.hasNextLine())
        {
            String thisLine = source.nextLine();
            for (int index = 0; index < thisLine.length(); index++)
            {
                char ch = thisLine.charAt(index);
                dest.print(ch);
            }
            dest.println();
        }
        source.close();
        dest.close();
    }
}
6.3.12. Testing I/O-based Operations
When it comes to testing, remember to write one or more test cases for each method that your write in your solution. Preferably, you should write these tests before (or as) you write the method itself, rather than saving testing until your code works. As you work on larger and larger programs, it is important to build skills in convincing yourself that the parts you have already written work as you intend, even if the full solution has not been completed.
For testing programs that read input or produce output, it seems difficult when the program operates directly on the console, since it is hard to “assert” what should come out on the screen. Plus you would always need to be present to “type in” the required input sequence.
To make these tests fully automated, however, don’t write tests that use
System.out or that read from an external source. Instead, simply create a
Scanner to read from a fixed input string as part of your test case.
For output, create a PrintWriter that can write to a String object instead of the console.
To make these tasks easy, the TestCase base class from which all your test
cases inherit provides a few helper methods for you:
setIn(<contents>);takes a string and uses it to create aScannerfor your test to use as input. The scanner gets cleared automatically before each test case, so you can call this insetUp()if you want to use the same input sequence for all your tests.in();returns the currentScannerbeing used for input. You can use this, in combination withsetIn()to set up an input stream for your own input-based methods inside test cases. The scanner gets cleared automatically at the start of each test case.out();returns aPrintWriterthat you can use for output. ThisPrintWritercaptures all of its own output for later use in assertions, and its contents are reset before each test case.
As an example, consider the following test method (which assumes your text fixture
includes a doIt object created from some DoIt class that provides a
method called processSomeInput() that accepts a Scanner parameter):
public void testProcessSomeInput()
{
    // set up the input stream
    setIn("some test input");

    // run the method to get results
    doIt.processSomeInput(in());

    // test that the result is what was expected
    assertThat( ... );
}
Suppose there was a produceOutput() method that wrote to a PrintWriter:
public void testProcessSomeInput()
{
    // run the method to get results
    doIt.produceOutput(out());

    // test that the result is what was expected
    assertThat("what I expect").isEqualTo(out().getHistory());
}
Finally, you can even deal with both input and output at the same time:
public void testProcessSomeInput()
{
    setIn("some test input");

    // run the method to get results
    doIt.processSomeStuff(in(), out());

    // test that the result is what was expected
    assertThat("output I want").isEqualTo( out().getHistory()));
}
The TestCase base class provides similar methods for setting System.in
or retrieving the history from System.out. See the javadoc for
TestCase
for more details.