Mutation Coverage In JUnit
Mutation Coverage In JUnit
Mutation testing (or mutation analysis) can help to design new software tests and to evaluate the quality of software test suites. Mutation testing involves automatically modifying a program some small way, such as by changing a plus operator to a minus operator, or changing a less-than comparison to a greater-than comparison. The program is then run against the program’s test suite. If the test suite fails to detect the small change in the code (that is, if it does not fail on at least one of the tests), this means that we need to improve the quality of the test suite. Knowing which piece of the program was mutated helps us with writing a better test case.
Mutation testing is considered to be a stronger metric than code coverage to assess the quality of a test suite. This is because the act of executing a line or branch of code is not enough to ensure that the code executed correctly.
The Web-CAT Submission Plug-in comes with the ability to run mutation testing in the Eclipse IDE. There is no need to install any additional plug-in for mutation testing. Just make sure that you have the latest version of the Web-CAT Submission Plug-in. (You should re-install the Web-CAT Submission Plug-in at the start of every semester that uses Web-CAT.)
Please note: If you have previously installed the Web-CAT Submission Plug-in for earlier courses, you must uninstall and re-install the Web-CAT plug-in. This will ensure that you are using the latest version of the Web-CAT Submission Plug-in for Eclipse.
Using Mutation Testing
After installing the plugin, begin writing test code. After completing the test code, run mutation testing on your test suite by the following steps:
Step 1: Right-click on a Java project that contains your test suite.
Step 2: Click on Run As > Mutation Test (see the red box in the image).

When you execute mutation testing, it will create two additional tabs next to your Console output UI.
The first tab, “Mutation List”, lists all the mutations. There are two groups of feedback.
Group 1: Lines Not Tested
Group 2: Lines Needing Better Testing

Figure 0.1: Mutation List Tab in The Eclipse Project
To expand the feedback, click on the [+] button on the right top corner of the Mutation List tab.
Lines Not Tested
This list shows all the lines of the project code that were not covered (that is, were not executed) by the test suite. In order to get a better mutation test coverage, you must write test cases that execute all the lines listed in this group. If you click on a feedback item, it will take you to the specific line of code that is not executed. The list also displays the package and class that the line of the code belongs to.

Figure 0.1: Mutation List Tab (expanded) in The Eclipse Project
Lines Needing Better Testing
This feedback group shows all the lines of code that, while they were executed by the test suite, still need better test case assertions. Similar to the list of lines not tested, you can click on any item in the list and you should be forwarded to the corresponding line of code.
There are many variations on how mutation testing can be done. Mutation testing can be expensive (more on that later), so there has been a lot of research on what is the best way to use mutation testing so as to minimize the cost while maximizing the quality of the test suite assessment. We are using two types of mutations for our mutation testing.
1: Mutations of Logical Expression.
2: Mutations of Arithmetic Operation.
For Logical Expression, you must write test case assertions to check the intended behavior for all branches of the logical operator. A simple logical condition has two branches, but a more complicated one with multiple boolean operators could generate more branches.
For Arithmetic Operation, you must write test case assertions to effectively check if the operation produces expected behavior.
What does it mean when lines need better testing?
As a typical example, you might have a statement if (a < b).
Mutation testing might replace this with if (false).
If your tests don’t notice a difference by failing, then you have not
actually tested whether it matters whether a is less than b or
not.
Of course, it is also possible in this example that your test suite
does the right thing if a happens to be greater than or equal to
b (which yields false), but maybe it hasn’t tested what happens
when a really is less than b.
This is one reason why a perfect score on mutation testing is not
guaranteed to find every bug in your program.
Mutation Summary
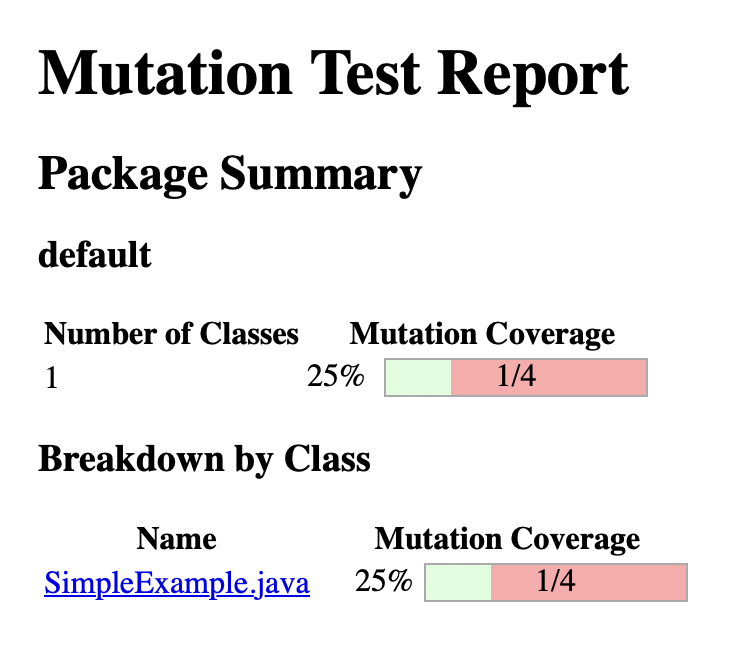
The summary tab shows the overall Test Coverage of the project. The Mutation Coverage is shown as a percentage which is calculated by the number of mutations detect vs. the number of mutations generated during mutation testing. A 100% Mutation Testing means all the generated mutations were detected by the test suite of the project.
There is also a breakdown of mutation coverage by different classes in the project.

Figure 0.1: Mutation Coverage Summary For The Eclipse Project
Use these visuals to help improve the quality of the test suite of the project by writing additional test case assertions.


